Seeing windows resource protection could not start the repair service is a such an awful situation when we try to run the SFC/scsnnow command on our windows computer. If you are also facing any such issues, then this article will turn out to be absolutely relevant to you!
The error ‘windows resource protection could not start the repair service windows 10’ usually occurs on our Windows computer when we try to run the SFC/Scannow command on the command prompt.
System files checker or SFC is a unique function of Windows Operating system which scans our computer for any missing or corrupt files and helps us repair them with the least efforts. This option is no less than a boon to the Windows users and turns out to be really handy at times.
But the problem arises when this SFC/scannow windows utility fails to start and shows us the “windows resource protection could not start the repair service” error. A screenshot of this error is given below.

Any error that occurs on our computer is totally annoying and ‘windows resource protection could not start the repair service’ is no different. In this guide, we will be telling you about all the solutions to fix this error along with the reasons behind its arrival. Read along!
Table of Contents
How to Fix Windows Resource Protection Could Not Start the Repair Service:
There might be various reasons for SFC /scannow windows resource protection could not start the repair service error on our windows 10 computer. It can be due to any virus or malicious program’s infection, the hard drive errors or when the Windows Module Installer service is not enabled.
In order to get rid of this error, we will try out all the possible solution that can help us resolve windows resource protection could not start the repair service error. Let’s get started with the tutorial.
Method 1. Run SFC in safe mode:
Before we move over to our next solutions, try to run the sfc.scannow command in the safe mode. Maybe it works for you and you won’t require going through the further solutions. Here’s what you need to do.
Step 1. First of all, press Windows+R keys to launch the Run window, type msconfig in the search bar and press enter. A screenshot for the same is given below.
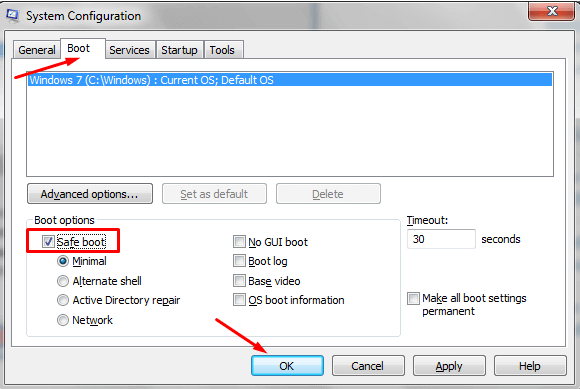
Step 2. In the System Configuration window, go to the Boot Tab and under Boot options, check the box next to the Safe boot and click Ok to save the settings. See the screenshot below.
In the next pop-up window, click Restart option to Restart your computer.
Step 3. After doing the above configuration, your computer will get restarted in the safe mode. Now you can run the SFC/scannow command.
If it works, great! But of it doesn’t go to the next method.
Method 2. Using Services.msc
The second method to repair windows resource protection could not start the repair service is by enabling the Windows Module Installer service or Trusted Installer service. It’s one of the most useful workarounds to fix this problem. Here’s what you need to do.
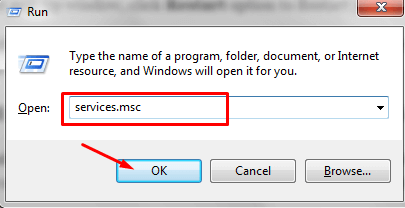
Step 1. Open the Run window by pressing the Windows+R keys and type in services.msc in the Run windows search field and press the enter.
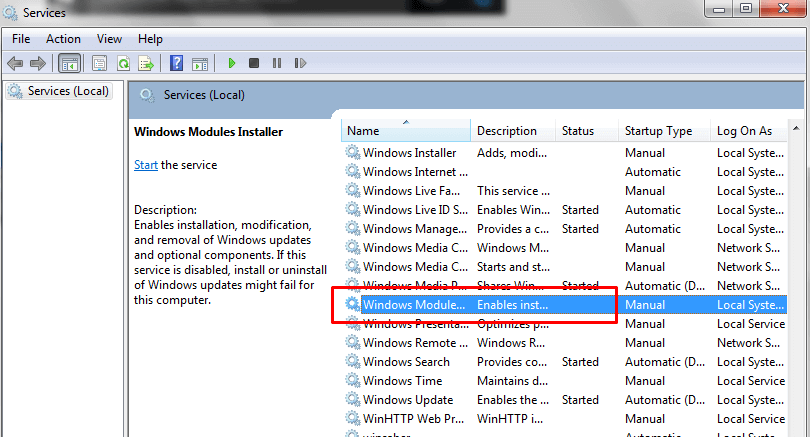
Step 2. In the services window, you will see a big list of services in the right pane. You need to scroll all the way down to locate the Windows Module Installer service. I’ve grabbed a screenshot to help you understand better. Just have a look on that.
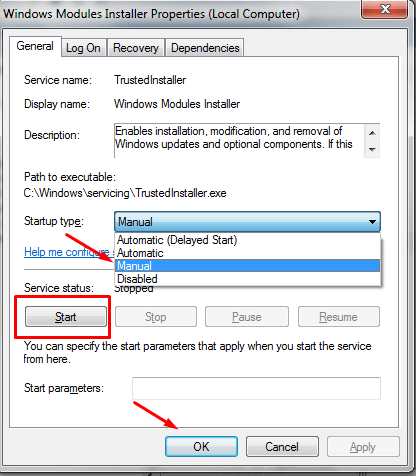
Step 3. As sooner you find this option, just double-click on it to open its Properties. Now set the Startup Type to Manual and click the Start button to enable the Windows Module Installer service and click Ok to save the changes. See the screenshot below.
Now try running the sfc/scannow command. I’m sure it will work now.
Other guys are checking: How to Fix Windows Update Error 80072ee2.
Method 3. Using the Command Prompt
If the above methods have not worked for you, try out this solution. Here’s what you need to do.
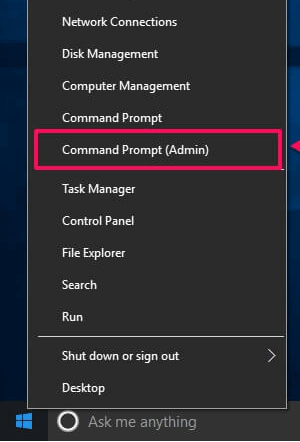
Step 1. First of all, Press the Windows + X keys together and select Command Prompt (Admin) option from the user menu. You can have a look at the below screenshot if you have any doubts.
Step 2. Now as the command prompt is opened in the Administrator mode, type in the following command.
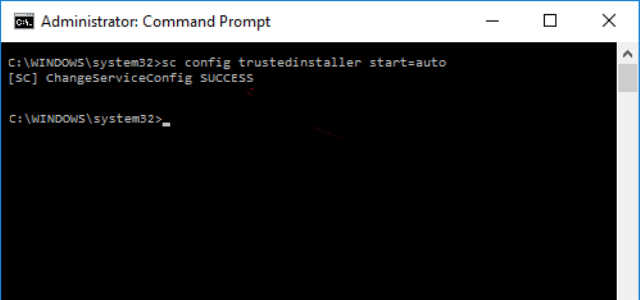
sc config trustedinstaller start=auto
Step 3. As sooner you run the above command, you will see a success message saying “[SC] ChangeServiceConfig SUCCESS“. Have a look at the below screenshot.
Step 4. Once done, just type in the following command in the command prompt and press enter.
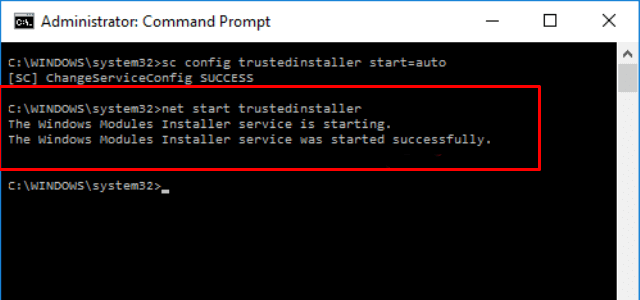
net start trustedinstaller
Step 5. On running the above command, you will see the following screen which says the Windows Modules Installer service was started successfully.
So in short, method 2 and 3 are similar to each other i.e enabling the Windows modules installer service in two different ways. You can follow any of the ways you feel comfortable with. If you are comfortable working on Command prompt, go with the method 3 else method 2 will suit you better.
Now coming to our next method.
Know: How to Disable Fast User Switching Windows 10
Method 4. Run CHKDSK
If the above methods have not yet helped you so far, try out the fourth fix i.e running the Check Disk service. If the problem is not with the drivers, it might be possible that the hard drive on your computer is creating the problem.
Follow the below steps to run CHKDSK.
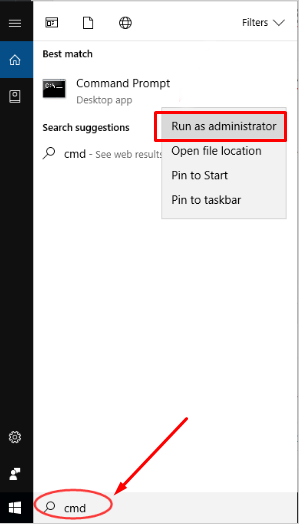
Step 1. Click on the start menu and type in cmd in the search bar. Now right-click on Command Prompt and select the Run as administrator option to open the command prompt in the administrator mode.
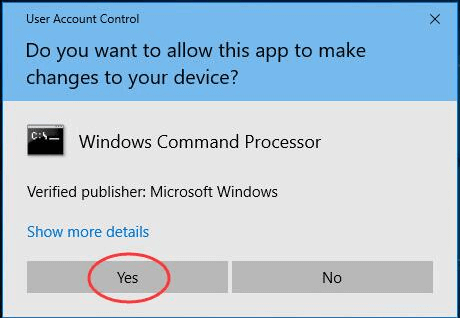
Step 2. In the user control window, you need to authorize this app to make changes on your computer. Click on the Yes option and move further. See the screenshot below.
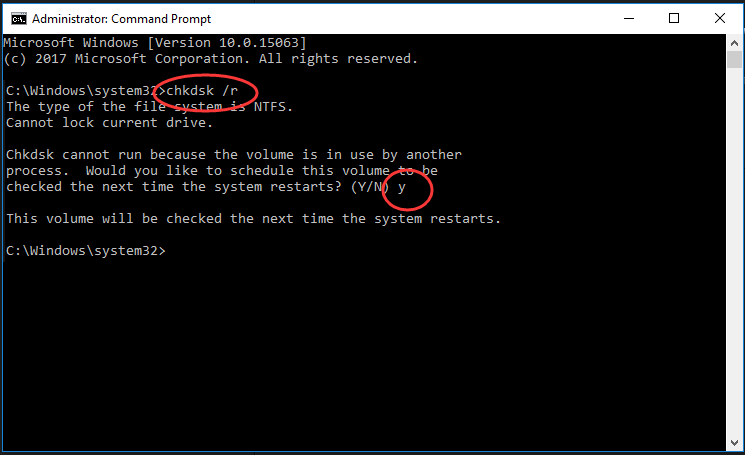
Step 3. As sooner the command prompt is opened in the administrator mode, type in the chkdsk /r command and press enter.
Step 4. Now you will be asked, “Would you like to schedule this volume to be checked the next time the system restarts?” You need to type in “y” and press enter.
Step 5. Once done, just close the command prompt window and restart your computer. You can have a better idea about the mentioned steps if you look at the below screenshot.
Step 6. Now when your system will be restarted, it will automatically check for any disk error available on your computer. If there are any errors detected, your system will try to automatically troubleshoot those errors.
If this method works for you, you can quit reading the guide now. Else, move to the next Solution.
Read Next: How to Fix Class Not Registered Windows 10 Error
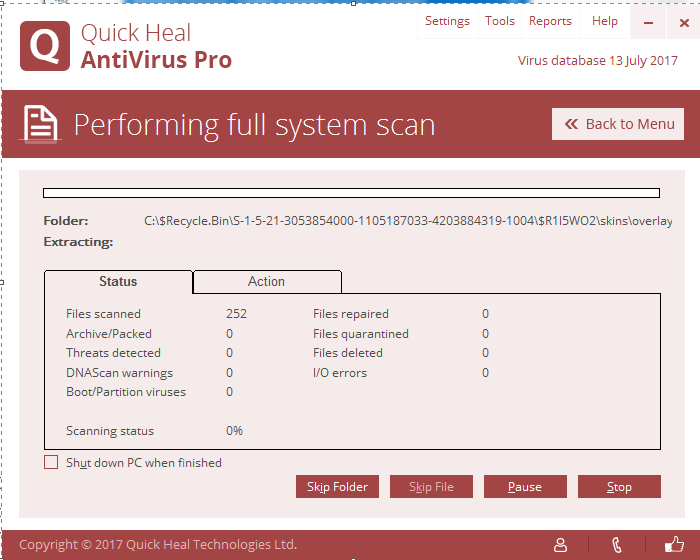
Method 5. Scan your Computer for any Malicious programs.
This method, however, is not an authentic way to resolve the windows resource protection could not start the repair service error, but it does help. Whenever our system is infected with virus, malware or any other malicious program, it acts weird and the unexpected happens.
We never know if this error is also caused by a malicious program. So whenever we face any unexpected issues on our computer, it’s always a good idea to scan your computer for any malicious programs installed on your system before trying any other workarounds.
So, one of the methods to resolve any system errors including Windows resource protection could not start the repair service is to scan your computer for any bad programs that might cause the unexpected system errors.
Method 6. Repair Install Windows 10
If none of the methods have helped you to resolve the windows resource protection could not start the repair service error so far, the last thing you can do is to repair the Windows 10 install.
Some people are misguided that Repair install deletes all the existing files on their computer. But that’s not true. There are options to select amid the installation process that if your want to wipe out all the data.
So select the options wisely before heading further. Here are the quick steps for the repair install of Windows 10.
- First of all, you need to download the Windows 10 setup from this link.
- Now click “Download tool now” and download the file to your computer.
- As sooner the file is downloaded, double-click on the installer file to run it.
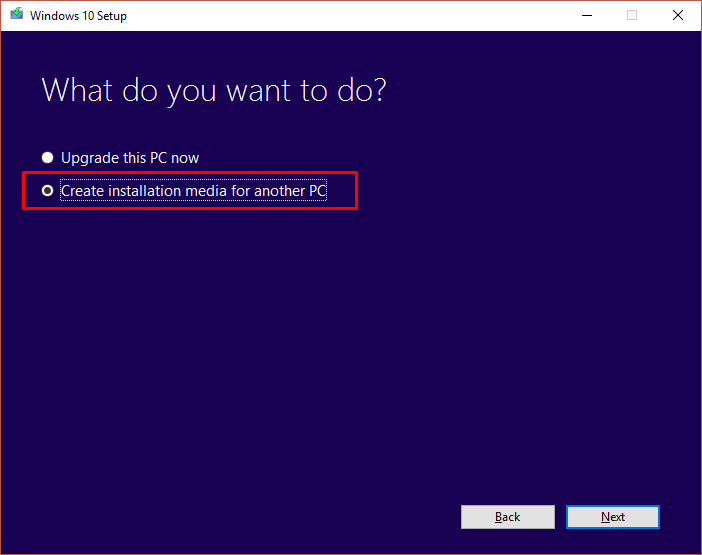
- In the next step, check the box next to the license agreement and click the Create installation media for another PC option in the new window.
- Now follow the on-screen instructions to complete the repair install of Windows 10.
Although, the steps are not detailed enough for the rookies to repair the install of Window 10. But for those, who are proficient in computers can follow it to repair install window 10. However, we don’t encourage to repair install windows yourself unless you are proficient in it.
If you are not much into computers, we recommend you to take help from an expert instead of trying out everything by yourself. The wrong steps can harm your computer even more and make it unstable.
Conclusion:
These are all the possible solutions to resolve windows resource protection could not start the repair service on the window. Depending upon the issues that is causing this error, any of the above methods might work for you.
If you have gone through all the methods one by and one and have followed all the instructions carefully, there are fair chances that you have managed to resolve this error.
But it is also possible that the problem still persists as every system has a different configuration and there might be different reasons for the arrival of this problem on the different computers.
If the above tricks have not yet helped you resolve windows resource protection could not start the repair service error, we recommend you to talk to your hardware person for the help!

Hey, Great article about the windows operating system. Keep writing.