“MMC could not create the snap-in”, is this the error that’s bothering you?? If so, you have landed on the right page. This tutorial has been compiled to enlighten everything about this error.
Any interruption occurred on windows lead us to the extreme annoyance. And ‘MMC could not create the snap in’ error is no different.
Whenever trying to open any Snap-in program in windows, you might encounter this error. Since ‘MMC could not create the snap-in’ error is not so known by the windows users, they get panic when they face this issue.
But as they say, every problem has a solution and so is the MMC snap-in error.
In this tutorial, we won’t just let you know the workarounds for MMC could not create the snap-in windows 10. But we will also give you the proper definition on MMC, its uses and of course the solutions for ‘MMC could not create the snap-in’.
So, let’s dive deeper into the guide and dig out every information related to MMC could not create the snap-in.
Table of Contents
How to Fix MMC could not create the snap-in
This problem can be resolved with two methods. The first way is by turning on the Microsoft .net Framework. And the second solution is by tweaking the Registry settings.
But before we move further to check out the solutions for MMC could not create the snap in error, let’s figure out what is MMC and snap ins and the reason for the occurrence of this error.
What is MMC and its Use in Windows?
MMC is the abbreviation for Microsoft Management Console. It’s a built-in feature of Windows operating system. MMC is responsible for proving graphical user interface and programming framework to the snap-ins.
And Snap-ins are actually the set of small administrative tools which are the crucial part of Microsoft Management Console. Snap-ins come integrated into the MMC. The management console works as a container for the snap-ins and provides them a framework to work properly.
The snap ins include Event Viewer, Task Scheduler, Services, Resultant Set of Policy (RSOP), Print Management, Group Policy Editor, Windows Firewall, Device Manager, Disk Management etc.
If the snap-ins are not properly installed on your computer or the registry configurations of any Snap-in gets broken, you may encounter ‘MMC could not create the snap-in’ error on your computer.
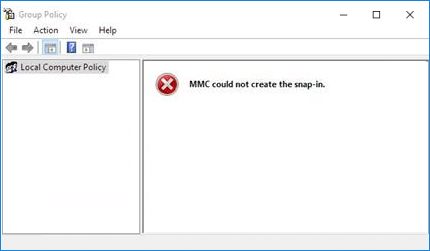
The error may look like the following image.
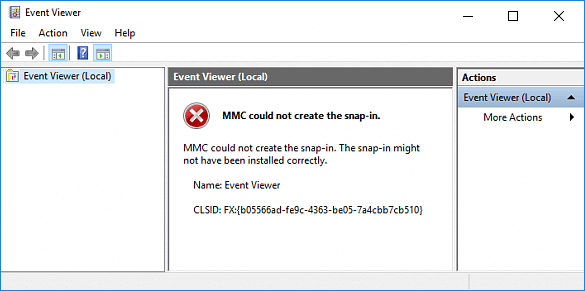
The above error pop-up doesn’t give you any details about the snap-in that’s creating the problem. But sometimes, you get to see an MMC snap-in error in the following type.
The second case of ‘MMC could not create the snap-in error is better, as it represents the error details like name of the snap-in that causing this error and CLSID key. Using these details, we can resolve it by tweaking the registry setting of that particular snap-in.
Now that you have enough information on MMC, Snap ins and the reason for occurring ‘MMC could not create the snap-in windows 7’, let’s check out how can we resolve this error.
Solutions for MMC Could not Create the Snap-in error:
As said above, there are two methods that can get you resolve snap-in creation failure error. Let’s go ahead and check them out.
Method 1. Fix MMC Could Not Create the Snap-in Error Using Registry
In this method, we will be doing some customization in Registry and most probably this method will help you get rid of this error. But this method will only work for you if you have been provided with the CLSID key in the error message.
Without knowing the error’s CLSID, this method can’t be applied. So if you have been provided with the CLSID key, follow the below steps.
Step 1. In order to get rid of this issue using Registry settings, you need to reach out to the Registry editor. To do that, press the window+R keys together to open the Run dialog box.
Step 2. As sooner the Run window is opened, type regedit in the search bar and press enter. Have a look at the screenshot below.
Step 3. In the Registry editor, click on the HKEY_LOCAL_MACHINE option in the left pane and a list of sub-options will get open up. Now you need to click SOFTWARE to see the options Microsoft.
As sooner you click the Microsoft, you will get to see MMC as one of the sub-options.
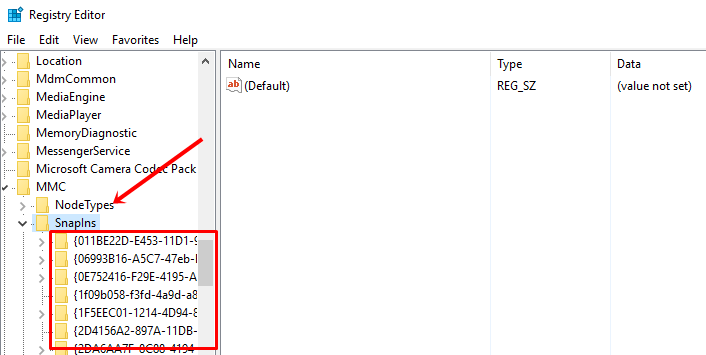
Step 4. On expanding the MMC further, you will get to see an option SnapIns. So, the path we navigated through is,
HKEY_LOCAL_MACHINE\SOFTWARE\Microsoft\MMC\SnapIns.
You can understand better if you look at the screenshot below.
Step 5. Inside SnapIns, you will see several Registry Keys with the prefix CLSID. Now you need to find out the option that matches with the CLSID specified in your error pop-up.(It’s assumed that you got the “MMC could not create the snap-in” error message with the Snap-in CLSID mentioned).
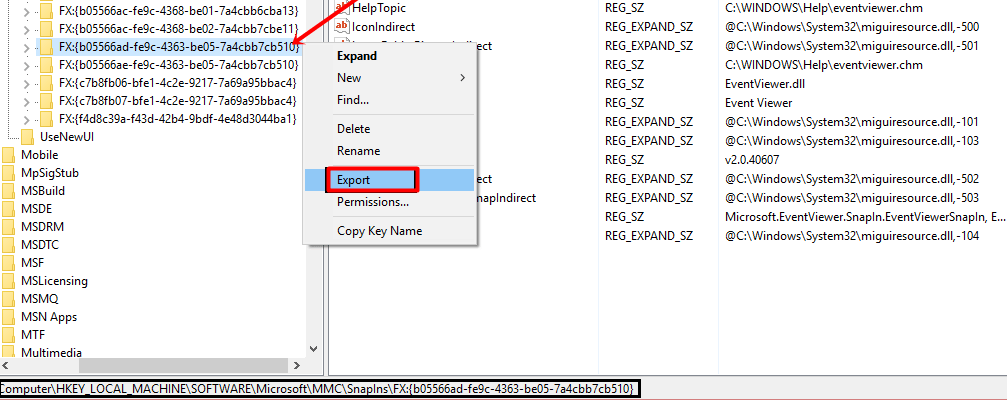
Step 6. Once you have located the registry key matching with your error pop-up, right click on it and click on Export. Let’s take the Example of the error, given in the beginning of the article.
In that message, the CLSID given in that error message is- FX:{b05566ad-fe9c-4363-be05-7a4cbb7cb510}.
So now you need to locate the Registry key FX:{b05566ad-fe9c-4363-be05-7a4cbb7cb510} under the SnapIns. After locating the correct registry key, we need to right click on it and click Export in order to keep the backup of the Registry entry. You can understand this complete step by the following screenshot.
Step 7. Once the registry key exportation is complete, right click on the same key and select the Delete option.
Step 8. In the next step, you will encounter a pop-up asking you to confirm the process. So click on Yes, and delete the Registry Entry for the Snap-in that’s causing the problem.
Once done, you are done with your part of the work and rest will be taken care by your windows. You just need to restart your computer for the changes to take effect.
This method works wonder in most of the cases. But if, by chance, this workaround has not helped you get rid of MMC could not create the snap-in error, move further. Possibly the second solution will work for you!
Note: Registry settings are the crucial part of windows. The wrong customization of Registry settings can put you in big trouble. And can lead instability in the windows functioning. So it’s requested to follow all the mentioned steps with caution. And if you have never been into the Registry before, we won’t recommend you to try your hands on it either.
Also Read: How to Fix Kmode Exception Not Handled Windows 10 Error
Method 2. Fix MMC Could Not Create the Snap-in Error By Turning on Microsoft .net Framework.
If the above method has not yet helped to resolve “MMC could not create the snap-in” error, try out the second method. Here’s what you need to do.
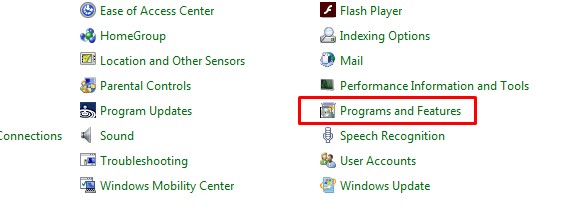
Step 1. First of all, click on the start menu and go to control panel. Out of all the Control Panel Items, you need to select the Programs and Features. You can take help from the below screenshot to locate the option easily.
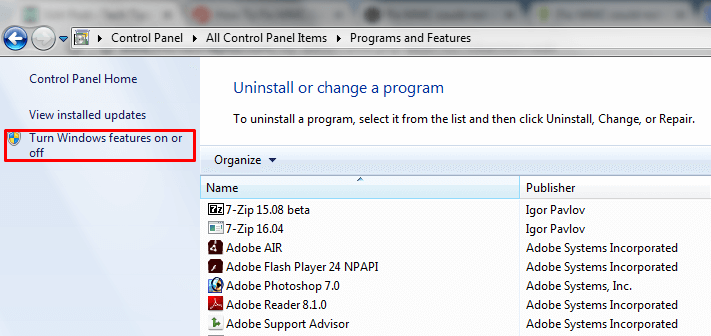
Step 2. In Programs and Features window, click on the Turn Windows features on or off option from the left pane. I’ve grabbed a screenshot to help you locate the option.
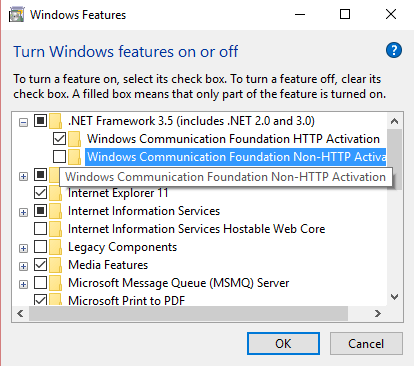
Step 3. On clicking the Turn Windows features on or off, in a fraction of seconds Turn Window features on or off window will get popped up. Now click the + icon next to the Microsoft .net Framework 3.5 to expand its sub options.
Now turn this option ON and restart your computer.
So these are the two official solutions for fixing “MMC could not create the snap-in” error. I genuinely hope these methods must have helped you resolve this error. But if the problem still persists, you can try out our bonus method.
Read Next: Windows Resource Protection Could Not Start The Repair Service
Bonus Method:
I don’t claim for this method to work as I found it on a forum while researching on this error. But the positive reviews show that these steps have been helpful to them. Here are the steps.
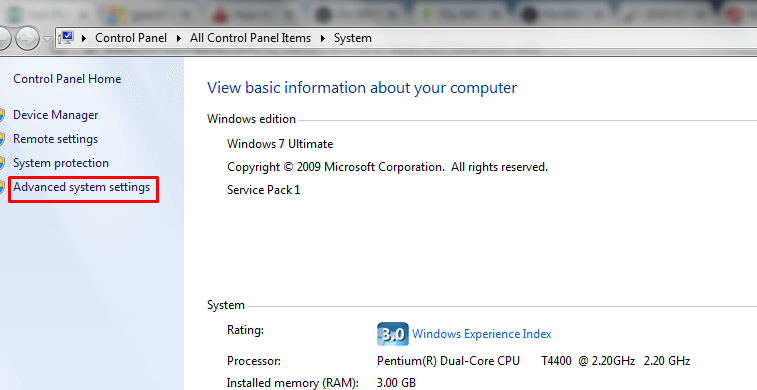
Step 1. Just right click on My Computer and go to Properties.
Step 2. In the System window, you need to move your cursor to the left pane and click Advanced System Settings. If you can’t locate the option, have a look at the screenshot below.
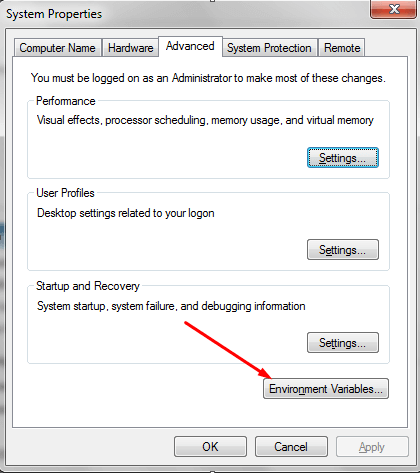
Step 3. Now you will see the “System Properties” window popping up. There, go to the Advanced tab and click the Environment Variables button at the bottom. I’ve grabbed a screenshot to help you locate the option, See below.
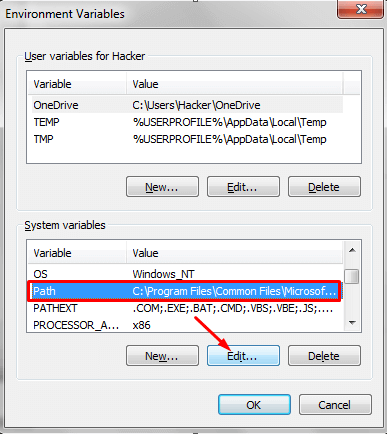
Step 4. In the Environment Variables window, try to locate the PATH option under System Variables section. Once the Path option is located, just click on it and click on edit.
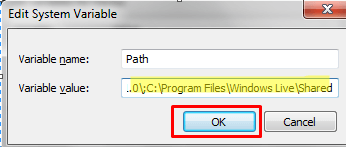
Step 5. Now highlight the previously written Variable value, copy it and keep it safe as a backup. Once the original path is kept safe, position your cursor to the last of this path and add the following line.
;c:\windows\system32\Wbem
Step 6. After it’s done, click Ok to save the settings.
Step 7. Now close all the other windows and restart your computer to make the changes take effect.
Now you can verify if the ‘MMC snap-in error’ is resolved! If the problem still continues to occur, make sure to undo the changes as this method is not tested and tried!
You may also like: How to Fix Class Not Registered Windows 10 Error
Conclusion:
So that’s it for this article. This was a comprehensive tutorial on MMC could not create the snap-in error on windows. We have tried to cover every detail regarding this issues and we hope this article met its purpose.
The solutions mentioned above most probably resolve this error for most of the users and we assume, you also have got it resolved. But in case, the problem is still not resolved on your windows, perhaps your computer’s hardware is creating trouble.
In such case, the above tweaks won’t help you! So without making any further delay or putting futile attempts, it’s better you contact an expert and get this issues resolved.
If there is anything else that we can help you with, tell us in the comment section below and do share this article on different social mediums to help the needy once.
