In this comprehensive guide, you will learn about all the ins and outs of InShot app, one of the most popular video editing apps.
Whether you are a content creator or someone who simply loves taking videos and photos, Inshot is your go-to destination. From trimming clips to adding images, music, and filters, InShot has everything you need for your creative self.
Not only video editing, but you can also edit photos and make photo collages with InShot. Curious to know what else it has to offer?
No more delay, let’s get started!
Table of Contents
What is InShot app?
InShot is one of the popular video and photo editing apps for mobile devices, available for both iOS and Android users. From trimming your clips to creating a visually appealing professional video for your different social media accounts, Inshot has you covered.
Key Features
- User-Friendly Interface: The interface of the Inshot app is easy to navigate making it easy to understand for new users as well. Also, it can be simply controlled with swipe gestures.
- Diverse Video Editing Tools: Inshot offers various video editing tools including trim, cut, merge, adjust speed, transitions, and more.
- Audio Editing Tools, Music, and Sound Effects: This is one of the most useful features in Inshot with which you can also easily add and control audio and music settings. Plus, you can directly add music and record voiceover directly within the app.
- Photo Editor & Collage Maker: Inshot is not just about videos! It includes a photo editor and collage maker to edit your photos like cropping, applying filters, changing the layout, adding text, and more.
- Easy Export and Sharing: Inshot’s easy export too with the additional option to select your desired quality is just amazing. Other than that, you can also directly share it with others or on your social accounts.
- AI advancement: InShot also provides its users with many AI tools to make editing easier like AI cut, AI effects, etc.
But wait, there is more! Let’s dive deeper and learn everything about this amazing editing tool.
Getting Started
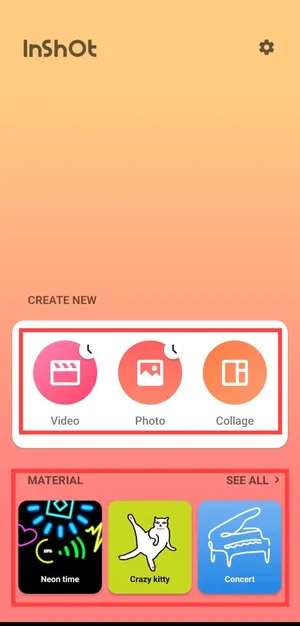
After you have downloaded the Inshot app on your mobile device, you will see three different options on the home screen namely Videos, Photos, and Collages.
Plus, you will also get the Material option below the Create new. But what are these?
Well, these options are different offerings of the Inshot app. Therefore, if you want to create a video, click on the video option. Otherwise, select the photo option to edit your photo and collage to create beautiful collages with Inshot.
However, in the material section, you can download new animated stickers, text, and social media stickers that you want to use in your design.
InShot Editing Tools
Ready to take your videos and photos to the next level? Inshot provides a comprehensive range of editing tools that make it easy to edit, create, and enhance your visual content. Let’s get editing!
Video Editing Tools
In the Videos section, InShot offers multiple tools to help you create an amazing video. Here is the breakdown of available tools:
Canvas
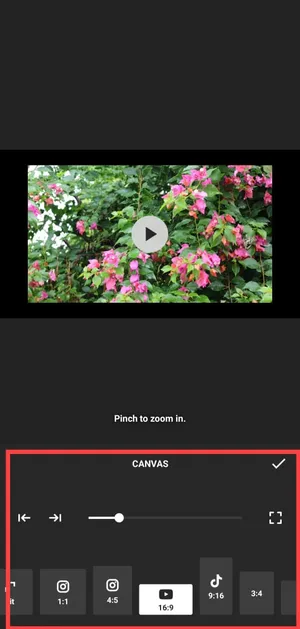
With the help of the canvas feature, you can change the layout of your videos according to your needs. You choose from various aspect ratios like 1:1, 4:5, 16:9, etc., or either according to social media including Instagram, TikTok, and YouTube.
Beyond layout, you can also zoom into your video using this option.
Music
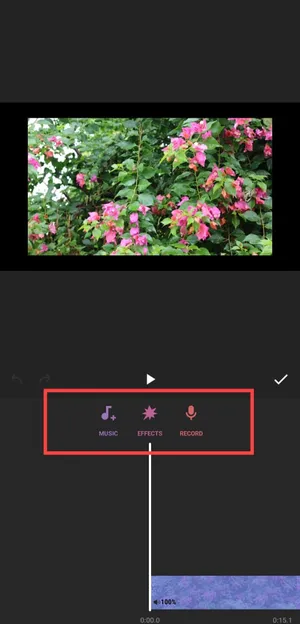
The next option on the queue is music which allows you to add music from InShot’s library and your device as well. Plus, you can add any effects and record voiceover with music features.
And if you wish to increase or decrease the volume, you can simply do that by clicking on the clip and adjusting the volume as desired.
Stickers & Text
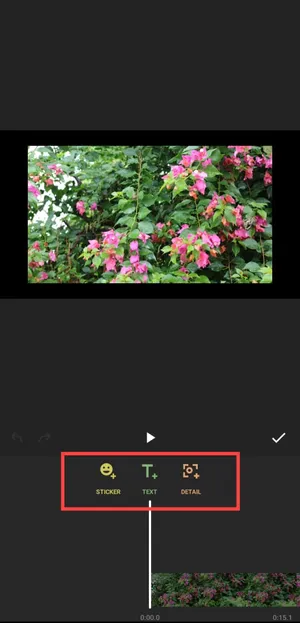
In this section, you can import and add stickers, and GIFs. Here, you also get an option as Detail which can be used to highlight or blur any specific area in your video. Also, you can easily add different text elements and apply text animations by tapping on the text option.
Filters
Want to beautify your video or add cool animations? If the answer is yes, this option is made for you. When you click on the filters option, you will see the option to apply the effect and filter. Also, you can easily adjust the video lightness, contrast, etc. by choosing the adjust option.
And the good part? You also get an in-built option to see before and after during editing to help you make an informed decision.
PIP (Picture-in-Picture)
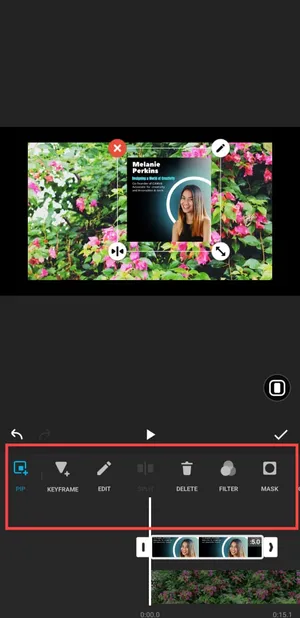
The PIP tool in InShot allows you to overlay a smaller photo or video on the top of your main video. This feature is often used in reaction videos, tutorials, and vlogging to show additional clips while the main video plays in the background.
Additionally, you also get various options to use PIP efficiently such as keyframe, filter, mask, blend, and chroma.
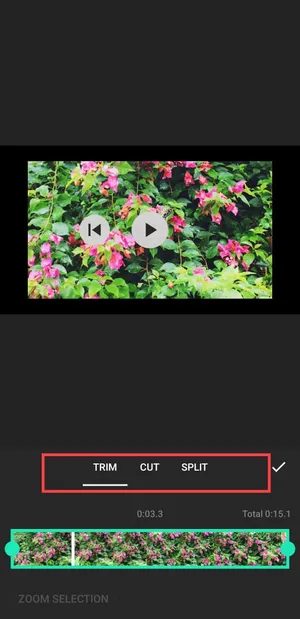
Precut (Trim, Cut or Split)
Do you want to trim or cut out your video or maybe split a long video into two? Explore, InShot’s Precut tool which provides you with options to trim, cut, and split your videos. And its easy drag functionality is cheery on the cake.
But if you mistakenly split the wrong video, you can use the next option on the queue which is delete to delete the video.
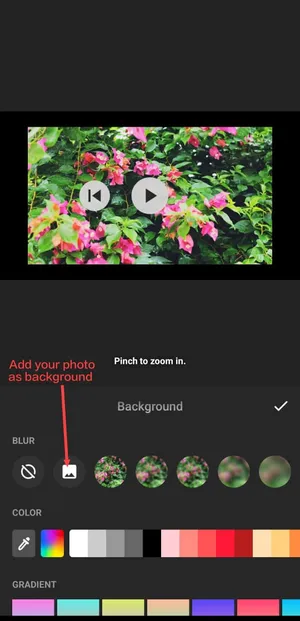
Background
From solid colors to gradients and patterns, you can easily add a background to your videos using this feature. In addition, you can add any photo from your gallery as a background.
Others
- Speed: This tool allows you to adjust the playback speed of your video from 0.2x to 10.0x.
- Crop: Like every other app, you can change the dimensions of your video with this feature.
- Volume: With the volume option, you can control the audio levels.
- Voice Effect: It’s a fun feature where you can change the original voice to any character’s voice.
- Denoise: You can use the denoise feature to improve the audio quality of your video by reducing background noise.
- Replace: You can use Replace to swap out a video or audio clip within your project.
- Duplicate: If you want to add the same clip of a particular video then you can use the duplicate option.
- Reverse: This feature lets you play your video clip backward.
- Flip: The Flip tool allows you to mirror your video horizontally or vertically
- Freeze: Last, but not least, this freeze tool can be used to highlight an important part of your video by freezing it for a set duration.
Photo Editing Tools
Some tools in this section like canvas, filter and effects, sticker, and background, are similar to those explained in the Video Editing section. Thus, we will skip repeating those details and focus on the unique tools and features exclusive to photo editing.
The following are the unique tools you get to see if you explore the photo section:
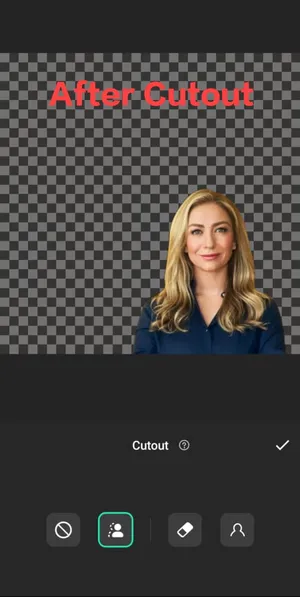
Cutout: The Cutout tool in InShot is helpful for removing the background and adding an outline to your added photo. Here’s the before and after for better understanding.
Frame: Another unique feature of Inshot is frames. You can choose and add any frame to your photo and adjust its size via the navigation bar. Also, you can modify the orientation of your photo by rotating it to any angle using the Rotate tool.
There is also an option to Doodle on your photos, so you can use it to make your photos more creative.
Collage Maker Tools
The last section of the InShot app is Collage Maker where you can make collages of multiple photos. Here, you get three options: Grid, AI Blend, and Stitch.
In the Grid option, you can create a collage of up to 9 images. Therefore, you will get options to choose from multiple layouts and add custom borders. Rest all of the tools and features in the grid section are similar to what we have listed above.
Secondly, you have an AI Blend feature that uses AI to blend selected photos together seamlessly. Also, you can select the layout, blend type, and aspect ratio.
The next option on InShot is Stitch which allows you to place photos next to each other in a horizontal or vertical manner, without following any grid pattern. Here, you can also add text and stickers.
Now that you are familiar with InShot’s extensive toolset, it’s time for action and create your first video using InShot!
How to use the InShot app?
While the InShot app is very easy to navigate, here is a detailed guide on how to edit videos and photos using Inshot.
How to Edit Videos Using InShot?
Here are the steps to edit videos using InShot:
- By this point, I assume you have the InShot app running on your device. So, now open the InShot app.
- Under Create New, click on Video and tap on New +.
- Now, tap to add your media including photos and videos, you want to edit from your gallery and click on tick right button to get started.
- After this, you are in the editing zone. Here, at the bottom, you’ll get all the editing tools like time, split, speed, filters, effects, and more. So, do whatever you want to.
- Tap on the clip to select it and then click on the precut option to trim it.
- Once all the edits have been made, preview your edits and click on the Save/Export button at the top right corner.
- Select the resolution from 720p to 4k and tap on Save/Export again to export your video. Plus, you can also change the frame rate and format.
- After exporting, you can directly share it to your social accounts like WhatsApp, Instagram, YouTube, etc.
How to Edit Photos Using InShot?
The following are the steps you can follow to edit photos using InShot:
- Launch the InShot app on your mobile device and click on Photo.
- Now, tap on new to begin.
- After this, select a photo you want to edit.
- Here, choose the right canvas, and apply filters, effects, etc. Once done, tap on Save to save it on your device.
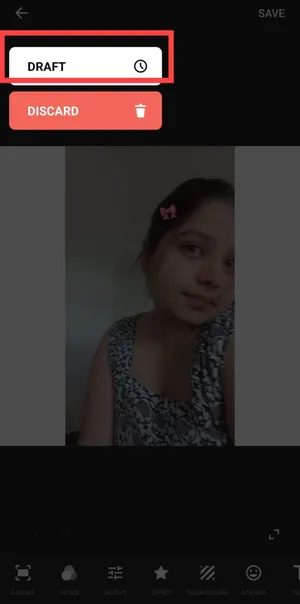
Moreover, if you don’t want to save it or edit it later, you can press back and click on Draft. So that next time, you can reopen it again. On the other hand, it will be deleted if you tap on the discard option.
How to Create a Collage with InShot?
- Firstly, Tap on the Collage option.
- Then select any photos from 1 to 9. Once selected, click on the tick option to create a beautiful collage.
- Now, you enter the editing area. Here, you can change the layout, add a border, and do other customizations to make it perfect.
- Lastly, save the collage to your device by tapping on the Save button. And that’s it!
InShot App: Free vs. Pro Version
The moment of truth has arrived! Now that you are aware of the vast capabilities of InShot, it’s time to reveal what’s included in the free version and what requires a premium upgrade.
In this section, I’ll break down the differences to help you decide whether you should stick with its free version or consider its upgrade plan.
While InShot offers a Pro plan to unlock all its tools and features, you can still edit and create your videos, photos, and collages. However, keep in mind that the free version of InShot adds a watermark to your exported videos. Thus, if you need no watermark on your content, you either remove it for free by watching ads or consider InShot Pro.
Not only this, but the free version of InShot also supports ads and doesn’t provide access to all transitions, effects, stickers, and many more.
Therefore, if you want to access all its advanced tools and features, you have to buy its pro plan which ranges from $1.97 to $22.73.
Inshot video editor for PC
While the InShot app excels on mobile, many users crave a desktop experience. But, it’s unfortunate to tell you that the InShot video editor for PC is currently unavailable. Hence, you won’t find an official version for PC.
However, you don’t need to feel restricted, there are various Video editors like Inshot for PC that offer similar video editing capabilities.
Some are Filmora, Movavi video editor, Adobe Premiere Pro, and others.
If you still want to use the InShot app on a PC, you can try using an Android emulator like BlueStacks, NozPlayer, etc. to run your mobile apps on your computer.
Want to learn more about Android Emulators? Read here: 5 Best Alternatives to Bluestacks
Summary
In conclusion, InShot no doubt is a top editing tool for all your needs. From designing your photos for social media posts to making engaging videos using the extensive toolset of InShot, everything is just a click away.
If you are just starting out with basic editing and ads & watermarks are not an issue for you then the free version of InShot is perfect for you. However, if you want an ad and watermark-free experience, create more professional videos, and need access to all premium content, you can go for InShot Pro.
So, what are you waiting for? Hit the download button and give wings to your creativity!
Related Readings
