How to use VPN on iPhone? If that’s your question, this guide is for you. I’ll share the exact steps using which you will be able to connect to the internet using a VPN on your iOS devices.
If you’re asking the question, you obviously have heard of VPNs recently. So, let’s start from the basics?
I promise the next section will be informative and surprising to you, let’s keep things interesting eh.
Table of Contents
- Why you need a VPN on iPhone (reasons you didn’t know)
- How to use VPN on iPhone?
- Why PureVPN?
- One of the fastest VPNs (6500+ servers)
- Choose from 71 countries
- Free 7-day trial on iOS devices
- Dedicated IP address
- Independently audited “no log” policy
- Use on 10 iOS (or any other) devices
- Final words- How to use VPN on iPhone?
Why you need a VPN on iPhone (reasons you didn’t know)
Hey, I know you’re aware of VPN benefits. Why else would you be reading this piece, eh?
However, I’m also sure most of you are only aware of partial VPN benefits. You probably had one problem and Google said the solution is a VPN.
A good VPN actually can solve your problem, while offering you a dozen other benefits.
- Unblock websites (duh): This is probably why most of you’re searching for a VPN, eh? Yes, it can unblock websites blocked in your region/country/institute or anywhere else.
- Get more content on Netflix/Amazon Prime and everywhere else: Surprised? Yes, Netflix, Amazon Prime and most other OTT platforms do not offer you 100% of their library. It’s not a package or subscription thing. This is true even if you’re on their most expensive package. That’s because some content is region-specific. So what you see on your Netflix is just a fraction of what’s actually available on Netflix. Using a VPN (that’s capable of bypassing Netflix VPN-detection) unlocks all of Netflix and other OTTs for you.
- Encrypts and secures your connection: Apple only encrypts the connection from your device to Apple servers. Everything else is open season for cyber criminals. A good VPN protects you from these threats. The most common threats you face are from free public Wi-Fi that you get at airports/cafes/stations etc. These can be hacked even by the dumbest hackers.
- Protects you from speed throttling: This is another VPN-benefit not many are aware of. Did you know your ISP (internet provider) sometimes consciously reduces your speed? It may be during peak network hours to reduce congestion. But a more sinister reason is “Paid Prioritization”. Your ISP reduces speed for specific websites/apps, e.g. Netflix or Amazon Prime. This helps them push you toward other streaming platforms, platforms which have paid your ISP to do so.
- Hide from your govt./other third-parties: As soon as you connect to the web, your location and identity is revealed to the entire world (and anyone monitoring you) via your IP address. Because your IP address never changes, all your activities (websites you visit, food you order, items you shop for, videos you watch) are logged and a profile of you is created by various third-parties (browsers/websites/ISPs etc.). A VPN changes your IP address everytime you connect to it and hence protects you from the digital profiling/fingerprinting.
Didn’t I say a VPN will do a lot more than just solve your problem?
So, let’s get back to your primary question then?
How to use VPN on iPhone?
There are two ways to do this. The easy way and the hard way.
The easy way involves you getting yourself a good VPN, and clicking on “connect”. Done.
The hard way involves you manually configuring a remote server, VPN protocol and other settings on your iPhone.
Let’s go with the easy way for now?
Step 1: Download PureVPN. (Why PureVPN? If you scroll down, I’ve listed all the reasons why I think PureVPN is one of the best VPNs for iOS in my experience).
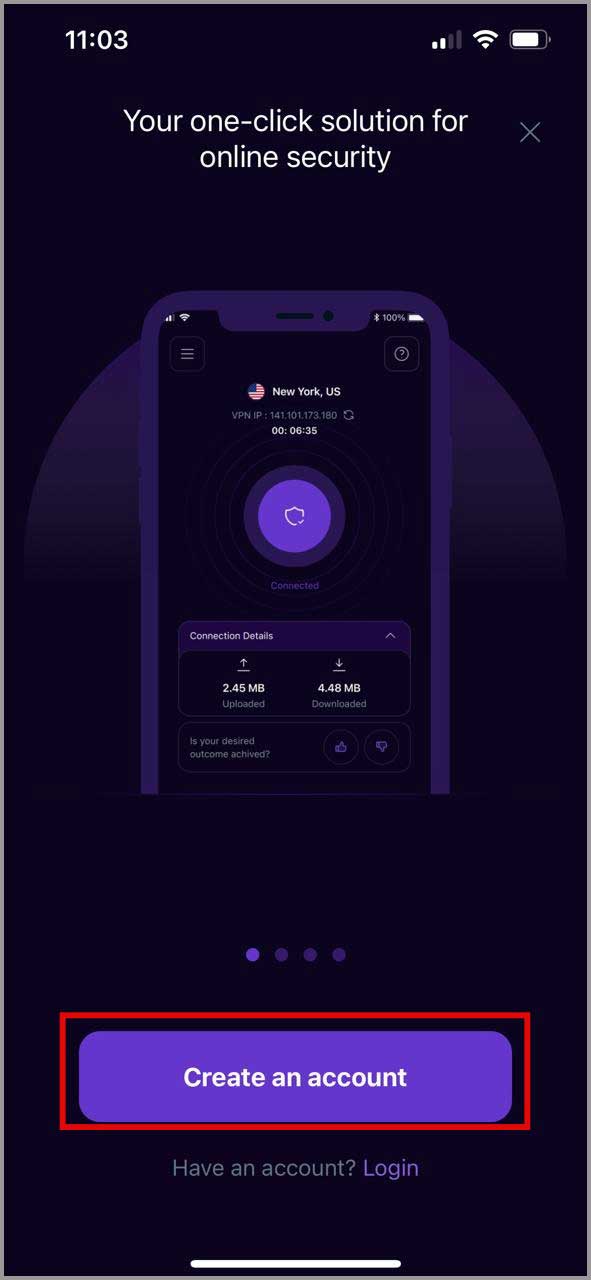
Step 2: Launch the application and click on the “Create Account” button,.
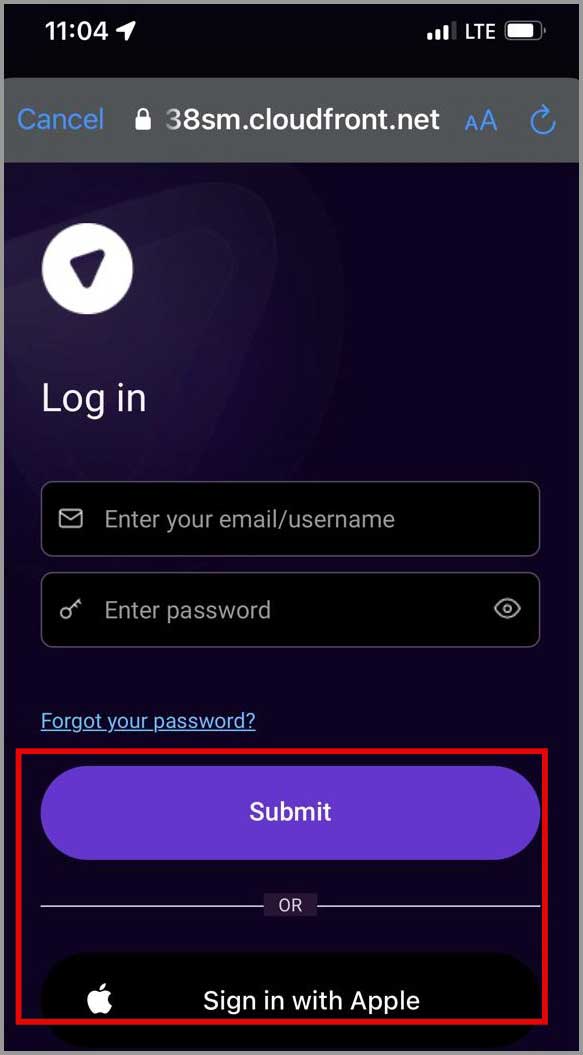
Step 3: Either enter an e-mail ID/password or “Sign in with Apple”.
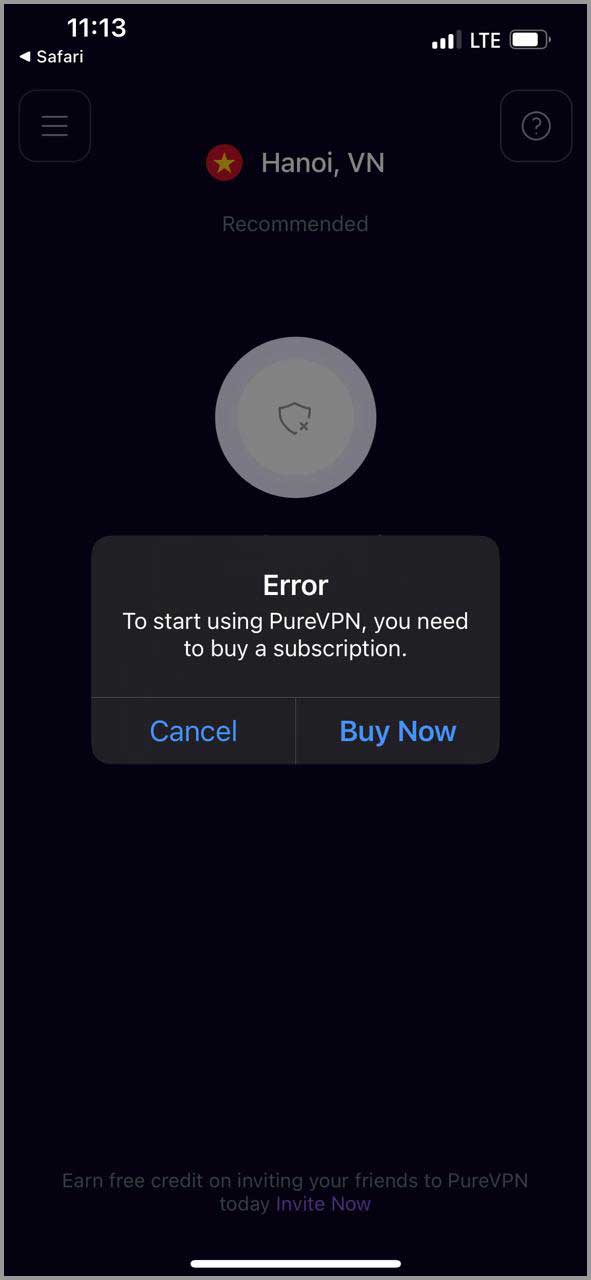
Step 4: Once you enter the details, you’ll be redirected back to the app. It’ll prompt you to buy a package. (It’s okay, you get 7 days of free trial).
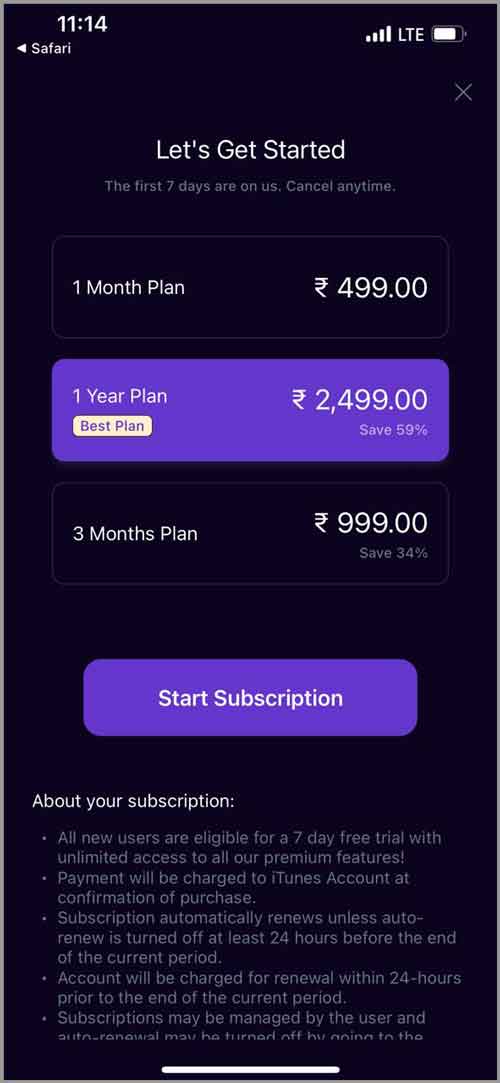
Step 5: Finally, choose a package that suits your budget.
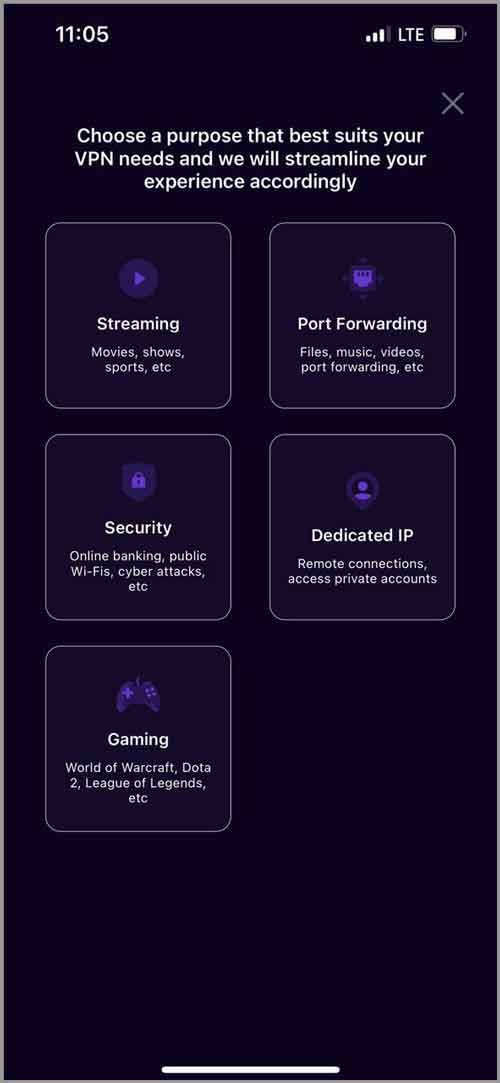
Step 6: You’ll be taken back to the PureVPN app. You’ll be prompted to select a “purpose”. Note that this isn’t absolute. You can pick any purpose and still be able to use it for any other purpose with all the features.
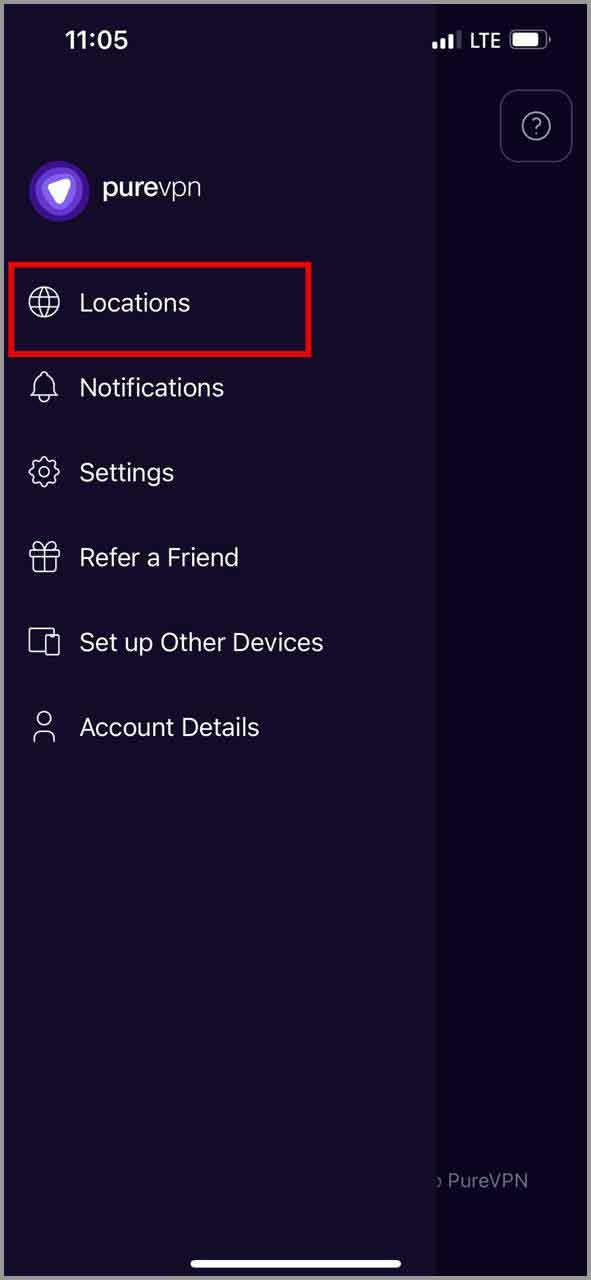
Step 7: Next, click on the three horizontal lines on the top-left and select “locations”.
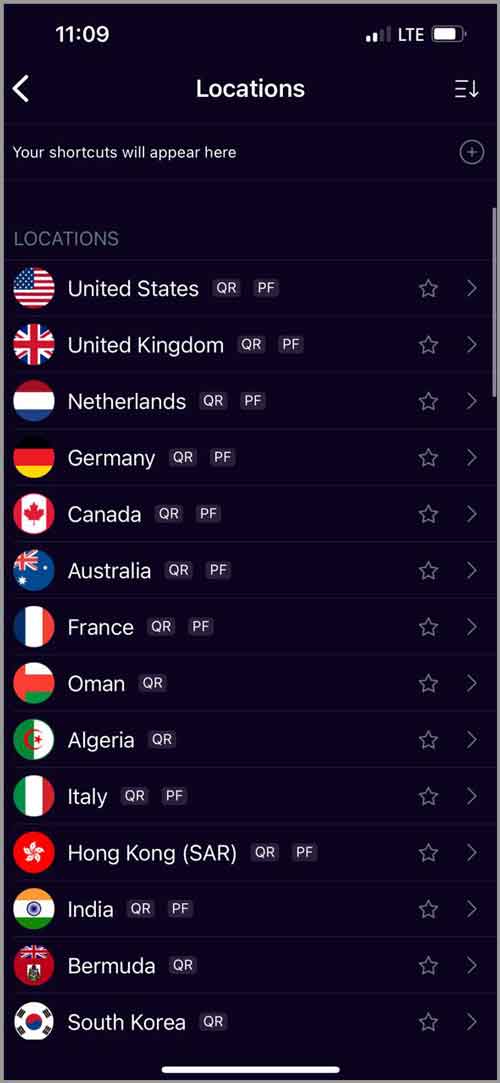
(Yes, you can choose any location you see fit).
Step 8: Finally, select a location you’d like to connect to.
Done. You’re connected.
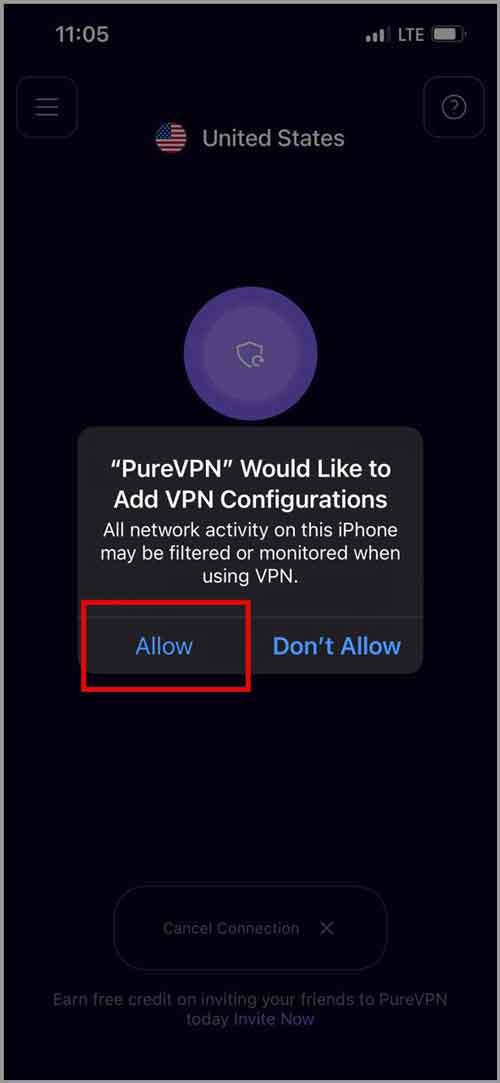
Do note that depending on your app version, steps may slightly differ. Also, if it’s the first time you’re connecting, you may see a few extra popups.
If you do, simply “allow” these prompts. Yes, it’s secure.
The entire process basically includes you downloading the VPN > logging in > selecting a server. That’s about it.
After connecting once, you only need to launch the VPN and connect to a server in the future. No more logging in.
Why PureVPN?
So, why did I use PureVPN for this guide? What if I’m trying to sell you the VPN? Hey, I’m on your side here being completely transparent and honest.
So, here are the reasons why I picked PureVPN and not one of the many other VPNs out there-
One of the fastest VPNs (6500+ servers)
VPNs generally reduce speed. It’s not a myth or a superstition but a technical fact. That’s simply because a VPN routes your connection via its own servers. It also encrypts your connection.
This additional routing and encryption of course impacts your speed negatively.
This isn’t even about any specific VPN. All VPNs have the same core principal and hence speed reduction is inevitable.
The reason I selected PureVPN is it’s one of the fastest VPNs I’ve ever used. The speed reduction is negligible and not even noticeable unless you use specific speed monitoring apps.
Its 6500+ servers are how this is possible. I’ve used some of the more expensive, older VPNs and I’ve never seen a company offer anything close to 6500 servers.
Choose from 71 countries
The primary reason you use a VPN is so that you can “change your country/IP address”, isn’t it?
The more countries a VPN offers, the better it is. This also means you get to unblock more Netflix/OTT content.
Well, PureVPN offers one of the highest number of locations, 71 to be exact.
Free 7-day trial on iOS devices
There are almost no VPNs that offer a “free trial”. PureVPN does.
When you download the VPN, you get a 1-week free trial.
That’s ample time to test the waters, isn’t it? Whatever your purpose may be, the week-long trial ensures PureVPN solves your problem before you decide to pay for it.
Even on top of that, there’s a 31-day refund policy on the paid plans. No risks whatsoever.
Dedicated IP address
This feature fortified my belief in PureVPN as an iOS VPN.
It’s one of the very few VPNs that supports and allowed a dedicated IP address.
So, a dedicated IP address is a permanent IP address that you get with all the VPN benefits. It helps you use a VPN permanently, even if you’re accessing your bank or other IP-specific apps/websites.
Independently audited “no log” policy
Any VPN will be moot if it kept “logs”, right? If your original IP address or activities are logged, you can always be identified.
Now, most VPNs claim that they do not store logs. Well, a lot of VPNs do. In fact, VPNs like HideMyAss have been caught helping the FBI directly.
PureVPN is one of the few VPNs in the industry that got itself independently audited. In simpler terms, a third-party, independent security firm audited its code and verified that the VPN truly doesn’t (can not) store logs.
Use on 10 iOS (or any other) devices
If you own an iPhone, you probably also own a Mac? Or, at least a Windows laptop? A few extra phones? At the least, your family members sure have additional devices, don’t they?
PureVPN is one of the few VPNs that allows you to use the VPN on 10 devices simultaneously. You, your family, friends and even neighbors (if you’re neighborly) get to use the VPN.
That means all the devices around you are protected, without any extra charges.
Final words- How to use VPN on iPhone?
I hope you’ve learnt how to connect a VPN on an iOS device. Well, the process isn’t that hard anyway, not if you’re using a VPN software at the least.
If you’re a technophile, by all means you’re free to use the manual method as well. It takes more time and is confusing to most, but I’m sure you’ll enjoy it.
And of course, you’re free to use other VPNs as well. The steps aren’t PureVPN-specific. However, you’ll probably end up paying more for fewer features. Yes, I picked PureVPN after quite a bit of research.
That’ll be all for now folks. If this helped, you don’t mind hitting the share button, do you?
