If you want to make most out of your Android device, you must learn how to use Tasker. Tasker is automated app, which automates our Android device to perform certain actions automatically when a set of conditions are met.
If you are hearing about Tasker for the first time, perhaps you are not a tech savvy. Or you don’t like making your life easier by automating your android to work as a home assistant for you.
Imagine, how easy would it be, when you come home, and your wifi gets switched on Automatically. And when you leave the house, it gets switch off automatically?
Similarly, how nice it would be, if your favorite song gets started automatically when you begin to eat your lunch? Or when your phone’s battery gets low, the power saver mode gets switch on itself?
Yes, Android does that all for you without even triggering any option manually. Now, you must be wondering how is that possible? Well, everything is possible in this ultra-techie era.
To get full control on your phone and get it automated, all we need is an app called Tasker and this tasker tutorial. Tasker does all the above-mentioned tasks for us and helps us live a better life in terms of operating Android phone.
So get yourself ready to know everything about how to use Tasker. Let’s begin our tutorial with the definition of Tasker.
Table of Contents
What is Tasker?
Tasker is an Automated Android app, which performs specific actions when the given conditions are met.
To trigger an automatic action, you first need to create a task on Tasker. After creating the tasks, profile needs to be created. I know you won’t understand the terminology used in here.
But you don’t need to worry at all. Below, I’ve given every single detail about the app, including the terms used. So, just read along.
Tasker is a premium app which you can download from Google Play store. However, there is a free trial version available for seven days, which you can download to know more about the app before you pay for it.
Why is Tasker so important?
There are lots of automated tasker tasks, that can save your life in different circumstances. For instance, Suppose, you are busy working in your office, and your phone is on silent. What if your dad needs you in urgent and you have ten consecutive missed calls from him???
Apparently, you will get a panic attack. But with the help of tasker, you can avoid this situation. For this, you can automate your phone to ring louder when there is a certain number of missed calls. Or you even trigger it to send an email when you miss a call.
There are a lot of smart tasker examples which can make your life easier yet smarter. Another Tasker task can be turning off the phone into silent when you go to your bed. And turn off the silent mode automatically, when you get up.
So, Tasker is an important app if you learn to use it thoroughly. But to make full out Tasker and get full control on your phone, you need to be an advanced user of Tasker.
The Tasker app has a complex interface. And it indeed takes some efforts to understand its working completely. So to help you understand Tasker better, I’ve compiled this detailed tutorial on how to use Tasker. Let’s dive deeper into the tutorial.
How to Use Tasker: Complete Tutorial
To use the Tasker app, you first need to know the terminology used in the app. Unless you know these terms, it would be difficult for you understand how to use Tasker.
So to make this tutorial understandable, I’ve divided this tutorial into 3 parts. The first part tells you the terms used in this app. The second part will tell you how to create your first task on Tasker. The third part is dedicated to teaching you about Profiles. And the fourth part is for Scenes creation.
Part 1. Terms used in Tasker:
As I told you above, there are certain terms used in the app, which is really crucial to understand. So let’s move further and check out what are those terms.
- Profiles- Profiles are the conditions, which are associated with tasks. When these profile conditions i.e. Contexts like time, even, state are triggered, the associated tasks get invoked. And our phone tends to perform the given task.
- Action: Action is the activity that our phone performs. You can understand action more with the example like, turning off wifi, turning on/off Bluetooth, switching off the phone, playing media etc.
- Tasks- Tasks are sequences of actions which our phone performs when it meets with the profile contexts. The profile conditions can be anything from reaching at a particular time, day, event to an opening of an app, location, state etc.
- Scenes- Scenes are user-Interfaces that you can design yourself. Using Scenes, you can create your own pop-up dialogues, menus, buttons etc. You can even design your own applications with scenes. It’s a great way to give your phone’s interface a new yet appealing look.
- Contexts: Contexts are nothing but the conditions in Profile.
- Plugins: Plugins are the Pre-built solutions by other developers. If you install Plugins on your Tasker app, you will get more actions to perform via tasker. Tasker offers about 200+ built-in, plugin support for users.
I know, all these definitions will be sounding alien to you. But when you learn about how to use Tasker, everything will become familiar. Now let’s move to the next part of the how to use Tasker tutorial. The next part contains the steps to create the first task on Tasker.
Part 2. How To Create Your First Tasker Task:
Now we have come to the main portion of this ‘How to Use Tasker’ Tutorial. In this part, I’ll tell you everything about Creating Tasks on Tasker.
I believe you have already understood that what tasks are. It’s nothing but the actions that your phone performs when the profile’s conditions are met. Now, let’s move ahead to learn the steps involved in creating tasks. So without any unnecessary delay, let’s get started with the steps.
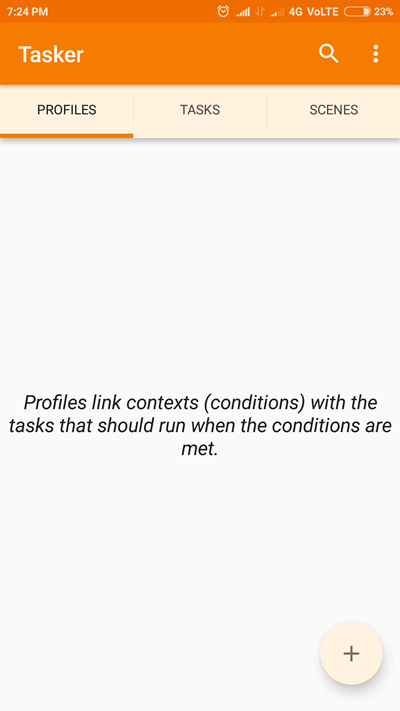
Step 1. To create your first task on Tasker, open the Tasker app on your Phone. The first screen you will see while opening the app looks like the below screenshot.
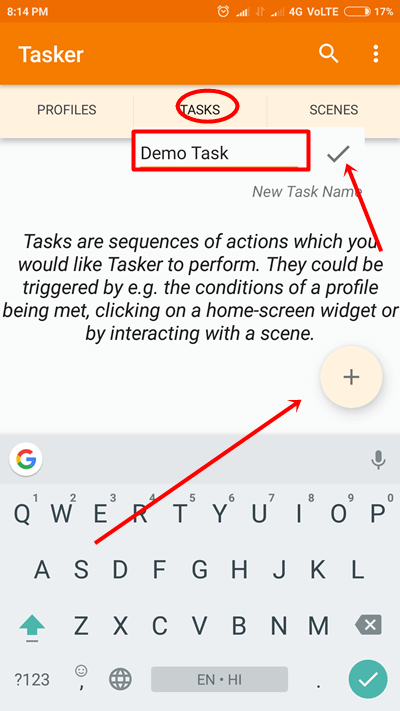
Step 2. Now go to the Tasks tab by swiping your finger to the right on the screen. On the bottom right corner, tap the plus icon. Now enter the name of the task in the new task name field. The name could be anything of your choice. But try to write down the name, that you can remember later.
If there are just one or two tasks created, you won’t get confused in any way. But when you will create more tasks with the time, you can get confused. So try to be descriptive about the name. When the name is entered, tap the checkmark, just next to the Task name.
You can take help from the below screenshot to understand better about the option I’m talking.
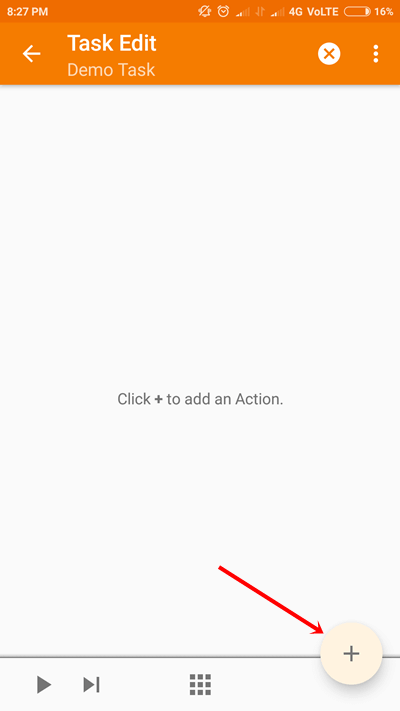
Step 3. In the next screen, you will be reached to the Task Edit screen. Here, you need to add actions to your newly created task. You can add one or more actions to your tasks. To add actions, just tap the plus icon at the bottom right corner.
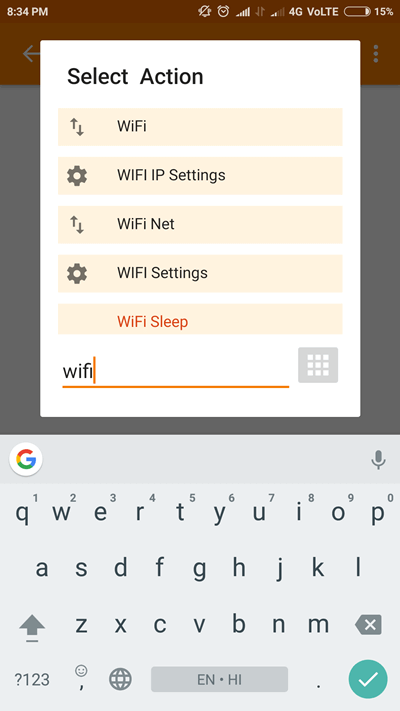
Step 4. On tapping the Plus icon, you will be provided with a list of action categories to choose from. For instance, if you want your Android phone to turn off wifi when you go to bed, select Wifi from the action categories list. If you can’t find the option, you can take help from the Filter option.
Have a look at the screenshot below.
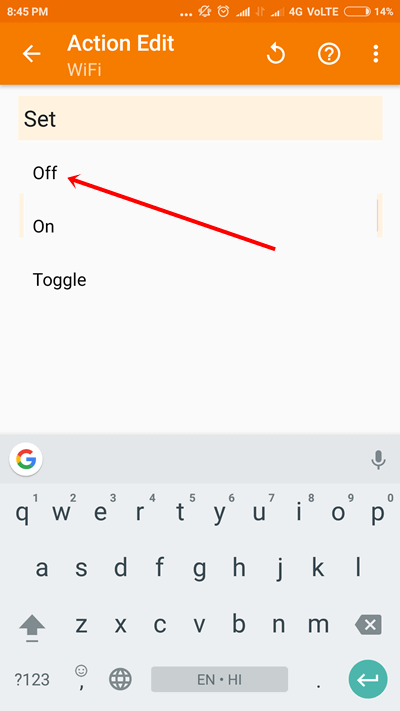
Step 5. In the next screen, you will be taken to the Action Edit screen. There, you need to EDIT the action, that you want your WIFI to perform. You can set it to turn Off, On or simply toggle its state. I’m setting it to Off.
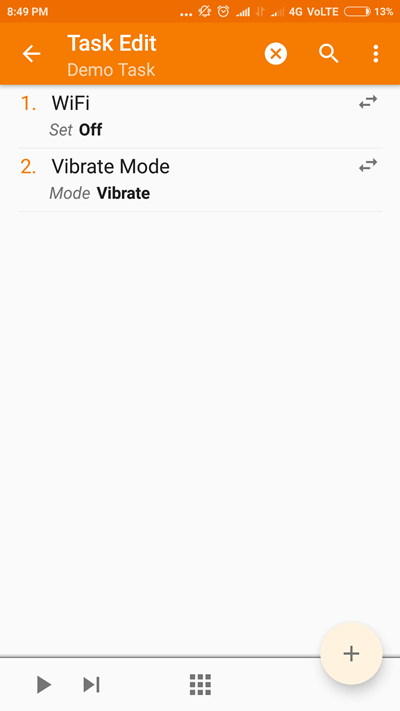
Step 6. Once the action edit is performed, press the arrow option on the top right corner to reach to the Task Edit screen. Now you can add even more Actions by pressing the plus icon again at the below right corner.
Note: The actions you add to your task are executed in the same order as you create them. For instance, If you add 3 actions, i.e. action 1, action 2 and action 3, the actions will be performed in the same order. So add the actions wisely. Or you can also change there order by interchanging them with each other.
Step 7. Once you are done adding all your required actions, you can give your action an Icon to make it more memorable. However, it’s entirely optional. But if you want to do it, tap the grid icon at the bottom of the Task Edit screen. And select you’re any desired icon.
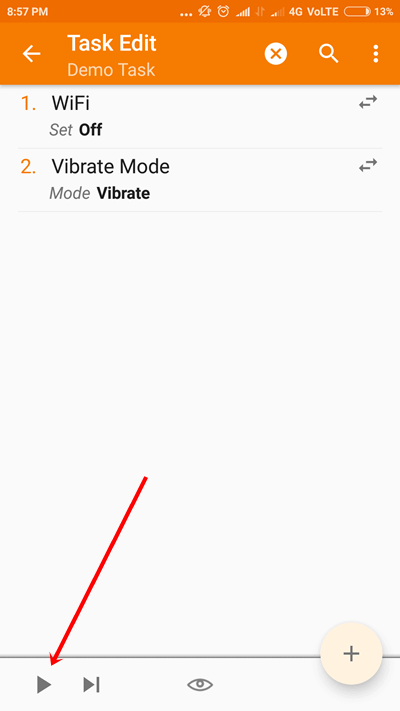
Step 8. With this, you have successfully created your first task on Tasker. If you want, you can preview the working of the task by pressing the play button at the bottom left corner. See the screenshot below.
Once the tasks are created and its working fine, you need to create the Profile. To understand it better, now we need to set the conditions when our created task must be performed. Let’s see how do we do it.
Part 3. How to Create Your First Tasker Profile.
After creating the tasks, the next step is to triggers the contexts when our task should be invoked. However, we could even create it before tasks, but the best order to follow is to create tasks first. And then the Profiles should be created.
Here’s how to do it.
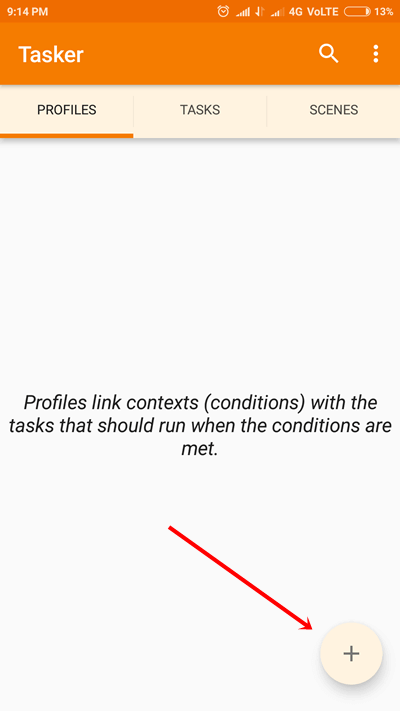
Step 1. Open the Tasker app. And move to the Profile tab. Now press the (+) plus icon at the bottom right corner. Have a look at the screenshot below.
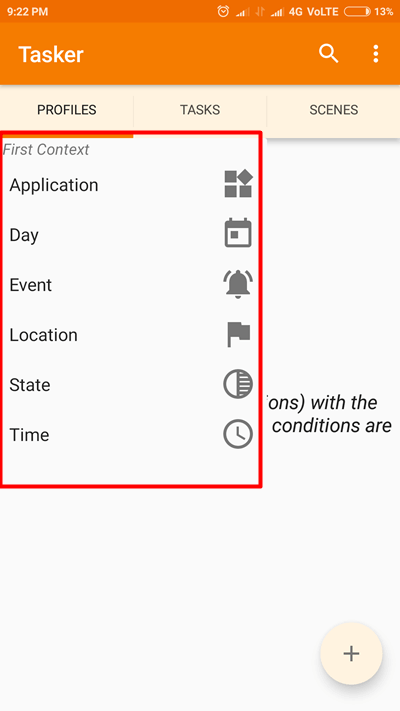
Step 2. On the next screen, you will be provided with the first context categories. There are six different categories to choose from, including Application, Day, Event, Location, State, and Time.
These Contexts are the conditions. On arrival of these conditions, your phone will perform the tasks you have associated with this context. For instance, if you go to the first Category, i.e. Application. There, you will be provided with the list of all the apps installed on your phone.
Now if you select one or more apps from the list, and associate it with the task you have created, your phone will perform that action when that app is opened. Similarly, day, state, time and event work as triggers.
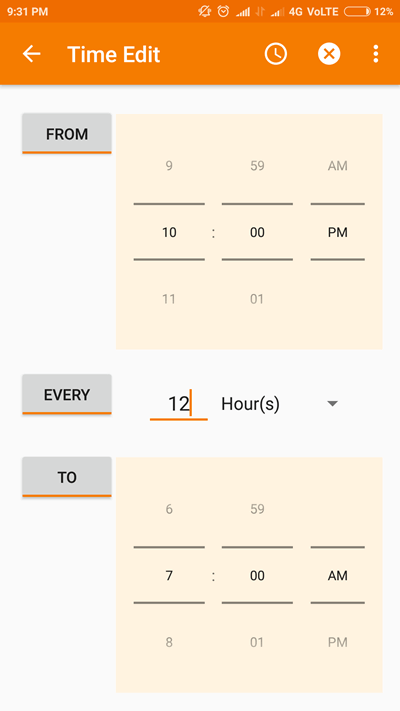
Step 3. Now you need to select any of the Contexts you wish to. I’m selecting Time for instance. Now, there are three options to set it up. Like from what time you want your phone to perform the created task. And when the task should end. Also, you can set the frequency of the occurrence of the task.
For instance, I want my phone to turn off wifi from 10 pm in the night to 7 am in the morning. So set that time up. See the screenshot below to understand better.
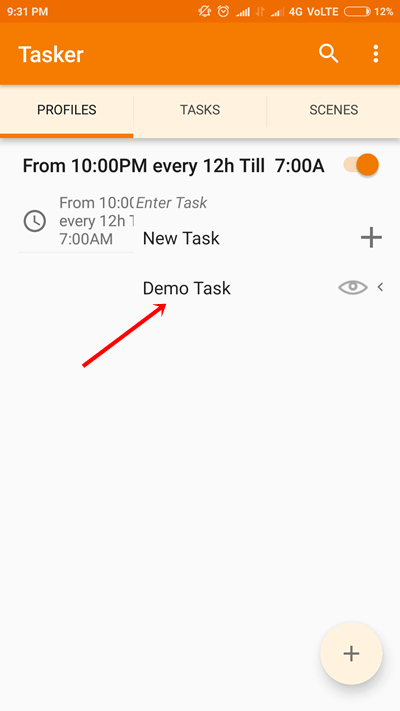
Step 4. When you are done with the above step, just press the back button. On pressing the back button, you will be asked to associate this Profile with a task. If the task is already created, you can choose it from the list. Or you can also create a new task if you want.
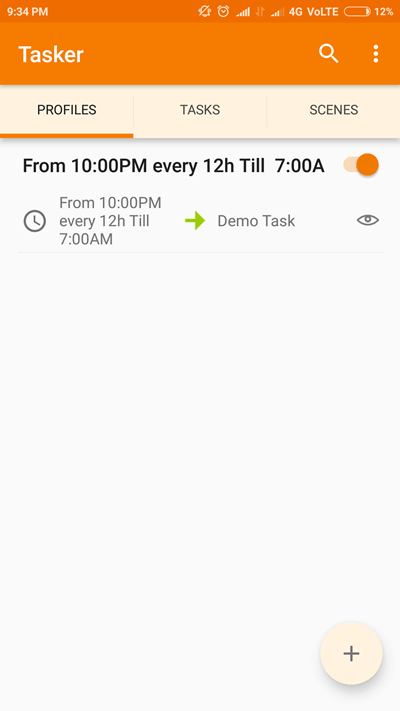
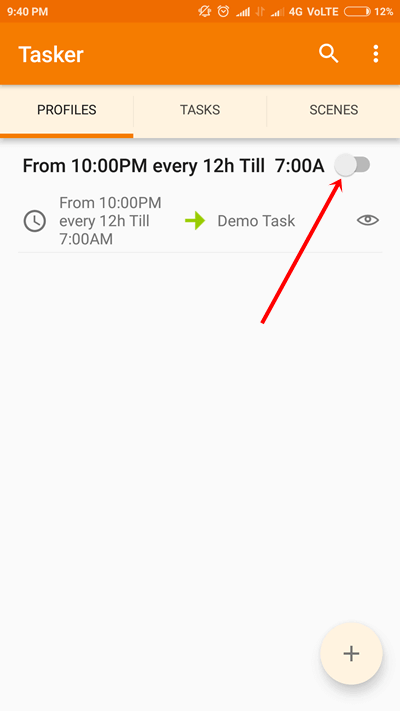
In my case, I’ve created a Demo task as shown above, so I’ll just associate this Profile with the Demo task. Once the Profile and task are associated with each other, you will see the following screen.
Step 5. When the profiles and Tasks are created and associated with each other successfully, Tasker will get activated. Now whenever the contexts on the Profiles are met with the given situation, the tasker will automate your phone to perform the given tasks.
You can also turn off this task for your desired time if you wish to. For this, just toggle the little orange slider, located next to the time and your Task will be deactivated. Have a look at the screenshot below.
Now let’s move further to the last part of how to use Tasker tutorial i.e creating Scenes on Tasker.
Part 4. How to Create Scenes
Although, scenes are not very important to learn. But I’m still giving you a quick overview on how to create scenes.
- Go to the Scenes tab.
- Press the plus icon at the bottom right corner.
- Name the task with any of your desired name.
- Now select the area of your pop up widget. You can change its size with the help of your fingers. When it’s done, just press the back button.
- Now tap the scene you just created and add the elements on the popup screen. You can learn more about this option on the various guides on the Internet. Since it’s not an important option, I’m not adding more information on it.
So that’s how to use Tasker. But since it’s a comprehensive tutorial on Tasker, Giving you a Bonus tip worth it. So, let’s move further to my last section of this tutorial.
Bonus Tips:
By now, I’ve told you everything about Terms used in Tasker, How to use tasker including creating your first task and profile. But as bonus tips, I’m giving you some tasker ideas, that can help you automate your Android to the fullest.
Below are the top four best tasker profiles, which you can leverage to make your life easier.
- With Tasker, you can Stop notifications from Interrupting your music.
- You can Play your favorite music automatically as soon as you wake up in the morning.
- Changing wallpaper automatically.
- You can automate your phone to open Facebook, WhatsApp or any other messenger app in your spare time.
These are just a few example. To know about more profiles, check this article about 10 Best Tasker Profiles.If you use your brain wisely, you can automate your phone more creatively with Tasker profiles. With this, I’m done with the detailed tutorial on how to Use Tasker.
Now, let’s conclude the article with my few last words on Tasker.
Hand Picked Stuff For You:
- Top 10 Chromecast Alternatives
- 5 Best Bluestacks Alternative
- How to Sign Out of Google Play Store
- How to Get Free Google Play Credit
- Best Sites To Watch TV Shows Online
- 10 Best Sites to Download Full Albums Free
Conclusion:
Android devices are smart. And they have played a vital role in making our life more comfortable. There are lots of advanced tasks which we can do on Android phone. And needless to say, smartphones have become a crucial part of our life.
But to increase the functionality of Android and make it a more powerful tool, there are automation apps like Tasker which help us automate our phone and makes our life smoother than ever.
Unlike most of the other Android apps, Tasker is the most powerful tool. And it is a bit complex when it comes to the Interface. For the newbies, understanding Tasker in a first go is a bit difficult. But when you understand its working, you would love Tasker than anything.
Android is already a smart-phone. But when we use apps like Tasker on our phone, it becomes far more intelligent and makes our life even comfortable. So, on that note, I’m wrapping up my detailed tutorial on how to use Tasker.
I hope this tutorial helped you understand the power of Tasker. For any doubts, suggestions or queries, you can reach out to me in the comment section below.
Hello
Jyoti,
This is an awesome post. I didn’t heared about tasker app before. Here, Great to know about Tasker app and its amazing features. Yes, there is many situation where we can not operate our smarphone while busy.
You have explained the full details of tasker app and how to use it. The step by step guide from your side is awesome and easy to understand.
Am going to download and explore this useful app.
Thanks for sharing with us.
Best wishes,
Praveen verma
Hi Jyoti, Though i am using Android device for a long time but was never exposed to such app. This is really a wonderful app and you explain the whole app wonderfully. I will definatly love to use this app on my device.