In today article, you will know how to start blogging in India and make money? I’ll guide you through the exact steps, with screenshots.
No experience? Never built a blog before? Have absolutely 0 idea? You’re exactly who this guide is for.
First, I’ll show you how to become a blogger in India, then, I’ll explain how to make money off it.
Yes, I’ll actually setup a new blog myself just to show you how to do it! Let’s get started then?
Table of Contents
Things (and money) needed to start a blog in India-
Before we get to the exact steps, we need to make sure we’ve everything we need, right?
There are 3 primary requirements to start a blog not just in India but anywhere in the known galaxy:
- You’ll need a “Domain”
- A hosting “server”
- And WordPress.
(I’ve explained what each of these are in the next sections).
Hey, money sure is an important part of this equation. So let’s not shy away from the question, eh?
I’ve made this guide so that you start your blog at the cheapest possible price!
The amount of money you’ll need to follow this guide is exactly
What is a domain? The basics
The domain is your address. The name of your blog. E.g. for this blog, it’s www.updateland.com . This is what a user types to visit your blog.
Note that this is permanent. Once registered, it can not be changed later. Sure, you can register another domain and shift all your content there. But, that’s very complicated and may cause you massive losses.
Hence, it’s best to choose a domain you’re sure about.
There are a few points you need to remember when registering your domain name. I’ll cover each of those points when I cover the exact step later in this guide.
What is a “hosting server”?
In the simplest of words, this is your “space on the internet”.
If your domain is your “address”, the hosting server is the “rooms in your house”. The server is your hard-disk. This is where you store your files/text/media and basically the blog.
Imagine it like a drive on a computer, that anyone can access using your domain. That’s what the hosting server is.
Obviously, I’ll cover (with screenshots) all the steps that will help you get your hosting server.
WordPress- An introduction
WordPress is the platform that you will build your blog on. Imagine it to be the bricks/cement/wood and everything else needed to build your rooms, on your address.
For you, it will just be like MS-Word for the most part. You’ll get an editor that will let you write your articles and publish them in a single click. No technicalities.
Of course, WordPress is capable of a lot more. However, I do not wish to complicate your baby steps so let’s leave it at that, eh?
How to start blogging in India in 2024?
Hey! You’re finally here. Welcome.
I will next guide you through the exact steps needed to start your blog from India.
You can also opt for your 100% free blog setup service.
“We will set your blog for you, 100% free. No setup charges”.
To opt for this free blog setup service, you need to buy hosting and domain with my Hostinger affiliate link or click here and then send an email to jyotichauhan@updateland.com with subject “100% free blog setup service“.
Of course, it’s best to do things on your own. You’ll gain some knowledge and experience that may prove helpful later.
Step #1: Getting a hosting server (and free domain worth Rs.1000).
We will use Hostinger to get you the domain and server.
Why Hostinger?
That’s because it’s arguably the cheapest host I’ve ever seen that doesn’t compromise on quality or features.
Secondly, Hostinger accepts most payment modes available to you in India. A credit card isn’t mandatory to buy from Hostinger.
Third, Hostinger automatically installs a SSL certificate and offers free weekly backups. You’d need these anyway but in other cases you’re required to pay for these. Many additional steps also are required to install and configure both of these. Hostinger saves us both time and money.
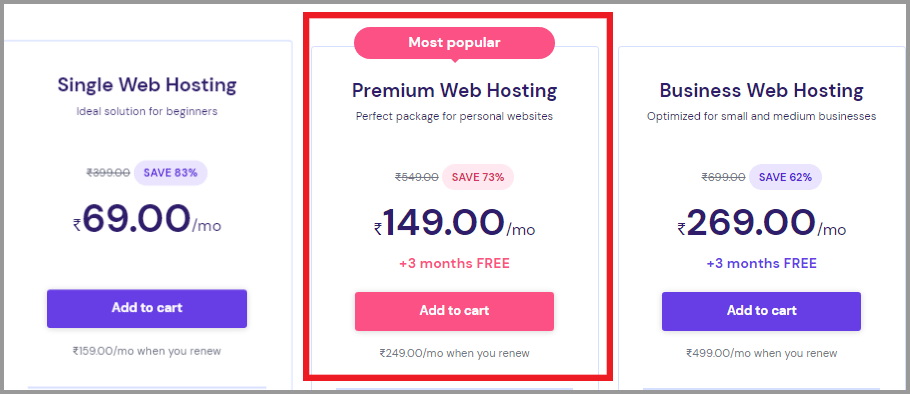
Just click this link and choose the “Premium Web Hosting” plan.
Why this specific plan? Am I trying to upsell you the services? Hey ,you totally should ask these questions.
So, I’m recommending this package because this actually is the CHEAPEST plan, despite looking like it’s the second-cheapest. That’s because if you go with “Single web hosting” (the plan that “looks” cheapest), you do not get a FREE DOMAIN!
You must purchase a domain to build your blog. That means, you’ll be spending at least about Rs. 900 extra and that’s mandatory. You can not skip this!
Hence, by going for the “Premium Web Hosting” plan, you’re actually getting the domain free for a year + the server, it’s not just a marketing gimmick.
Also, the “Single Web Hosting” only allows you 1 website. Are you seriously confident you’ll never launch another website? Why pay for a complete new host when you get 100 websites on the “Premium Web Hosting” plan!
So, choose the “Premium Web Hosting” plan to get to the next page.
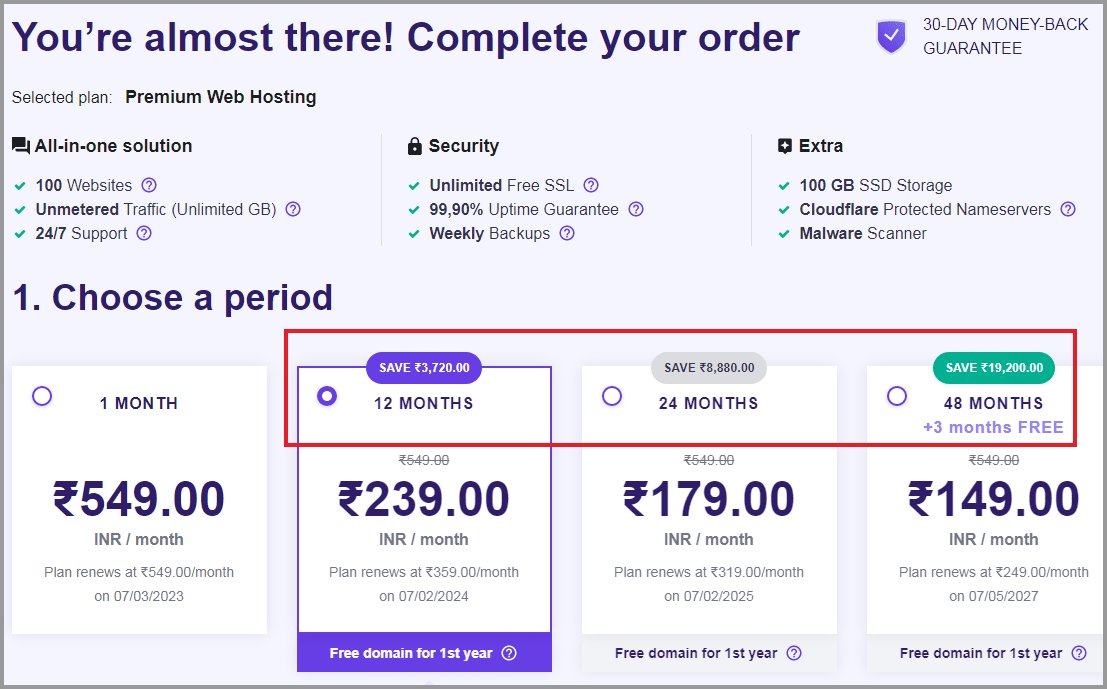
On the next page, choose to pay at least for 12 months, or higher. I say that because only then you get the free domain.
Also, you get massive discount by paying for 12 months as compared to paying monthly. In fact, you get an extra 50% off if you pay for 24 or 48 months! But, that may increase the cost so I leave that choice up to you.
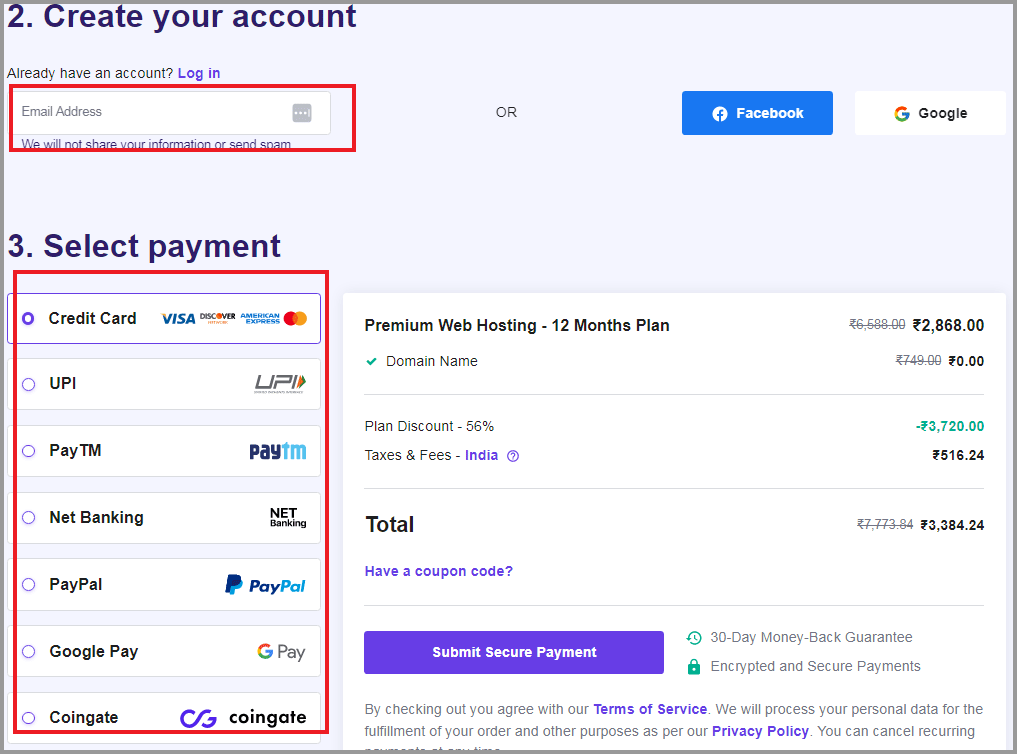
On the same page, Simply scroll down. You’ll be asked to enter your e-mail ID and payment options.
Being in India, I’m certain you’ve got Google Pay, you can use that to pay as well. Of course, you can choose any other mode of payment that suits you best.
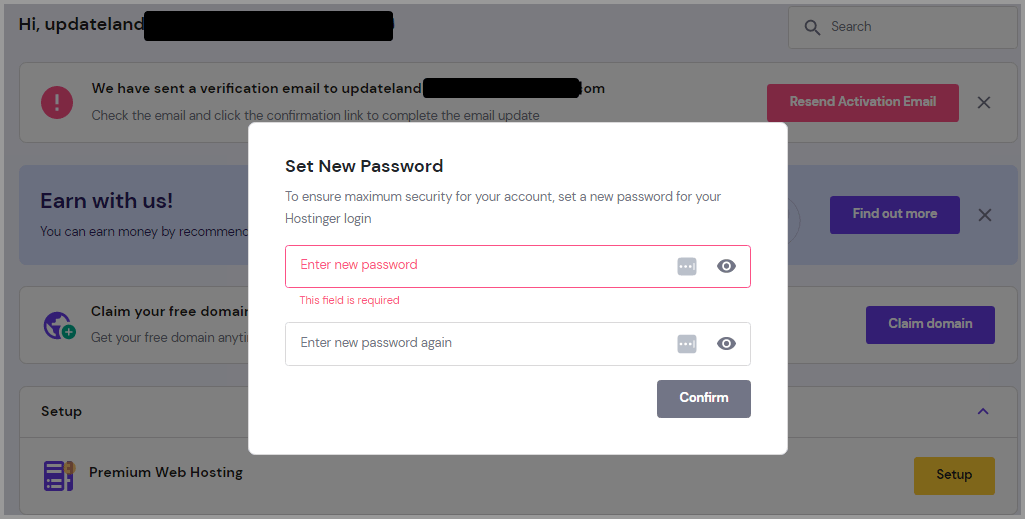
Once you make your payment, you should see the following screen. You must set a password for your account.
Done! So, now you have a Hostinger account with a server on it! Let’s move onto the next step? Please do not change the page, we need to be on this page for the next page.
Step 2: Claim your free domain
As mentioned earlier, you get a free domain with Hostinger.
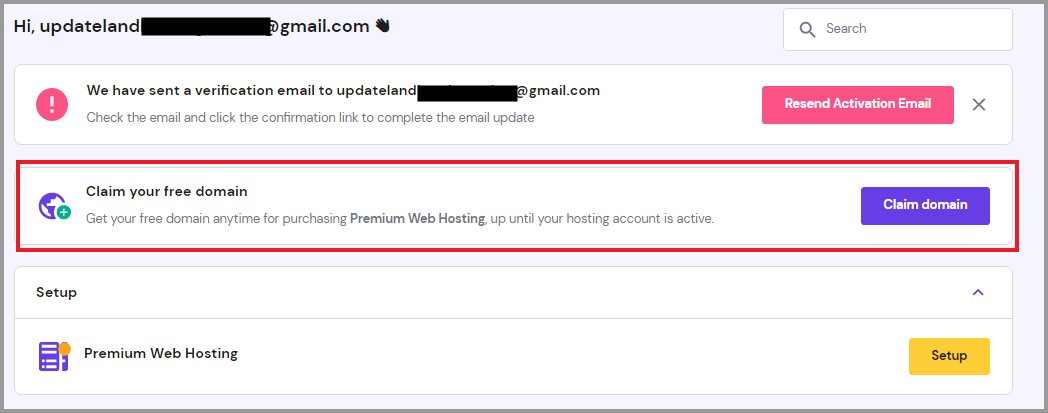
On the same page that you were earlier, you’d see a “claim domain” button.
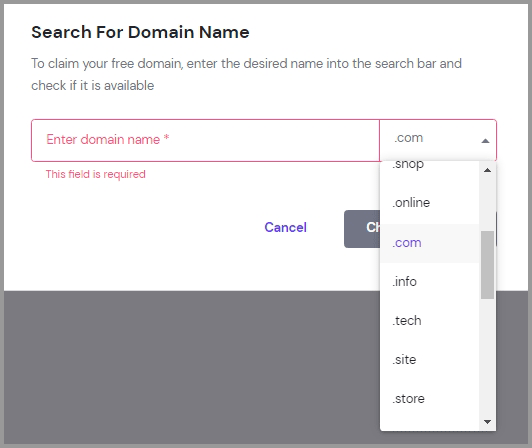
Next, enter the domain name you need. Click on the extensions and choose “.com” from the list.
Now, here are a few tips which will help you choose a good domain:
- Make sure your domain has your primary keyword in it. E.g. if it’s about technology and phones, it can be techcell.com. The closer your domain’s keywords are to your primary keyword/niche, the better it is.
- Keep it short. No one remembers long addresses, the same goes for your domain.
- Prioritize .com domains. These are the oldest, most remembered domain extensions. Of course this isn’t mandatory, you can go with newer domain extensions such as .shop/.site/.help/.me etc.
- Before finalizing the domain, check social media handles. Make sure the exact same keywords or very similar usernames are available across Youtube, Facebook, Instagram at the least.
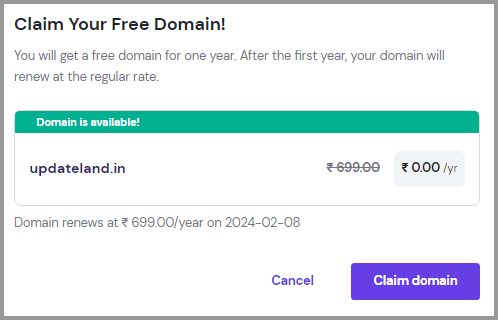
Anyway enter your domain and if it’s available, it’ll be shown to you. Click on “Claim domain”.
(Yes, I went with .in because I do not need a .com right now.)
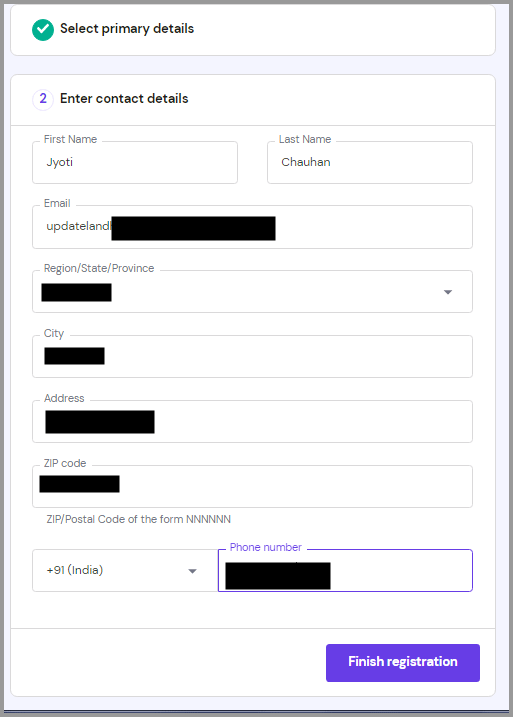
On the next page, select your country and enter your contact details. It’s best to enter true details here and not random gibberish. This will fix your domain if there’s a problem.
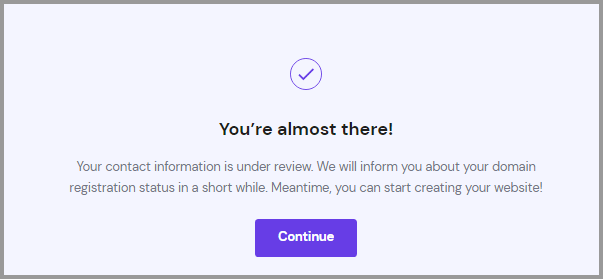
Click “continue”.
Done! Your domain will be registered in the next few minutes. You can now close all tabs.
Verify your e-mail ID
This isn’t a “step” but needs to be done. Simply log in to the e-mail you entered for Hostinger.
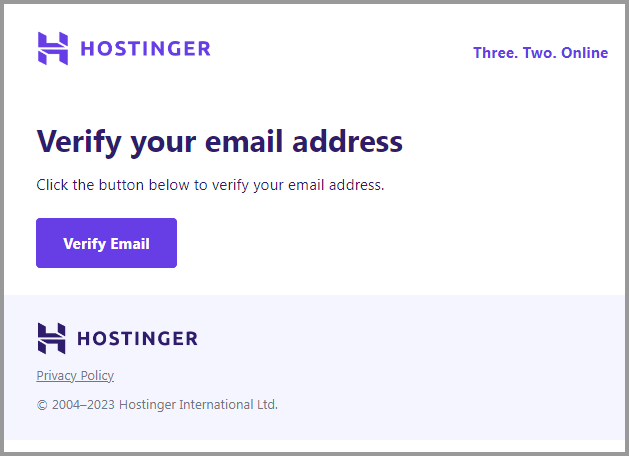
There you’ll find an e-mail from Hostinger with the subject line –“Verify your e-mail address”. Click on it.
Inside, you’ll see a “verify email” button.
Done.
Step 3: Setting up WordPress
So, you now have your domain and your hosting server.
The only thing that’s left is to get WordPress installed.
Click this link to go to your Hostinger control panel.
Click on the “setup” button next to the “Premium Web Hosting” tab .
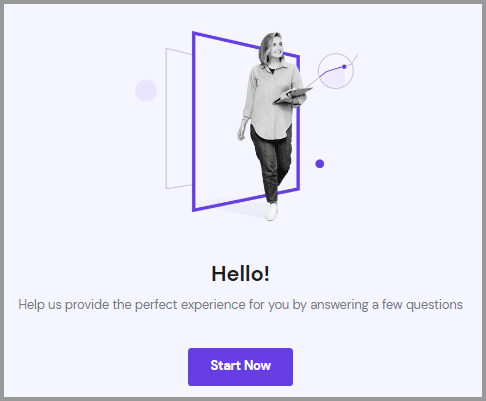
On the next page, click on the “Start now” button.
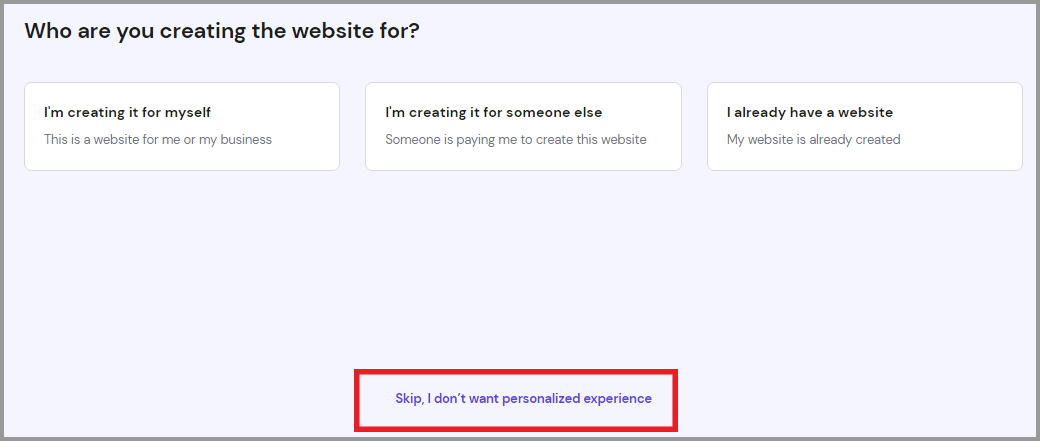
Then, click on the “Skip, I don’t want personalized experience”. It only adds to the confusion, especially if you’re new.
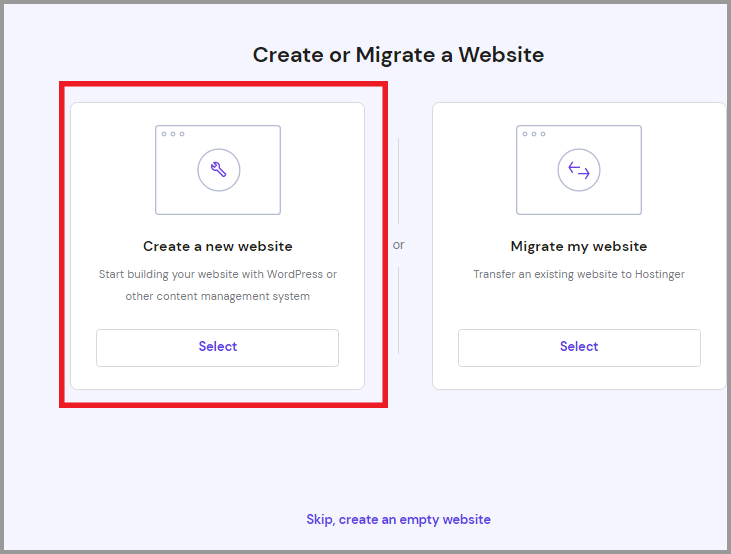
On the next page, select the “create a new website” button.
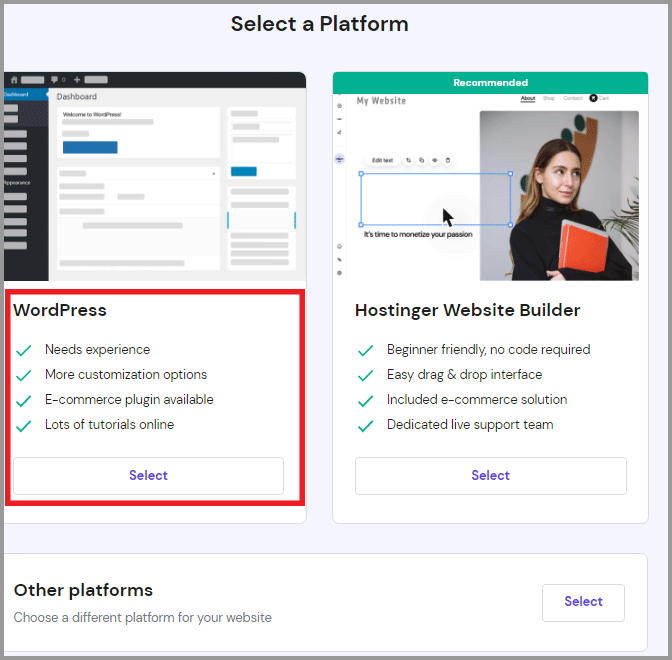
Finally, just select “WordPress”.
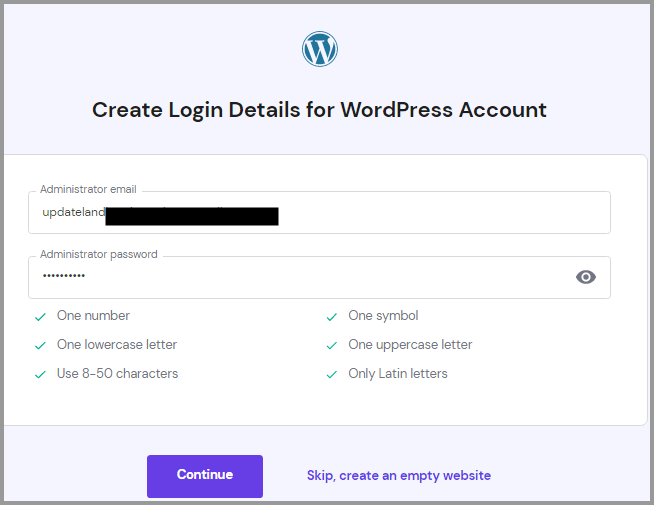
Enter a password (your e-mail will be auto-filled here. You can choose to use any other e-mail if you want to. This e-mail will be used to login to your WordPress site. I’d recommend using the same e-mail for your Hostinger panel as well as WordPress though).
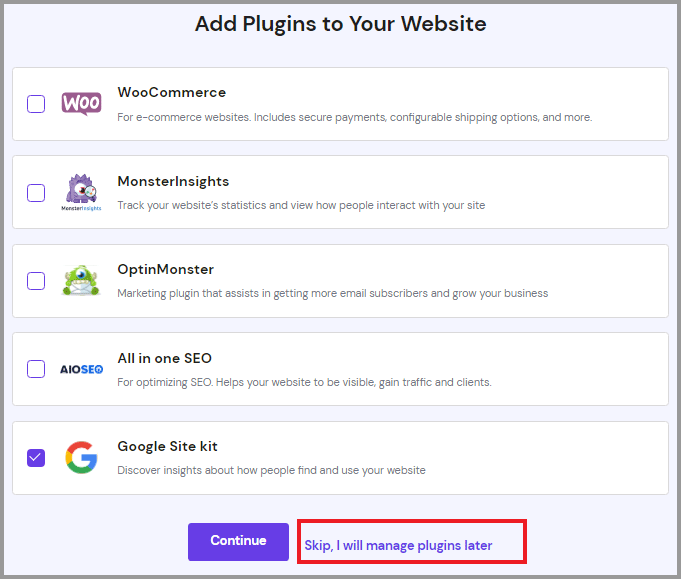
On the next page, Hostinger would automatically show you a few of the plugins you may use. I’d recommend clicking on the “skip” button for now.
(Yes, we will need plugins but not these. All of these are amazing plugins but if you’re just starting out, you probably don’t need them yet.)
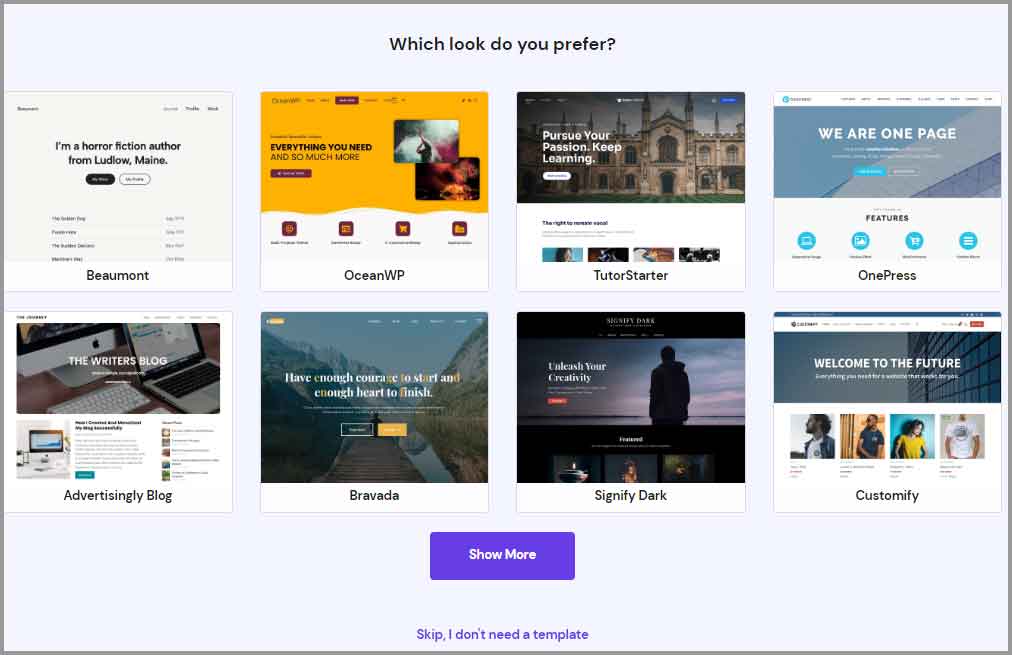
Next, you’re shown a few themes. Choose the theme that you like best.
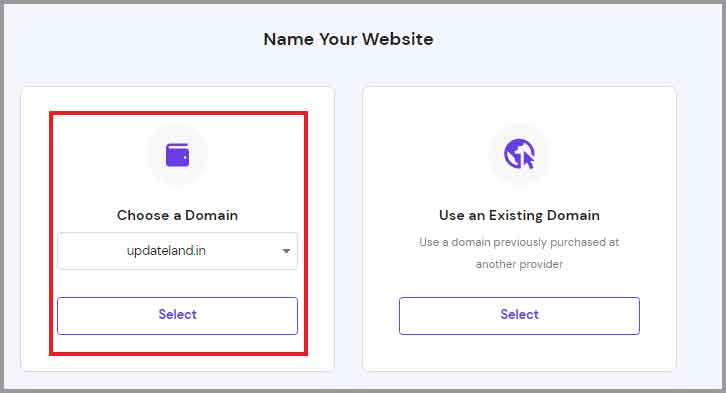
Anyway, on the next page, click “select” under the domain you registered.
Finally, your details would be displayed. Just click “Finish setup”.
Congratulations! You now have a live blog!
Celebrate by typing your domain in your browser and see what you’ve created! (Do not close the tab you’re on, we will use this page next).
Step #4: Logging in and customizing your WordPress blog
Most of you on this piece are building a blog in India for the first time, aren’t you?
I wouldn’t leave you mid-way! So, let’s log in to your WordPress blog?
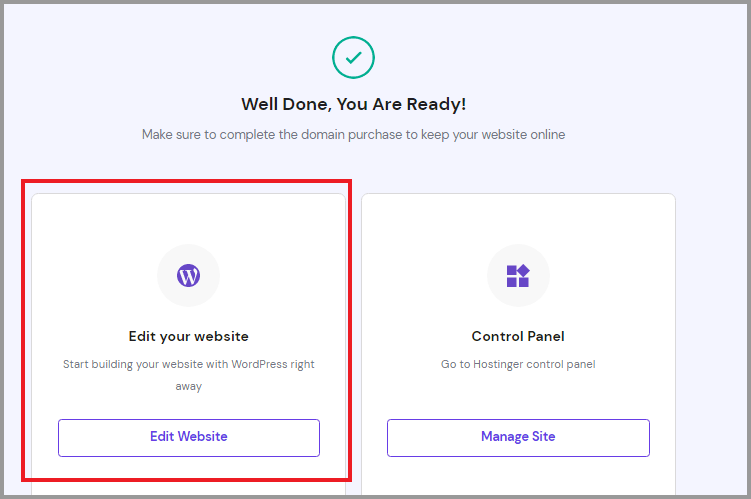
So, you should now be seeing this page, click “edit your website” here.
How bloggers earn money in India?
There are multiple ways bloggers make money in India. In fact, the blog monetization sources for bloggers is the same regardless of where you’re from.
I’ll first list the primary sources of income, and then get to explaining them, sounds good?
- Ads
- Sponsored posts
- Affiliate commissions
- Coaching/mentoring
- Direct product sales
- Third-party revenue originating from the blog.
- Speaking gigs.
Hey, before we even start, let’s set your expectations right. Do not expect any revenue from your blog at least for the first 3 months. Even after that, it may take you a few extra months to see your first dollar.
Yes, it’s not a “get rich quick scheme” and requires serious hard work. Now that you know what you’re jumping into, let’s get started?
Ads
I’m sure you know what ads are, at least the basic idea behind them. There are many different types of ads that can help your blog make money.
Static Banner ads
These are simpler, straight-forward ad banners. You get a graphic banner from the advertiser. You’re then required to place this on your blog. The duration of the display generally decides how much you get paid.
The best way to get these ads is to manually contact advertisers. You may contact any service you’d like to promote, that’s related to your niche, and pitch your idea.
I’d recommend keeping your initial rates ultra-low. This would help bring in more clients.
Text/graphic ads from third-party providers (CPM/PPC Ads)
There are multiple ad networks you can join. These will give you text and/or graphic banners to display on your blog.
These are different from static banners because here you do not get paid simply for displaying them.
Rather, your payment will depend on either one, or both of these factors. In most cases, you can choose the factor for your payment.
- No. of impressions: This is also known as CPM (Cost per Mille/ Cost per thousand). If you selected this, you get paid X amount, for each X no. of impressions. Basically, the more time to ads is seen by your visitors, the more money you make.
- No. of clicks: These are known as a PPC (pay-per-click) ads. You get paid for each “click” that the ad gets. Of course, the price for each click depends on a number of factors which I’ve discussed in the next section.
The primary difference between static and PPC/CPM ads? You often get to control the ad-creative/content with static ads. With PPC/CPM ads, these are automated and fetched directly from the ad-network, without granting you much control.
Do note that there are many different types of CPM/PPC ads available. These include dynamic ads, native ads etc. However, we aren’t getting into the technicalities to keep this piece simple.
Where to find CPM ads and advertisers?
I know, you’re looking for the list of PPC/CPM ad networks now.
Wait up. Please read the next few lines carefully. The reason being, these networks are pretty strict.
If you apply to them before you’re ready, you’re rejected and often blacklisted. Meaning, you may close a money-making door forever by applying too soon.
Before applying, make sure:
- You’ve decent traffic. Most ad networks wouldn’t accept sites below at least 100 organic hits/day.
- You do not have restricted content. Each network has its own policies, however, porn, gambling and even Crypto currency may sometimes get you rejected. Make sure you read a network’s content guidelines before applying.
Here are the best PPC/CPM ad networks:
These are the best-paying but also the strictest PPC/CPM ad networks out there:
- Google Adsense
- Media.net
- AdCash
- Publift
- Adbuffs
- Infolinks
- Bidvertiser
- Taboola
If you’re reading this piece, I’d recommend save this article and come back later. Please, do not try to sign up for these today if you do not have a blog yet or have a very new blog.
Sponsored posts
Sponsored posts are another major source of earning for blogs. It’s a simple process where you publish someone else’s article, for a price.
Often, the client provides you the article and all you need to do is publish it. However, at times, you may need to get the content done from your end. You of course are free to charge an additional fee for this.
There are multiple networks for sponsored posts. You can start with Adsy. You may list your site and pick any available listings that fit your blog.
Affiliate commissions
Affiliate Marketing is actually one of the highest paying monetization models for blogs in India.
It’s a process where you promote someone else’s products/services and receive a commission for the promotion. Generally, you’re required to make a “sale” and a fraction of the sale-price goes to your pocket.
The exact product you promote would differ for your blog and niche, of course. E.g. finance sites can promote stock apps, loan apps. Similarly, Cryptocurrency sites may promote Cryptocurrency wallets, exchanges and so on.
Direct product/services sales
Your blog is basically your shop. You can sell almost anything here. Depending on your niche, the product would differ.
Some of the most common commodities sold on blogs include e-books, custom software, graphic designing services, setup/fixing services for various platforms etc.
E.g. here on my blog I’m offering you a free blog setup service. I’ll set your blog absolutely free, without any additional price. Now, if I wanted your money, I could easily “sell” this service, couldn’t I?
Third-party revenue originating from blogs
The blog can actually open many other monetization channels for you.
For starters, you can start a YouTube channel that supplements your blog. You can also use your social media to promote your products, affiliate marketing or even sponsored posts.
Coaching/Mentoring
This is one of the hardest but the most profitable ways how bloggers earn money in India.
For this to work, you must establish yourself as a leader/expert in your field. This would require social media dominance, in-depth knowledge of your field, webinars and everything else.
It would also take the longest. You don’t become a coach overnight.
However, once you’ve mastered your field, you may start mentoring others, for a price. Just like a personal gym trainer.
You can set your own prices and if you’re worth it, people pay for video-call sessions, internships etc.
Speaking gigs
This is another blog monetization source that only opens up after you’ve built yourself some credibility.
Established bloggers are often invited to conferences, webinars, meetups. Of course, they’re paid to be there. The flights, hotels, travel too may be covered depending on your level and authority.
But then again, if you’re on this piece, this is a long way for you to go.
Factors influencing the amount of money your blog makes
Now that we’ve covered “how” money is made, let’s see how the “how much” is decided, eh? (Yes, the repetition of “how” is intentional).
Each blog may get paid a different amount for the exact same ad depending on a number of factors.
It’s important you understand these so you can optimize yourself better. Here are the primary factors influencing the amount you make:
- Traffic
- Niche
- Traffic source
- The ad being displayed
- And of course, the ad-network
“Traffic” obviously means the no. of hits your website is getting. It clearly is the first and major factor deciding your total revenue. That’s because regardless of your monetization method, you’ll need an audience to view/click or buy your products, right?
The niche is basically your “industry/field”. Your CPC (cost-per-click) will almost always be directly and primarily be influenced by your “niche”. Some niche (e.g. Finance) pay 5x-10x of what most other niches pay.
By traffic source, I meant the country/device your visitors use. This is another very crucial factors which decides how much you make. For the exact same ad, you’ll probably make more in clicks from a country like U.S than you would for a click from Bangladesh.
Of course, all of this is very ad-specific. Meaning, some advertisers may pay you more even for Bangladesh traffic if they’re targeting the country, won’t they?
Finally, the ad-network comes into play. Each ad-network has different commissions and charges. The same advertiser may be paying different amounts on different ad networks.
Things to do and not to do just after starting a blog
Okay so now you have a blog.
Here are the top 5 things you should, and shouldn’t do just after!
Things you should do:
- Grab social media handles. These should be identical, or as close to your domain as possible. E.g. @updateland for updateland.com. Get Facebook, Instagram, Youtube, Linkedin, Reddit without miss.
- Setup an about us page/contact page/ privacy policy and disclaimer page.
- Make sure you installed the plugins discussed above.
- Be very consistent. This is one of the core factors that would contribute to your growth, especially in the early stages.
- Finalize a colour-palette, font, size and layout and stick to it.
Things you should not do:
- DO NOT start signing up for ad-networks.
- Never copy content or use automated software to write them. Google is smarter than you’d think.
- Always prefer quality over quantity. It’s okay to publish fewer posts, with great quality than dozens without proper research or quality. Similarly, it’s okay if you build fewer backlinks but avoid low-quality links.
Well, I guess you’re ready!
FAQ:
If you’re on this piece, I’m certain you’ve more than just a few questions. Well, let me try and answer the most common of those?
-
How much does a beginner blogger earn in India?
As I’m sure you know by now, this would depend on over a dozen factors. Traffic, mode of monetization, ad-network and so much more. However, to give you a realistic idea, I’d say not more than $100.00 in the first 3 months, if you’re very hardworking.
-
Can you use any other hosting provider except Hostinger?
Certainly. I only used Hostinger because it’s good AND cheap. You can go A2 Hosting, BlueHost or many other hosts. Of course, they’re slightly more expensive.
-
Will we really build a 100% free blog for you?
Yes. We will. Do note that by free we only mean that we will not charge you anything for it. However, you’ll still need to pay for the hosting. Of course, the price will exactly be the same that you’d pay if you were building it yourself. Shoot an email to jyotichauhan@updateland.com to get this free blog setup service and start your blogging journey today.
Final words- How to start blogging in India?
That was it folks, that’s how to start blogging in India. Of course, the money making part should help too but I advise you to hold on that front for now. Do not rush the money.
For now, simply do your research, post quality content. Also, focus majority of your time on promotions. Meaning, if you spend 3 hours on a post, spend 10 on promoting it. Facebook groups, Reddit, Quora are some of the best places to start.
If you think you’re ready, go check things out on your own. I hope I helped you learn how to start blogging in India and make money? If I did, do share this piece with your friends. I wouldn’t mind if you link to this article on one of your blog posts either.
