How to start an anonymous blog in 2025? If that’s your question, it’ll be answered right here, right now. I’ll detail and explain each step required to make a blog that’s untraceable to your real-life identity.
Is it legal to make an anonymous blog? Does it cost more than a normal blog? Is the setup process any different than creating a normal blog?
These are just some of the questions I’ll be explaining in detail throughout this piece. Let’s get started.
If you go through this piece, I promise you’ll be posting on your newest, untraceable, anonymous blog in the next 15 minutes or so.
Table of Contents
- What do you need to create an anonymous blog?
- How to Start an Anonymous Blog in 2025
- Things to take care of when creating an untraceable blog
- Is creating an anonymous blog illegal?
- What are the problems with creating an anonymous blog?
- Which offers more anonymity? Blogspot or WordPress?
- Final words- How to start an anonymous blog?
What do you need to create an anonymous blog?
The requirements differ slightly as compared to creating a normal blog.
For an anonymous blog, you’ll need:
- A VPN
- An anonymous E-mail ID.
- A domain
- A server (hosting account)
- And Bitcoins or other Cryptocurrencies.
How to Start an Anonymous Blog in 2025
Let me outline the basic steps right here?
Download and install a VPN > Register an anonymous E-mail ID > get Bitcoins > get a cheap but anonymous hosting + domain.
Obviously, you’ll learn the why and the how of these steps throughout this guide on how to start an anonymous blog.
Step #1: Get a VPN
This is the most important and the first step you’ll need to cover when you wish to create an anonymous blog.
You need to hide your IP address. The IP address is what’s used to connect web-activities to real-life people.
Every internet connection/household has an IP address of its own. Using your IP address, your exact location can be pinpointed. (You don’t want that now, do you?)
The VPN is a simple software. It offers you a list of IP addresses. You can choose any IP address from the list. Once you do that, your IP address is hidden and the chosen IP address is then used for everything.
This means, neither your ISP nor the websites you visit see your real IP address. All they see is this new IP address you selected from the VPN. You’re invisible (literally.)
So, now the question is, which VPN should you choose?
In one word, the answer is NordVPN. The reasons?
- It’s a Panama-based company. US/EU laws do not apply to NordVPN. It also isn’t a member of the Five-Eye alliance.
- It has proven its “No Logs” policy via an independent, third-party audit. Meaning, even if NordVPN wanted to, it can’t help govt. agencies or anyone else connect the VPN IP address to your actual, real IP address.
- It’s “the” fastest VPN I’ve ever used. (And, I’ve used over 50 VPNs throughout my lifetime.)
- It’s also the most secure VPN (because of its encryption protocols and algorithms.)
- It’s dirt-cheap!
You can get NordVPN today for $89 for first two years + 3 months free, save 68%. Most other VPN Services, with a lot less features, cost a lot more.
Do note that getting NordVPN will also let you access the full Netflix library for most countries. It also unblocks almost any website, for any region (even China).
Why did I ask you to get the VPN first? Because, without the VPN, if you visit any website, your IP address will be logged and may be linked to you.
Hence, make sure you download a VPN, and connect to any country. It’s best to connect to Netherlands or other more liberal countries.
Only after you launch the VPN and connect to a VPN-country (IP address) should you initiate your browser.
Step #2: Register an anonymous E-mail ID
Once you have the VPN, the next step is to get yourself an anonymous E-mail ID. This is important to create an untraceable blog.
You’ll be using this E-mail ID to register for your domain, as well as for your hosting accounts.
Now, the best way to do this is to use Protonmail. Why Protonmail?
Well, it’s a Switzerland-based company. It’s free. And, without doubt, Protonmail is the most popular anonymous E-mail providers out there.
The company doesn’t store logs. And, it can’t access your E-mails.
But, before you create a Protonmail ID, you’d need another E-mail ID. Protonmail IDs can only be created if you either enter a mobile number, or provide a secondary E-mail ID.
Obviously, you can also make a small donation if you want. (I’d recommend this, Protonmail is truly a service the world needs right now.)
However, if you need the free E-mail ID, create an E-mail ID on https://tuta.com/ first. It’s another anonymous e-mail service like Protonmail.
Once you have your Tuta ID, use this to register on Protonmail. (You can also use the Tuta ID for everything, however, it’s not as established or reputed as Protonmail yet.)
Pro tip: It’s best if you create two anonymous E-mail IDs. Then, you can use one for your domain, and the other for your hosting. It’s just an additional security measure which you can totally skip.
By now, I hope you’ve your VPN connected, and you got your anonymous Protonmail (or Tuta) ID.
Maybe you don’t exactly know how to create an anonymous E-mail ID? Well, it’s exactly the same as signing up for a normal E-mail ID.
Just make sure you use untrue/false details when signing up. Meaning, your name, address, PIN code and even the password should be as unrelated to your real-life as possible.
Step #3: Get Bitcoins
You’ll need to pay for your domains and hosting, right?
You can’t use credit/debit cards, bank transfers, online wallets and other similar modes for payments if you need to learn how to start an anonymous blog.
These traditional modes of payments are called “fiat” modes. They can be very easily traced and tracked to a person’s real-life identity.
So, if you pay for your domain or your hosting using fiat modes, you lose all your anonymity right there.
Now, you need Bitcoins. If you know what they are, great. If you don’t, well-
“Bitcoins are Cryptocurrencies which let you make payments anonymously, and can’t be traced back to you”. (That’s the rough, basic definition of it.)
So, where do you get Bitcoins? You can use CEX.io. It’s one of the most established, trustworthy and reputed Bitcoin exchanges on the planet.
Just choose “Buy/Sell” from the top-bar on CEX.io

Enter your purchase amount in the last box.
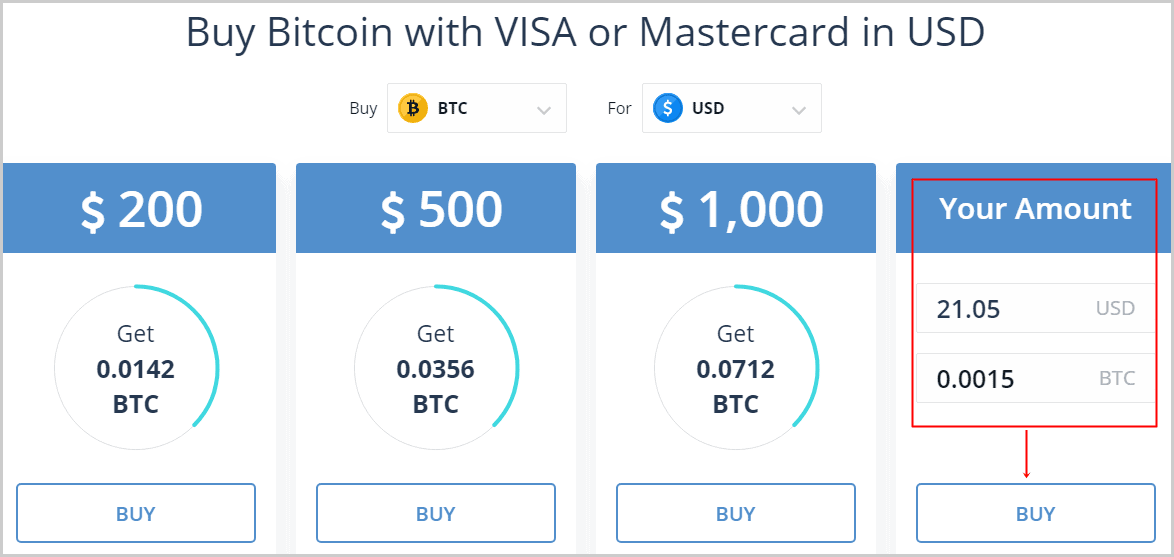
Buy Bitcoins for a minimum of $19.00. This amount will let you run your anonymous blog for the entire year! (It’s less than $1.84/month, cheap, isn’t it?)
You can add an additional $8.88, bringing the total up to approx. $28.00 if you also wish to purchase the domain from Namecheap.
Should you buy the domain with the server? Yes. I’ll give you three solid reasons why.
First, you get free WHOIS Guard protection, forever.
Secondly, you don’t have to deposit Bitcoins multiple times, to different platforms. Rather, in this one order you get your hosting as well as your domain. (This will save you a lot of time, and even some money. Bitcoin transactions are charged “per transaction”. More transactions mean more expenses.
And third, you won’t have to manually connect your domain to your nameservers. This is required only when you purchase a domain from another provider. (Hence, this will let you create an anonymous blog even with zero previous experience.)
On the next page, simply add your card and click on “Buy now”.
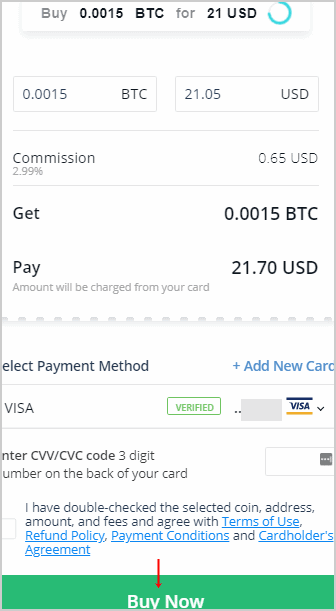
Done. It’s as easy as that.
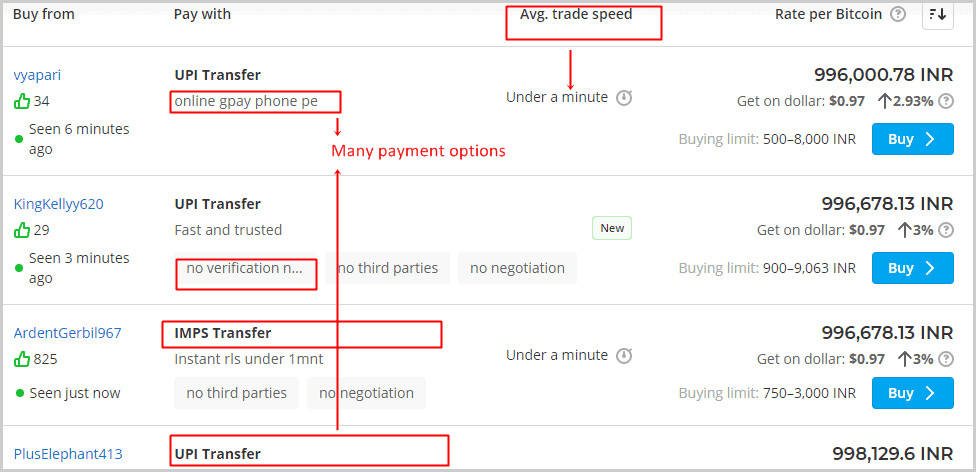
You can also use Paxful to get your Bitcoins. Paxful is a P2P Bitcoin exchange. This takes a bit longer than CEX.io and requires manual interaction (chat) with the seller.
Real, human sellers post their desired prices for Bitcoin on the platform, and you can pick the cheapest seller, and buy from him/her. Paxful acts as an Escrow service so you can’t be scammed.
On Paxful, you can pay for your Bitcoins via almost “anything”. Meaning, it accepts gift cards, online wallets (Paytm/BHIM etc.), bank transfers, even cash and many other modes of payments.
You can even negotiate the price for your Bitcoins (in some cases) on Paxful.
Either way, get these Bitcoins. They’ll arrive in exchange wallet in about 30 minutes. Keep these here, you’ll need them in the next step.
Step #4: Add funds to your Namecheap account
So, you just purchased some Bitcoins. Let’s add those funds to your Namecheap account. This will let you use these funds to buy your domain and server anonymously.
Click here to go to the Namecheap. Click on “Account” and then “dashboard” (top-right).
On the next page, click on “Sign up”
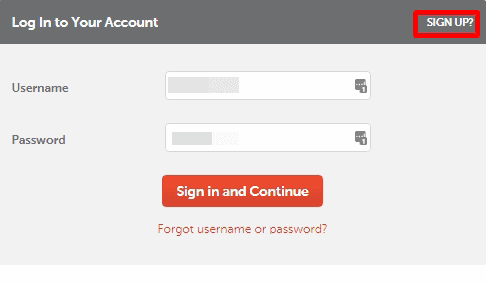
Fill the account registration form. Keep in mind to enter the anonymous E-mail ID you created earlier in the “Email address” field.
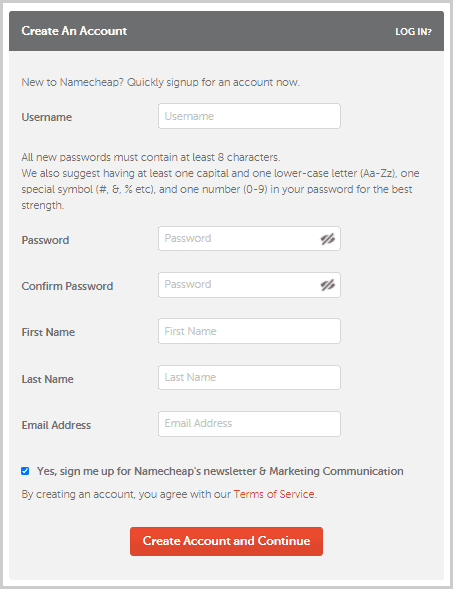
The account is created instantly. You do not even need to verify your email address.
Once it’s created, just go to your dashboard and click on “Top up”. It’s displayed at the center of your dashboard.

On the next page, just select “Bitcoins” and click next.
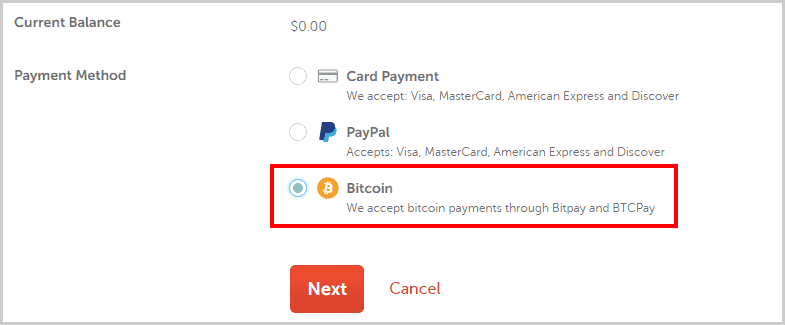
Then, you can just enter an amount. Enter the amount of funds you purchased earlier.
(You can enter $19.00 if you’re buying just the server. Or, you can deposit $28.00 if you’re buying the domain as well.)
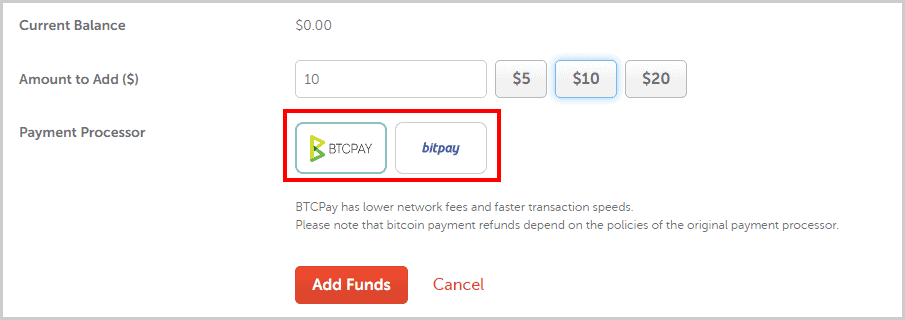
In the above screenshot, you see two payment processors, BitPay and BTCpay. Choose either one of them; this won’t change much for you.
And then, finally, you’ll be shown the deposit address for your Bitcoins. It’s generally something like this-
“29N2B2qEkpR5Q5ghwz7PnhfK96stRUKnQw.”
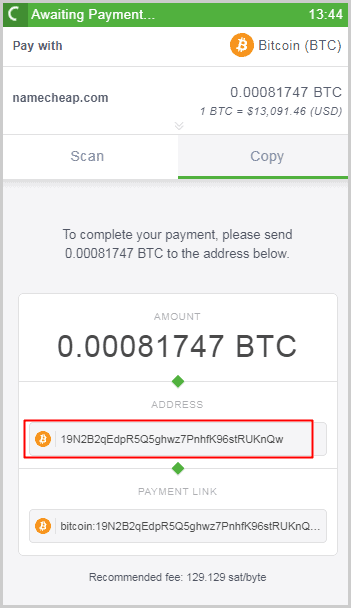
If you don’t see an address like that, you may need to click on a few buttons. But, a lengthy, alphanumeric combination of addresses will always be available.
Now you only need to go to your exchange where you purchased your Bitcoins, and make a withdrawal. Send those funds from the exchange, to the address shown to you on your payment page.
Give the funds a few minutes to arrive in your wallet. In some rare cases, a few hours. (Hey, for all that anonymity, a few extra minutes are worth it, right?)
Step #5: Get hosting and domain name
By now, I hope you have your VPN running, an anonymous E-mail ID, and Bitcoins in your Namecheap account.
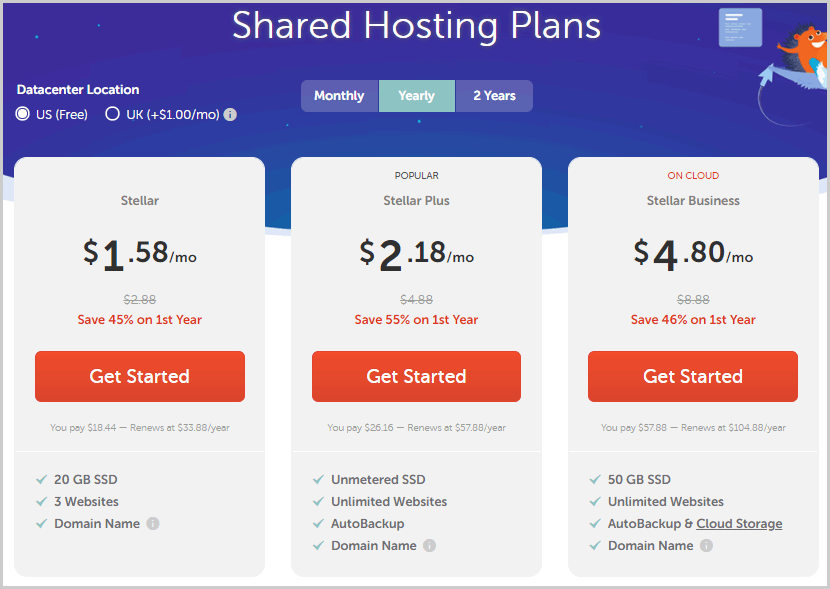
Now click here and get yourself a hosting plan. I recommend “Stellar”. It starts at just $1.58/month. Go for the annual plan to avail the best discounts. You pay only $18.44 for the entire year! (Now you know why I quoted $19.00 for your Bitcoin deposits earlier.) And, you get to host 3 domains.
Feel free to go with any of the other available plans depending on your needs.
Once you select your plan, You will redirected to another page. At top, you will see “Domain Name Connection”. Now time to choose your domain.
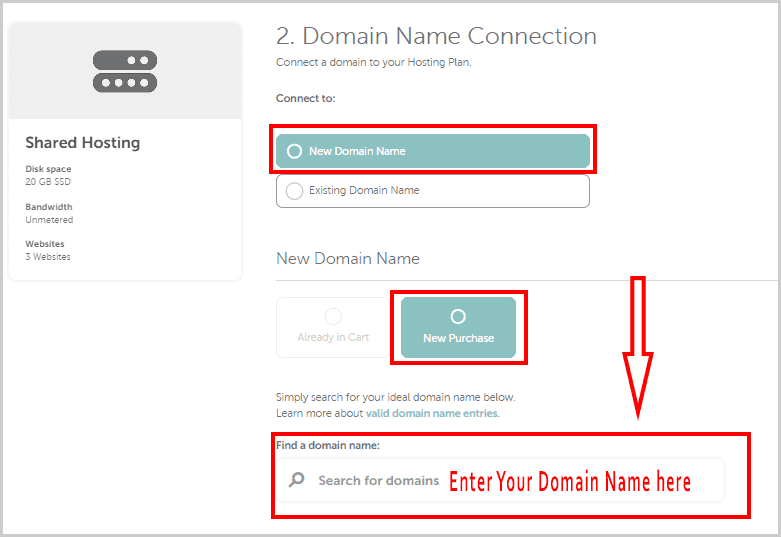
Enter your desired domain name in the filed” Find a domain name” and click on “Connect to Hosting” at the bottom of the page. And after that click “Add to Cart” button.
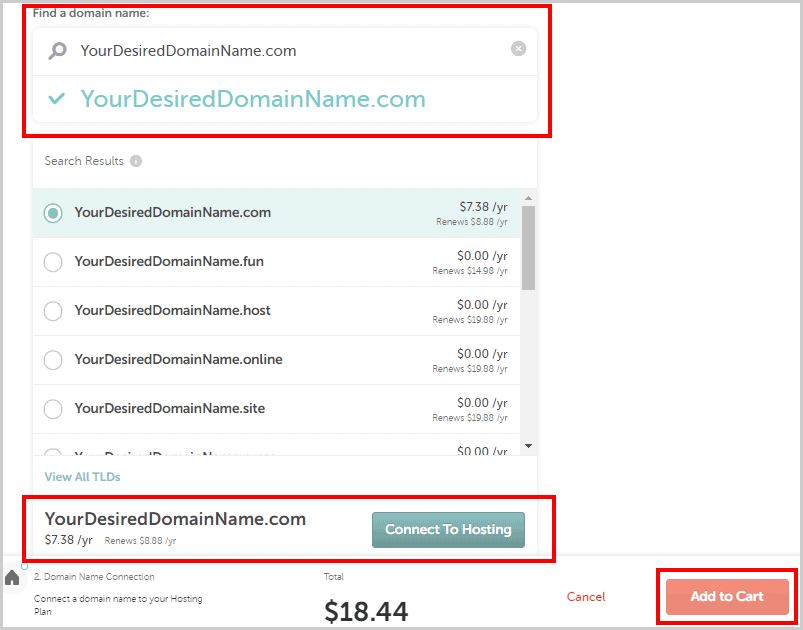
It’ll cost you around $8 – $9 extra. But, that’s the industry-price.
Just click “Confirm order” on the next page:
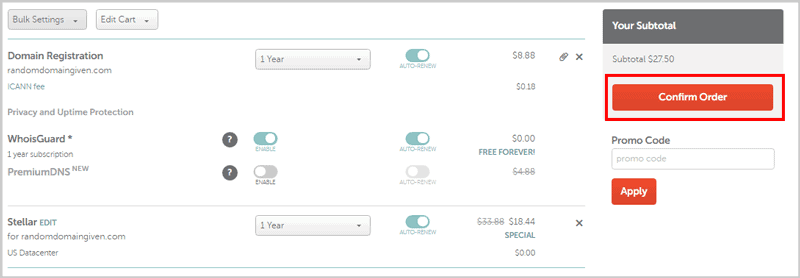
The next page will be your payment page. We need to make sure this payment is untraceable and can’t be linked to you, right? Simply choose “account funds” here. This will make sure the Bitcoins you deposited earlier are used for your purchase.
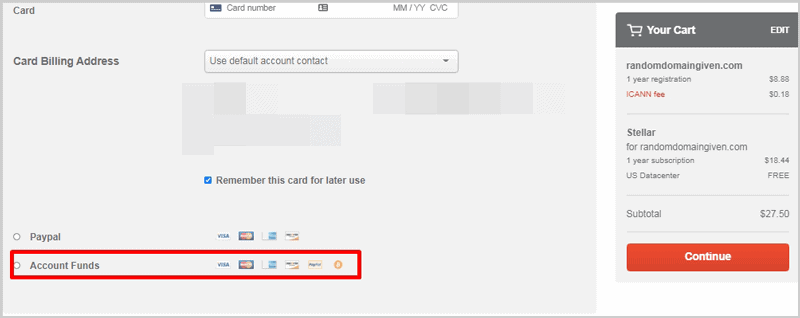
Finally, click continue. You just purchased a server (and hopefully a domain) anonymously! The funds are auto-deducted from your account!
Step #6: Install WordPress
You have your domain and hosting now. Now, you need to install a blogging CMS. In simpler words, a platform which will let you actually “blog”.
To do that, just login to your cPanel and then scroll down and you will see a section named “SOFTACULOUS APPS INSTALLER”, now click “WordPress”.
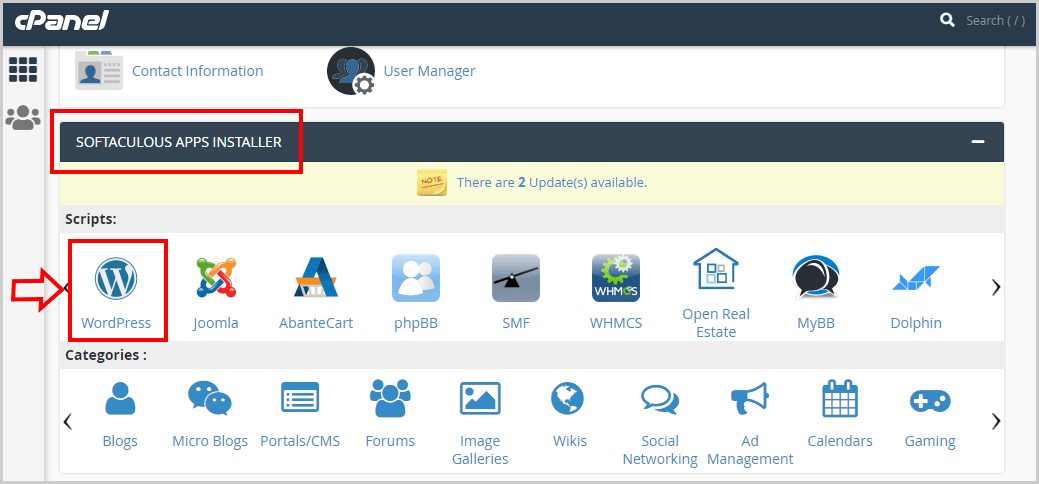
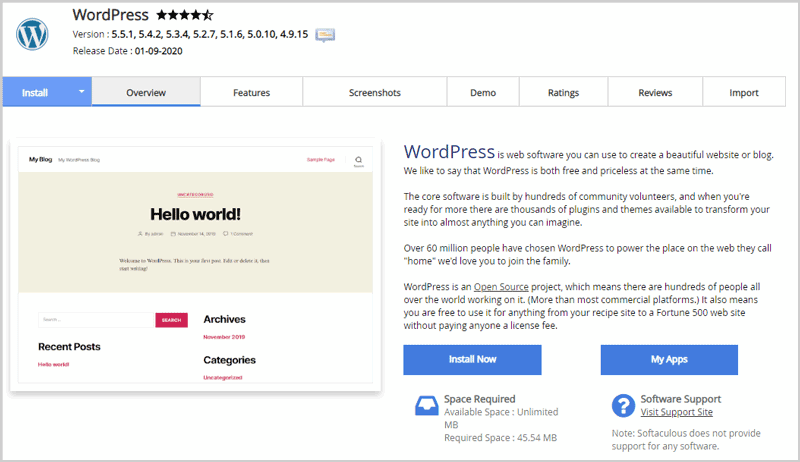
This will take you to the WordPress installation page. Now, click on the “Install Now” button.
Then, simply fill in the form as directed.
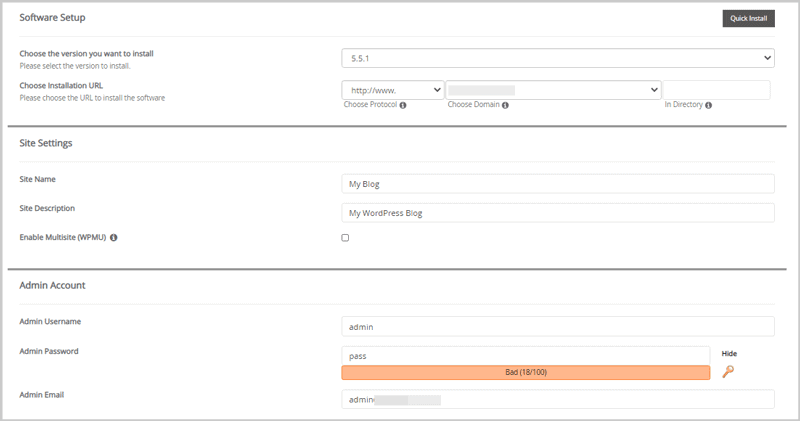
Need some help? Well, if you’re new you may be confused with the “choose installation URL” field. Most of you should leave it blank. Leaving it blank will install WordPress on www.yourdomain.com directly.
However, if you want a subdirectory, e.g. www.yourdomain.com/blog or www.yourdomain.com/officialblog or anything of that sort, you can enter the name of the desired subdirectory in the “in directory” box.
Also, note down the admin username and admin password which is displayed. It’s recommended you change it from the default “username” and “pass” values.
You’re pretty much done. Simply click on the “Install” button at the end of the page. It’ll take a few seconds (minutes at best) and your WordPress blog will be ready.
Step #7: Installing the most important WordPress plugins
Just getting your WordPress blog isn’t enough. You’ll need plugins to help you run it smoothly.
Here are the three most important plugins (in my personal opinion) for a new anonymous blog:
- YoastSEO: This in my opinion is a “must-have”. It’s free. YoastSEO is arguably the best SEO plugin which helps you optimize your content better.
- Wordfence: It’s a security plugin which helps block hack-attempts, enable 2-FA, restrict/block countries, monitor traffic and a lot more.
- Updraft: Helps you create automated and instant backups making sure you never lose years of work.
You can install any plugin by going to “plugins> add new > upload plugin”. (You get the plugins in a simple .zip file which can be uploaded.)
And hey, there are a dozen other plugins you can use. However, do note that these plugins will slow your website down.
Things to take care of when creating an untraceable blog
We’re done with the technicalities. But, there are a few basics I’d like to cover.
- Whenever filling up the purchase form on Namcheap for your hosting account, try and use “untrue” data. Meaning, do not enter your real name, address, PIN code, or anything else which can be linked to you. This is true for any other form on any other platform.
- Never use fiat/traditional payments. Always use Bitcoins (or other Cryptocurrencies) for making payments.
- Whenever accessing your blog, make sure you’re connected to the VPN. Without that, even a single login can lead to your anonymity being compromised. In fact, do nothing related to your blog if the VPN isn’t connected.
- Enable the “Kill-switch” on NordVPN. It’s an advanced feature which auto-disconnects your Internet if the VPN connection drops in the background. This makes sure you only access your blog when you’re secure.
- Do not use your real name when creating your WordPress account/username/display name.
- If you ever contact support, make sure you do not divulge your real information. Always stick to the data you created the accounts with.
Is creating an anonymous blog illegal?
So, you now know how to start an anonymous blog. But, is it illegal to do so? Well, that depends on a few factors.
Why do you wish to create an anonymous blog?
If you intend to share illegal content, it “may” be illegal. Even this has exceptions. If your content is illegal, is it illegal only in your country, or throughout the world?
As in, content related to Atheism is illegal in Saudi Arabia. But, it’s not exactly illegal in most other countries. Hence, you may be able to share such content even though it’s illegal in one or a few specific countries.
However, if you intend to share content promoting terrorism, illegal porn, violence etc. it sure will be illegal.
However, largely, anonymous blogs aren’t illegal by themselves.
What are the problems with creating an anonymous blog?
Hey, I’m pretty sure you know what are the benefits of blogging anonymously. Else, you wouldn’t be trying to learn how to start an anonymous blog, right?
Now, it obviously isn’t without any demerits.
- Forget all and any “fame”: When blogging anonymously, you’re invisible. (That’s, kind of the goal, isn’t it?)
- Making money is hard: If you’re blogging for money, it’ll be a hard road for you. No matter what you use, most sources wouldn’t agree paying you via Cryptocurrency. And, you can’t accept payments via fiat modes because then your receiving account can be traced back to your real-life.
- Less creditability: People find it harder to trust blogs without a face. Obviously, you aren’t putting up photos of yourself. Sure, a made-up biodata may still be used however it’ll take longer to establish your creditability.
- Risk of termination: You may have used untrue/false data for your domain/hosting registration, right? At times, companies ask for verification. Unable to provide the right documentations matching the registered details may lead to problems.
- Not 100% untraceable: If you manage to offend the right people (g. NSA), you can still be traced. It’s highly unlikely, however, not completely impossible to trace/track you.
Which offers more anonymity? Blogspot or WordPress?
I’ve recommended WordPress and WordPress hosting above. Why? I believe you deserve an answer to that. Why should you blindly follow anything I say, right?
Well, “Blogspot” is owned by Google. Google is quite literally one of the least privacy-respecting companies on the planet. It can read your e-mails, and it lets other third-parties do so as well!
WordPress on the other hand is an open-source, free CMS. So, there’s absolutely no backdoor or privacy-breach.
On top of that, it’s multiple times better than Blogger even when it comes to “features”.
Many other reasons exist, but, I believe these are enough to help you decide between Blogspot and WordPress, aren’t they?
Final words- How to start an anonymous blog?
So, as you know by now, creating an anonymous blog is no rocket-science.
The only things you need are a VPN, some Bitcoins, and an anonymous E-mail ID. Rest of it remains exactly the same as starting a normal blog.
Just remember to “always” be connected to your VPN. When you access your server/cPanel, WordPress dashboard, or even create backlinks for your blog. Basically, always.
There are a few more advanced ways of starting an anonymous blog. E.g. you could funnel your Bitcoins from the exchange to a Bitcoin mixer, and then to Namecheap (or any other anonymous hosting company.)
However, this is a bit more complex, time consuming and expensive. So, for now, your blog can still be anonymous if you simply follow the steps above.
If I’ve learnt how to start an anonymous blog, I’m sure you wouldn’t mind hitting that share button; would you?


