This is a step-by-step guide on how to start a blog in 2025 that makes $1000 every month.
If you want to create a blog and are wondering where to start, you’ll love this easy guide.
In this guide, we will cover everything.
Let’s get started.
Table of Contents
How to Start a Blog in 2025 and Make Money
Part 1: Choose Blog Niche
Choosing a blog niche is the first and most important step toward starting a blog.
If you are clear about what you are going to write about on your blog then you can jump to the second step by clicking here.
If you don’t have any idea what to write then keep reading.
Your blog should be focused on a category. So, the question arises; how will you choose that category?
Here are some questions that can help you choose the right category:
For example, when I started my first blog, I had a bit of experience with Off Page SEO, so I started the blog to share “backlink resources”.
Back then, I thought the resources would be useful for everyone. So, I put them all on my first blog.
Eventually, people found my blog, liked the content, and some requested for more similar content, that’s how I became a blogger.
So, if there is something that you’ve knowledge of and think others can benefit from, that’s your topic right there.
Are you passionate about something?
Is there something that you find most interesting and can’t stop doing, reading about it, or learning more about it?
If yes, then you already know what to write about.
Now this has double benefits, if it’s something that interests you and you’re passionate about, you can easily generate a lot of content on the topic.
So now, you know how to choose your niche.
Let’s move to step 2, the actual step to set up your blog.
Part 2: Buy Web Hosting And Domain
There are several cheap web hosting companies out there that you can use to start your WordPress blog.
But if you’re just starting out, there’s nothing is better than BlueHost in terms of cost & performance.
It’s one of the most widely used and popular hosting providers.
I use it for a few of my micro-niche blogs.
Ready to buy a web host for your blog? Follow the steps mentioned below.
Step #1: Choose Hosting Plan
First of all click here to get started.
After clicking, you will land on a page which looks like the following screenshot. Here, you will see four plans: Basic, Choice Plus, Online Store, and PRO.
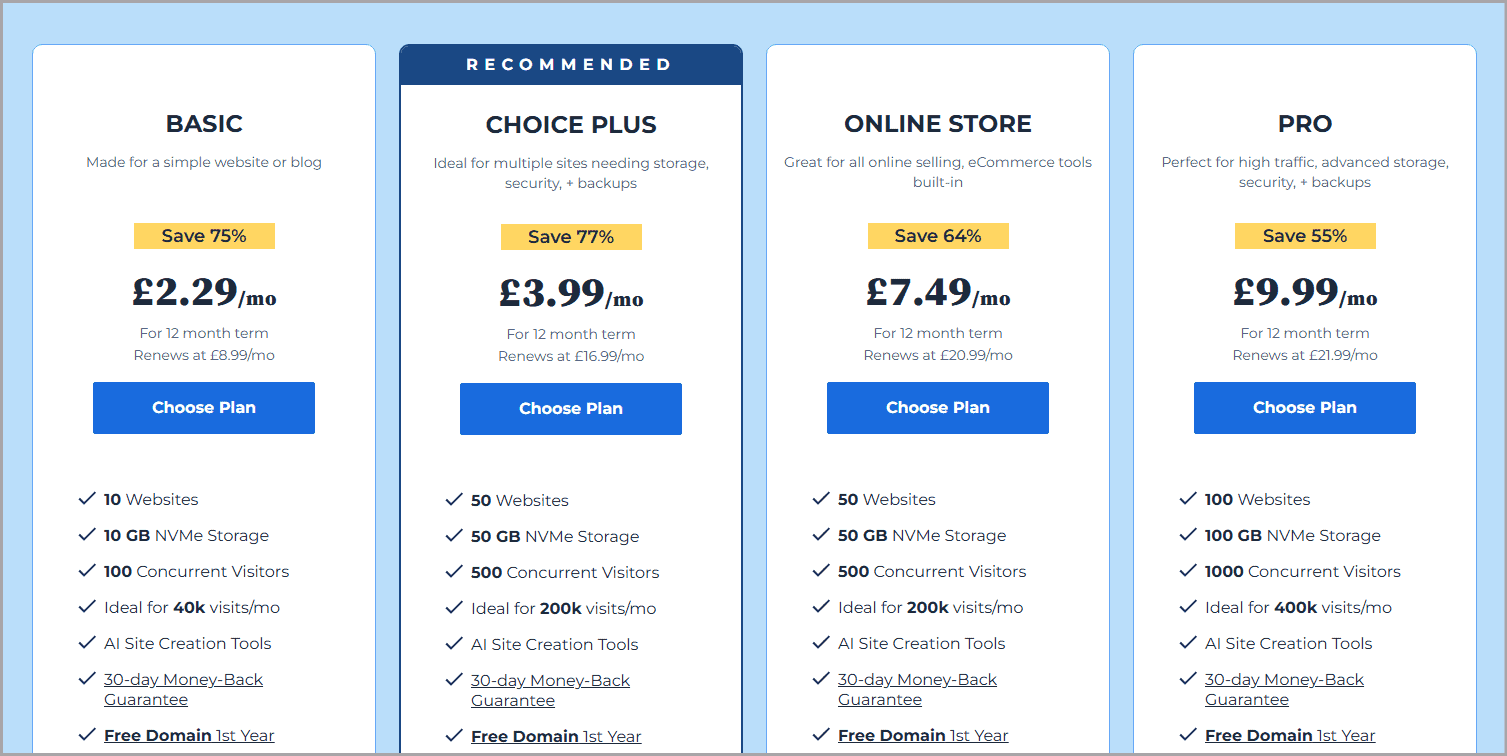
Choice Plus is the best plan for you, here you get everything that you get in the Basic plan and additional phone support plus daily website backup free for 1st year. Since you are new, phone support and daily backup are life saviors for you. You don’t need to worry about backup, Bluehost takes care of it. You just need to focus on the main things: content, SEO social media, etc. And if you face any issue, you simple call them. You don’t need to wait in the Chat queue.
Step #2: Choose Your Blog Name
Before you take actual steps to buy a domain name, please pay attention to the below information.
Naming a blog is one of the most crucial aspects of starting your blog. You name it once and it is known from this forever. Hence, spend some time and be creative.
Quick tips for choosing a good name for your blog:
- It should be meaningful, short, and memorable.
- Easy to spell
- Don’t use hyphen (-).
- Easy to pronounce
- Use keywords
- Your priority should be getting a .com domain
- Avoid copyright issues & legal conflicts
- Check social media handler availability
Now, that you know the tip for choosing a good domain name, let’s follow the steps to take it.
After clicking the “Choose Plan” option, you will be redirected to the Order page where first option is Domain. Here you need to enter your blog name. And click “Search For Domain”. option.
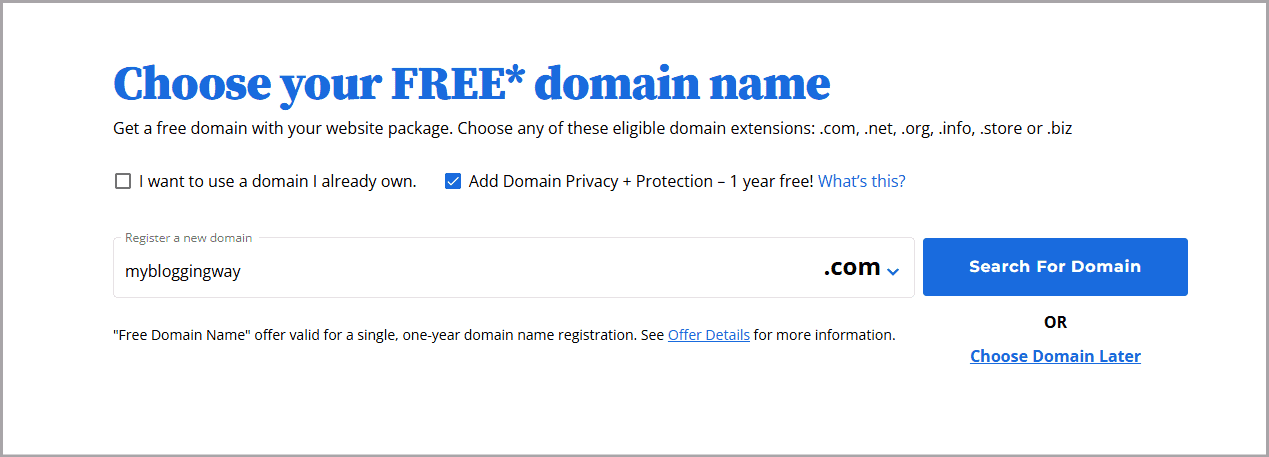
If the domain is available, it will redirect you to the Cart page. If the domain is already taken, it will ask to you search the domain again and also display a list of domains with a little variation or with different extensions. You can choose one of them if you like the suggestions or go with another name to check the availability.
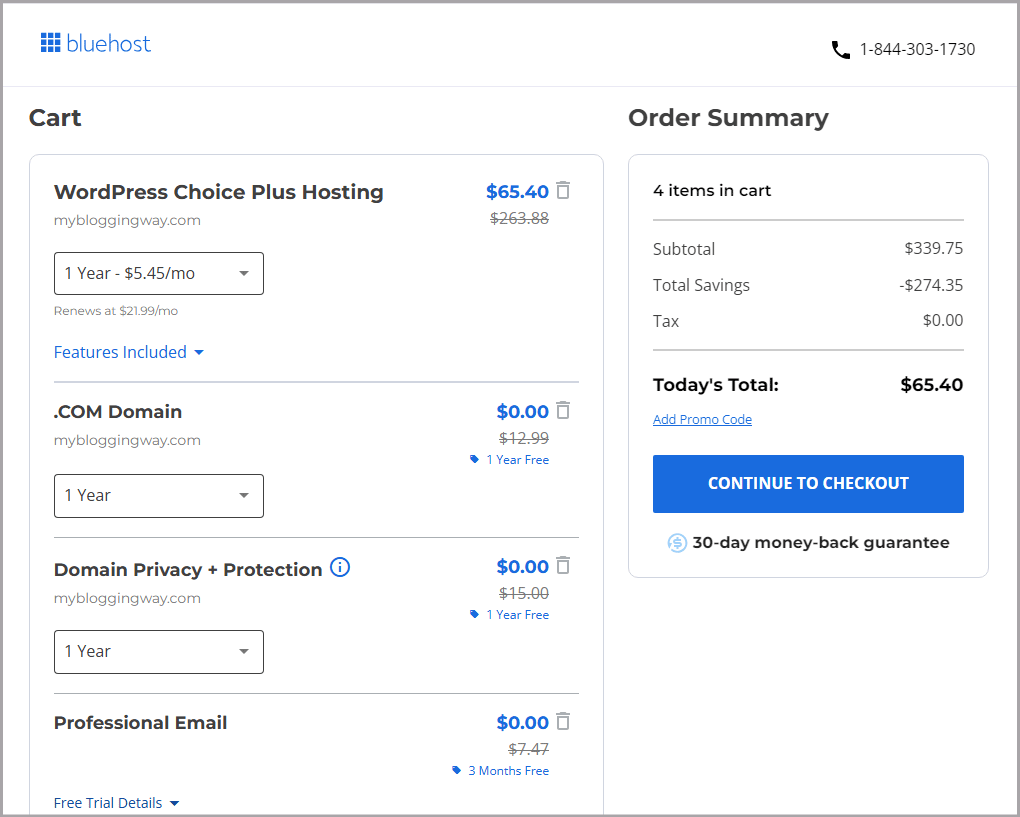
At the Cart page, choose hosting plan duration and click the “Continue To Checkout” button.
Hosting is recommended for 1 year since as your blog grows, it receives more traffic. Hence you need to upgrade to another plan that can handle higher traffic. For a new blog, the Choice Plus plan is best. As it can handle 500 Concurrent Visitors and 200K visits/mo. That is a good number.
After one year, you can renew your hosting plan as per your requirements. Also, as of now, you save money which you can spend on WordPress themes and plugins.
Note: You get free .Com domain (which you have chosen earlier) and Domain Privacy + Protection for one year, also free Professional email for 3 months.
At the end, you see options: Commerce Solution and Google Workspace. You don’t need them.
Step #3: Enter Contact, Account & Billing Details
Now, enter your contact details, password (save it, you will need it later to access your hosting account) and Billing details. It is straight-forward, no explanation needed.
I suppose you’re now at the end of the form.
Go through all the options to ensure everything is correct.
After verifying the entered data, click “Submit Payment”.
Now you have done your job. Let Bluehost do theirs.
Once your blog is live, Bluehost will send you a confirmation email with all the essential details to access your WordPress blog.
Usually this process takes 10 – 20 minutes, occasionally, a couple hours may be required . So, don’t worry if it is taking more time.
Once you get BlueHost’s confirmation email with the login credentials such as the username and password, you’re ready to design your blog.
Part 3: Design Your Blog
You have bought hosting and domain name for your blog. It is time to design it. To design your blog, you need two things: theme and plugins.
Step #1: Choose a WordPress Theme
GeneratePress, Kadence, Astra, and SmartTheme by OptimizePress are the most widely used themes among bloggers and webmasters.
At UpdateLand, we are using GeneratePress theme With GP Premium Plugin. It gives you full control over customization. While free GeneratePress comes with limited customization.
GP Premium price is $59/year. With GP Premium, you have 100+ pre-built starter sites, local font library, theme builder, and various customization options.
You can choose design for your blog from starter sites or design from the scratch. It is very user-friendly theme.
If you wish to have more advanced blocks, style controls and patterns, then go with GeneratePress One, here you get everything what they have built and will build in future.
GeneratePress One price is $149/year.
Kadence offers free and premium lightweight plus SEO friendly theme. To use their premium theme, you need to buy Kadence theme Kit Pro. That cost you $99/per year.
SmartTheme is not available individually, when you buy OptimizePress (all in one page builder), you get it.
What I like most about OptimizePress is that they offer more than dozens beautifully designed blog homepage template. Using them, you can give awesome look to your blog with just one click while in case of GenreatePress and Astra, you need to go through several customization to achieve same design.
Only Drawback with OptimizePress is that You can install it on one site only. If you need to install more than one site, you will need to upgrade higher plan that cost you $149/year and renews at $199/year. While GP Premium plugin can be used on unlimited sites.
Best part? All these theme providers offer a money-back guarantee.
- GeneratePress: 30 Days
- Kadence: 30 Days
- Astra: 14 Days
- OptimizePress: 14 Days
Hence If you do not like the theme for any reason, you can cancel it within guarantee period and they will refund your money.
However, I bet you that you will not need to take such action. No matter which option you choose out of four, you will love it.
Defiantly, there can be a learning curve to design a good and unique layout for your blog. Believe, you will get better day by day on theme designs once you start.
Step #2: Upload and Install Theme
Note: Process of Installing premium plugins and themes is same. When you purchase premium plugins/themes, you get a zip file, you need to upload and then install it. And final step is activation, which can be done simply clicking “Activate” option.
The only difference is when you upload theme, you go to Appearance option. And in case of Plugins, you choose Plugins option that is just below the Appearance option.
Let’s follow the below steps to upload a theme.
Log into WordPress Admin dashboard using this URL: http://yourblogname.com/wp-admin/ (replace yourblogname with your blog name as in my case I will replace yourblogname with updateland).
Go to “Appearance” and click “Theme”.
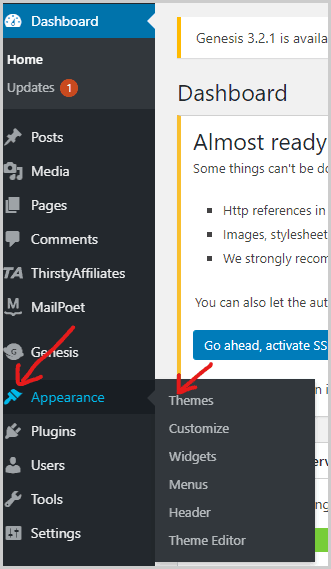
After Then you will see the “Add New” option at the Top. Click on it

After clicking, you will see the “Upload Theme” option at the top. Click on it and then you will have the “Choose File” option.

Click ”Choose File” to upload your WordPress theme, select the theme, click open, and finally after uploading the theme, click “Install Now”. This way, your theme will be installed. Now you are ready to customize your blog theme as per your requirements.
To Customize, Go to the”Appearance” option again, choose the “Customize” option and then it will take you to the Customize window.
Step #3: Install WordPress Plugins
WordPress plugins are handy when it comes to adding any new feature or functionality to your WordPress site. You just need a plugin for that. For example, if you wish to make your WordPress website completely secure, install the best Security WordPress plugin. That is it. Surely, you need to tweak some settings of the plugin, but there is no need to write codes. Is it not amazing?
Most of the necessary WordPress plugins are free. Installing a plugin is very simple. Go to Plugins -> Add New. Now you have two options: Upload Plugin and Search Plugin.
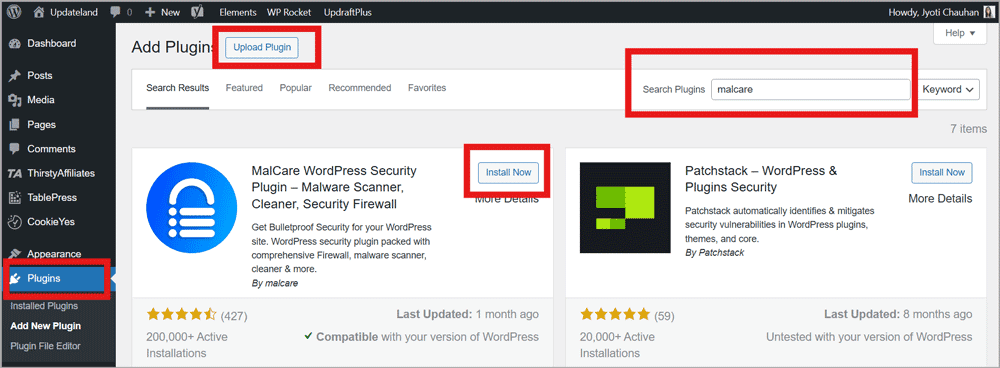
If the plugin you wish to install is premium, then use the Upload Plugin option. If it is a free plugin, simply type the name in the Search field and hit enter. WordPress will show you relevant results along with active installations, the last updated date, and the status of compatibility with your WordPress version.
Decide which plugin you wish to install. Click the “Install Now” and then the “Activate” option. This way, the chosen plugin will be installed.
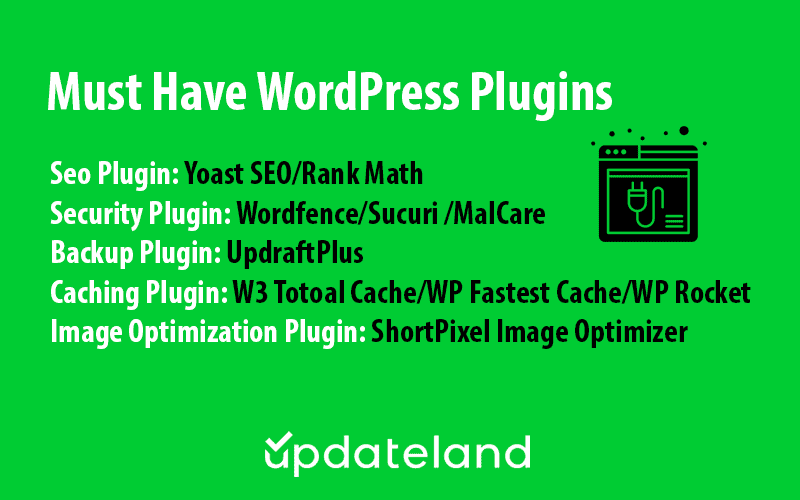
These are the plugins we use at UpdateLand.
Yoast SEO: To optimize our blog posts for search engines.
Alternative Option: Rank Math offers more features as compared to Yoast SEO and can be a good choice.
WP Rocket: To improve the loading time of our blog and optimize for core web vitals. It is one of the best caching WordPress plugins.
Alternative Options: W3 Total Cache, WP Fastest Cache, WP-Optimize, and LiteSpeed Cache
Table of Contents: To create a table of contents for each blog post automatically so that readers can easily navigate through detailed guides.
Wordfence Security: To protect our blog from day-to-day attacks. It is one of the most popular security plugins. It offers you amazing features like 2FA, limits login attempts, scans for malware, and sends you notifications via email for any kind of vulnerability or security threats.
Alternative Options: Sucuri Security, MalCare, All-In-One Security (AIOS)
UpdraftPlus – To take backups of our blog frequently.
GP Premium: To design our Blog theme as we are using GeneratePress theme. It is only needed if you go with GeneratePress.
ShortPixel Image Optimizer: To optimize our images automatically. However, we optimize our images before uploading too at our end for better loading time.
ThirstyAffiliates: To manage ugly affiliate links.
Currently, you can install the plugins listed above on your WordPress blog. As your blog grows, you can install more as per requirements.
Note: Only install essential plugins on your blog, as having too many plugins can slow down it. For instance, if you are not going to use affiliate links, you can avoid installing ThirstyAffiliates plugin.
Now, you’ve successfully set up your WordPress blog.
Time to optimize it for Search Engine Rankings.
Part 4: Optimize Your Blog for Search Engines
Step #1: Install SEO Plugin (Yoast SEO or Rank Math) and Configure Its Settings
I am using Yoast SEO to show the steps.
First, install Yoast SEO if you have not done so now.
After installing, complete the first-time configuration by going to Yoast SEO -> General -> First-time configuration. Add details about your blog such as name, logo, and social profiles.
After completing this, Go to Yoast SEO “Settings.” And enable/disable settings as needed. If you are completely new to Yoast SEO, follow the below instructions.
Site Basics: Add your blog name and tagline (gives info about your blog in a few words). Also, choose a title separator (- and | are used most widely).
Site Representation: It will fetch the details from the first-time configurations settings, if you see empty fields, add the details
Site Connections: Add verification codes here for Baidu, Bing, Google, Yandex, and Pinterest.
I am showing the exact steps for verification on Google Webmaster tools. In the same way, you can verify others too.
First of all click “Google Search Console” option.
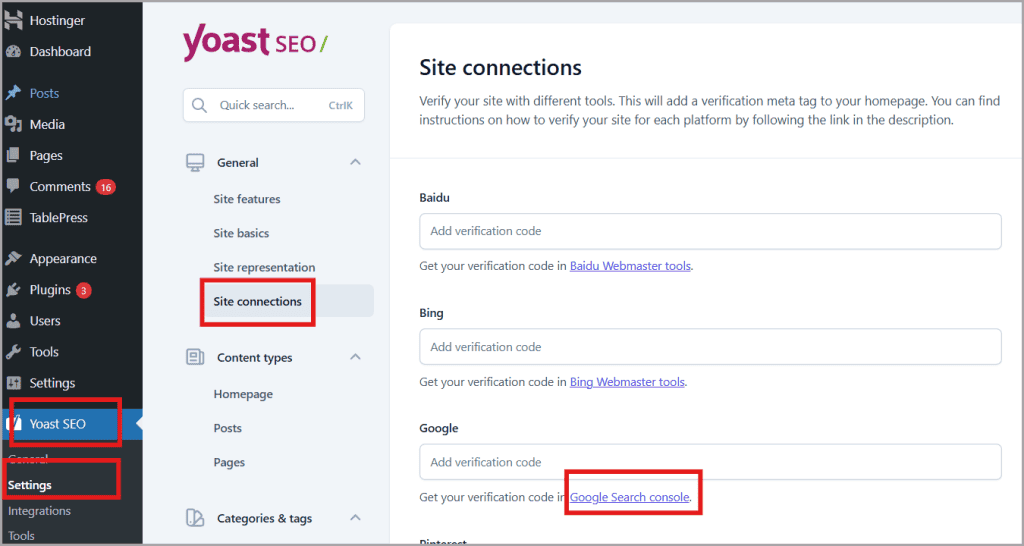
After clicking, you will need to log in to your Gmail account. If you’ve already logged in, click “Alternate Methods” and select the “HTML tag” option.
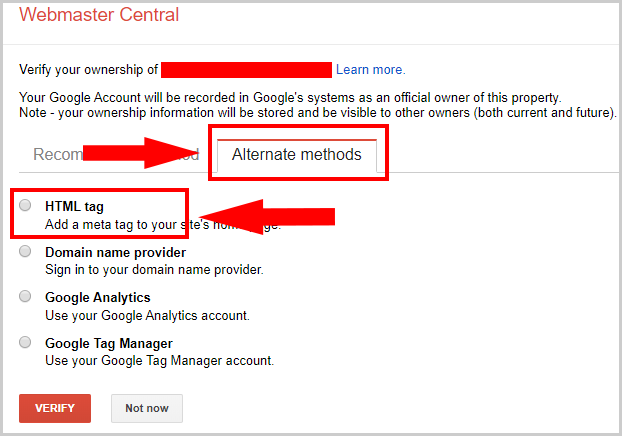
After clicking, you will have a new drop-down with Meta tag properties. From this code, copy content value or alphanumeric string without inverted commas.

Paste this into the “Google Verification code” field under the “Site Connections ” tab. And then click “Save Changes”.
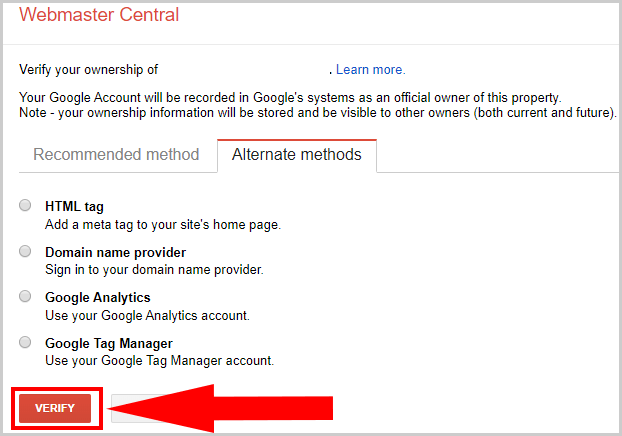
Now click “Verify”. And now, your Google Webmaster Tools configuration is done.
Homepage: Add your homepage title, meta description, and image for search engines and social media.
Posts & Pages: There is nothing to change, default settings work smoothly.
Categories: Disable categories in search results, enabling them can cause thin content or duplicate content issues on your blog.
Tags: Disable them too
Breadcrumbs: Enable the “Bold the last page” option, the rest are good.
Author Archives: Disable it.
Date Archives: Disable it.
Format Archives: Disable it.
Step #2: Set Up Blog Post Permalinks
Permalinks are your blog post URLs.
They play an important role in SERP (rankings). Google love short and descriptive permalinks. (This is why I said categories are important, they may reflect in your URLs and that affects your SEO.)
Go to “Settings” in the left side and then click “Permalinks”.
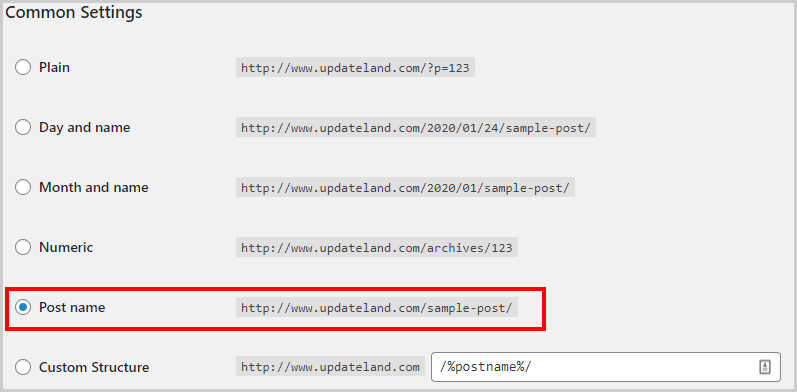
Select “Post Name” and hit Save Changes. Post Name format is the most widely used format. I also use the same format here at UpdateLand.
Now, your blog is optimized for search engines. Time to write your first blog post or in other words, start blogging? Let’s jump to the actual “How to blog” part.
Step #3: Write your first blog post, Optimize for SEO and Publish
For writing a blog post, first you need to get a keyword research done.
In simple words, by doing keyword research, we find a keywords around which we write blog posts.
For example: For this post, the keyword is how to start a blog.
If you are thinking why you need to do keyword research, let me help you with this.
Keyword research helps you in knowing how many people are searching for a specific query.
I remember my initial blogging days, when I ended up writing blog posts with zero searchers.
I will recommend you check this guide on keyword research.
If you already have some idea regarding keyword research, you can write your first blog post right away, simply follow the steps:
- Login to WordPress dashboard https://yourblogname.com/wp-admin/
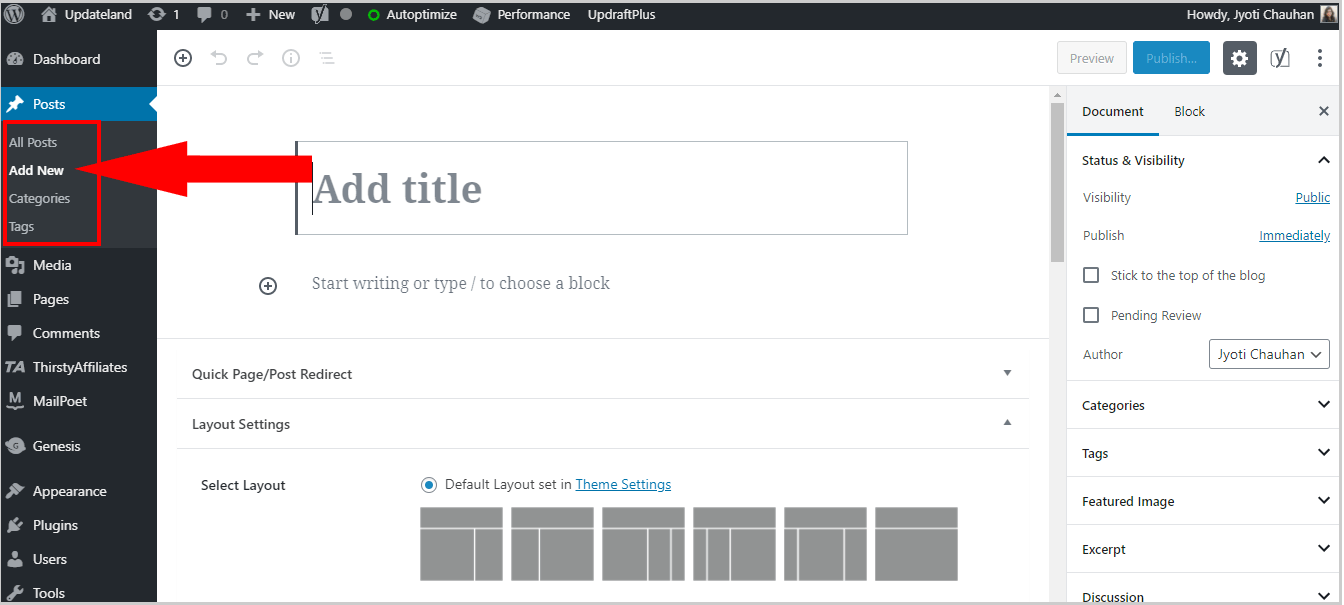
- Now click on Posts.
- After clicking on Posts, you will see four options: All Posts, Add New, Categories, and Tags. You need to click on “Add New” Option. After clicking, you will be redirected to the editor.
Now you are ready to write.
Enter a title of your blog post in the first section.
And, the second section is for blog post content.
You can use “plus into circle” symbol to add block like heading, paragraph and image etc.
If you are find this process a bit complicated, you can simply write in Microsoft doc or any other offline text editor, and paste it into the WordPress editor (I mostly do the same).
Once you are done with the title and content, click on “Save Draft” option at the top-right to save the content you have written.
Now, it’s time to add Meta descriptions, keyword and modify permalinks.
To do the same, scroll down on the editor. And you will find Yoast SEO.
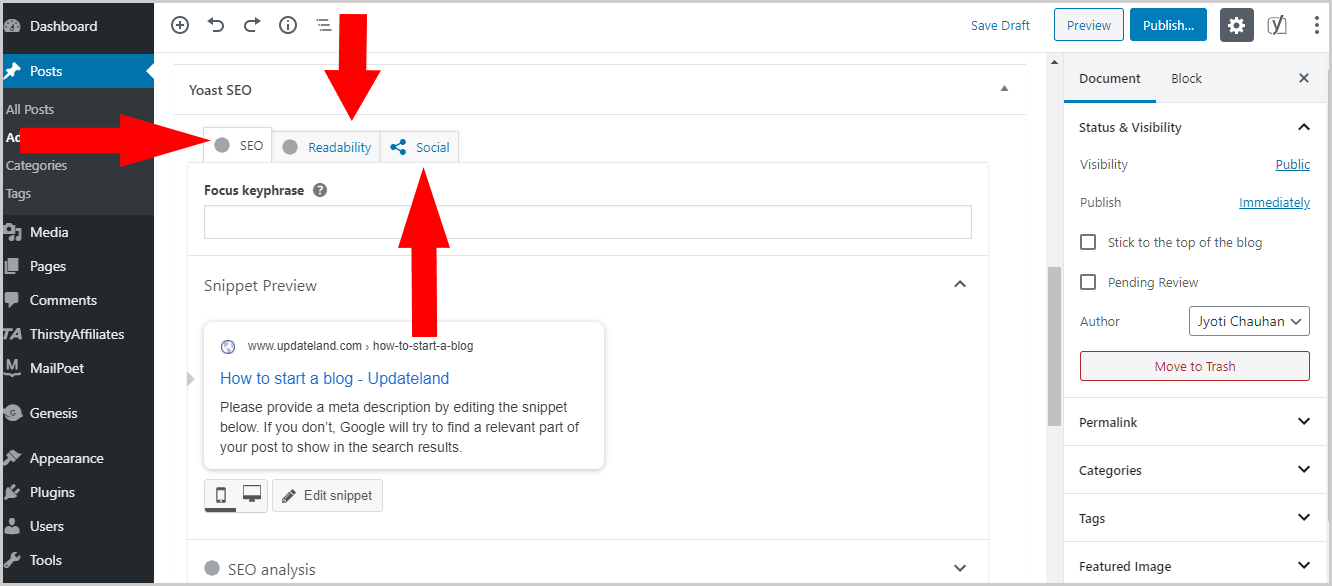
At the top, you will see three options: SEO, Readability, & Social. Click on “SEO” and enter your primary keyword in the focus keyphrase field.

Now click on the “Edit snippet” option.

After clicking, you will see three fields: SEO Title, Slug, & Meta Description as shown in below image.
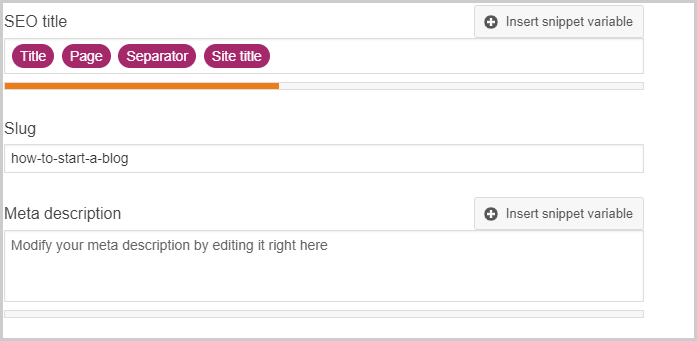
Let me explain these terms for better understanding.
SEO Title: SEO title is the title which shows on the search engine result pages.
Better you optimize it, more the chances to rank (it’s not the only factor which determines the rank, but it matters to huge extent). Note that it can be different from the Blog post’s title, but doesn’t necessarily have to be.
Slug: It tells you how your blog post URL will look like. Keep it short. Avoid stop words (Examples a, an, the, and etc.) and year also.
Meta Description: Meta description gives a brief to users about your blog post. And, it displays in search results. Every time you write Meta description, ensure you place your primary keyword at the starting of the description.
It should be unique. Thus, try not to copy meta descriptions from other blog posts.
Next, click on SEO analysis to see Analysis results. It shows problems, improvements and the good results for your post.
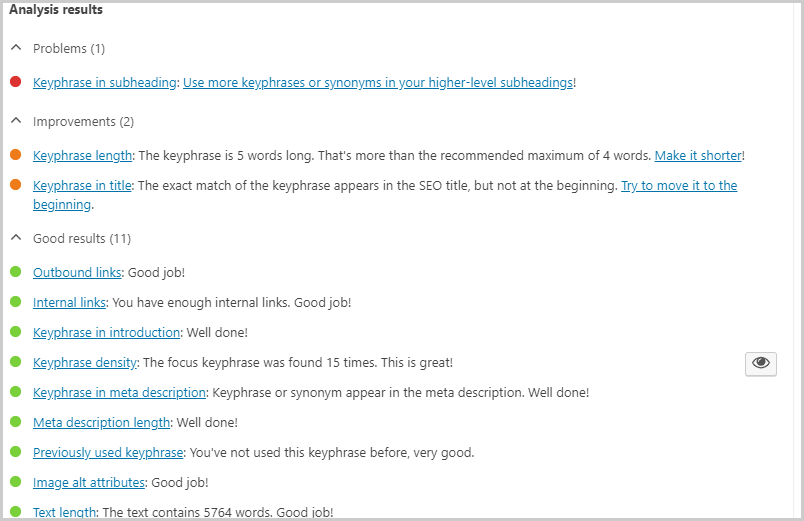
If you think, you can implement suggestions, that’s great but don’t do anything blindly.
Green light shows you are doing great. Red indicates there’s room for improvements.
With the help of readability analysis, you know how readable your blog post is. If you are getting a red score, you should consider taking Yoast SEO’s suggestions.
I will simply advise you to write short sentences to avoid confusion. Always use conversational tone. Simple is best. Make sure everyone can understand your words.
Social option will help you set a Title, description and image for Facebook. If you want to show some specific image and Meta tags then you can make changes otherwise leave it blank.
Featured Image, Categories & Tags Settings
You will find featured image, categories and tags options in the right side of editor under the document option (as shown in image).
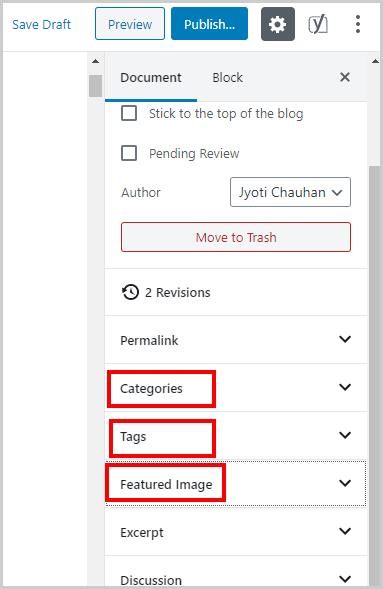
To add featured image, click on featured image > set featured image > Upload files > Select files.
Now, you will see a new window to choose an image.
Go to the specific folder where you have the image. Select the image and click on the “open” button. Now, add alt text in the field of Alt text and click on Set featured image. It is done. Notice how easy it was?
To add categories, Go to Categories > Add New Category.
Then you will see a field named “Add New Category”. Enter category name and click on Add New Category button. This way, you can add all the relevant categories to your blog.
To add Tags, Go to Tags. You will see here a field named “Add New Tag”. Add all relevant tags here (I personally add 3 – 4). Tags are closely related words to your keyword.
Finally, your first blog post is ready to go live on the web. Click on Publish button (at top in right side). And it is done.
Now you know how to write & publish a blog post with WordPress. Time to learn how to promote it on social media to bring instant traffic. Let’s jump in.
Part 5: Promote Your Blog Post on Social Media
Social media plays important role when comes to driving instant traffic to your blog.
Popular social media platforms that send huge traffic to your blog are Facebook, Twitter, LinkedIn, Instagram & Pinterest. To promote your blog on social media, you need to creat social media handles and join relevant groups/communites. Let’s start with social media handles.
Facebook Fan Page Creation for Your Blog
To create your blog handle on Facebook, first login into your account.
Now you will see Create Option at top into right side. Click on it and after this click on the Page option. Then, you will see two options: Business or Brand and Community or public figure.
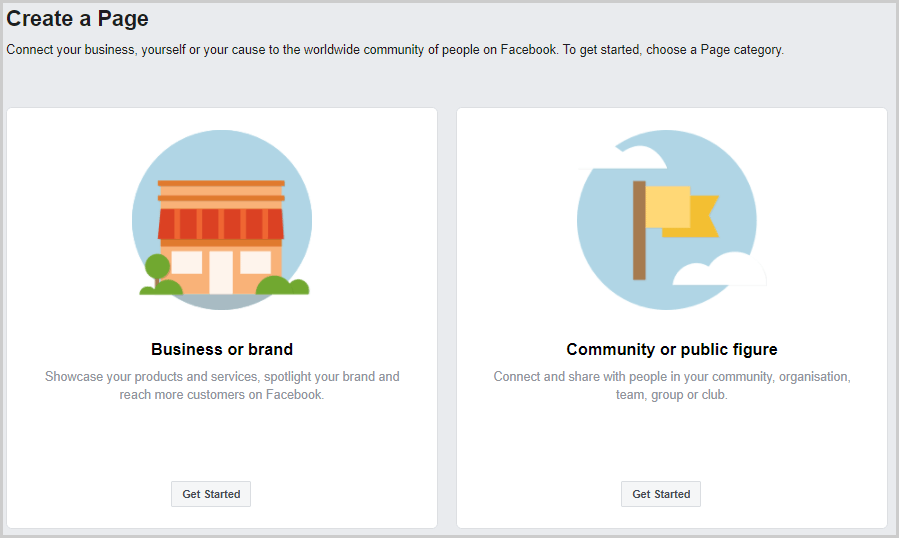
You need to first choose one Business or brand. Now, click on the “Get Started” button. Then, you will see two fields named “Page name” and “Category”.
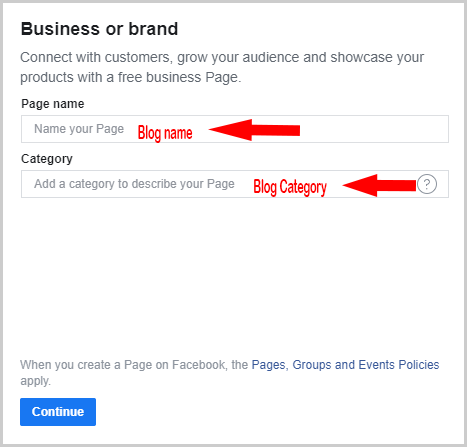
Your page name should be the same as the name of your bog. And category can be the niche of your blog.
E.g. If you are going to write about travel, then write travel in the category field and click on continue. It will show all the relevant categories, choose one which describe your blog best.
And then, click on the “Continue” option. Now click on the “Skip” option and again “Skip”. Don’t worry you can add an image later.
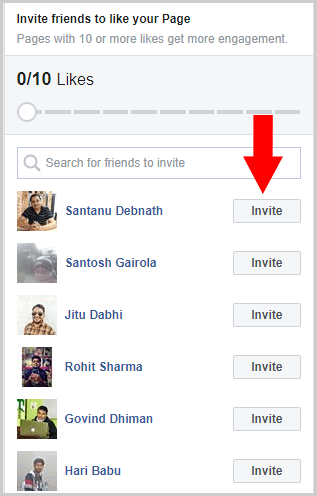
Now, you can see a new page with your blog’s name on it. Now, Upload a cover photo and profile photo. It should represent your blog name. And, invite your friend to like your page.
Inviting options are available on the right side (the screenshot will help you understand better). Click on the “Invite” button and it is done.
Create Twitter Handle for Your Blog
The process to create a Twitter handle is the same as registering a personal account on Twitter. The only difference is, you enter the name of your blog instead of your own for the account.
If your blog name is unique, and isn’t already registered, your Twitter profile URL will be something like- www.twitter.com/yourblogname.
If there are numbers or other changes to the URL and it’s not exactly your blog’s name, it means the username isn’t available.
Remove the numbers, and make it something unique.
Here are some initial that you can use to come up with a perfect handle:
- Thisis
- The
- Real
- Ask
- Iam
If above initials don’t sound good with your blog’s name, consider adding the following words as suffixes (at the end)
- Blog
- Official (only work for short blog name)
To change your username, Click on More > Settings and Privacy. Then, you will see the “Username” field under “Login and Security” at the top-right. Click on “Username” and make changes. Then save.
Create LinkedIn Fan Page
To create LinkedIn fan page for your blog, first of all login to your account. If you don’t have one then register now and wait for 8 days. To create a company page, your account should be 7 days old.
Once you’re logged in, click on “Work” option then you will see a window on the sidebar. Now, scroll down, at the bottom you will see an option named “Create a Company Page”. Click on it.
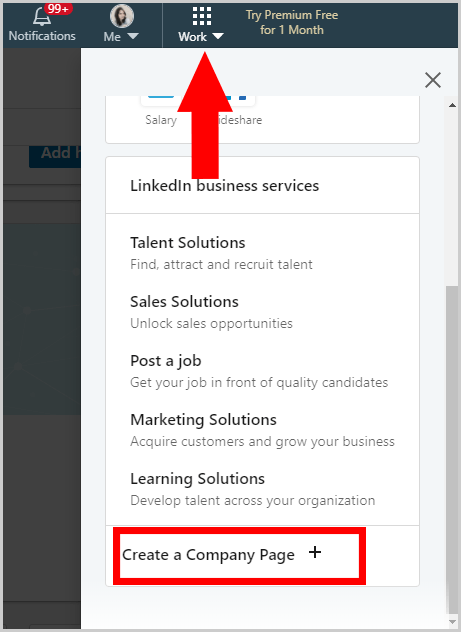
Now you have four options (Small business, Medium to large business, Showcase Page & Educational institution) to choose from.
Click on “Small business” and enter all the required details & upload your blog logo. Then, click on “Create Page” at the bottom..
Note: Upload banner that describes your blog perfectly.
Page creation is done.
Now you know how to create page to promote your blog on Facebook, Twitter and LinkedIn.
Creating fan page on Instagram and Pinterest are quite similar. And I am sure you can do that yourself without my help. In case, you do get stuck, drop a comment below and I’ll help you out.
Time to move towards the next step.
Groups/Communities are great sources to drive instant traffic to your blog post and increase brand awareness.
Here’s how to join relevant groups on Facebook.
It is very easy process.
Enter relevant keywords in the search box, then click on Groups and Facebook will show a list of relevant groups.
For example: If you blog is about SEO, then you can enter keywords such as SEO, Link Building, Search Engine Optimization, Digital marketing etc.
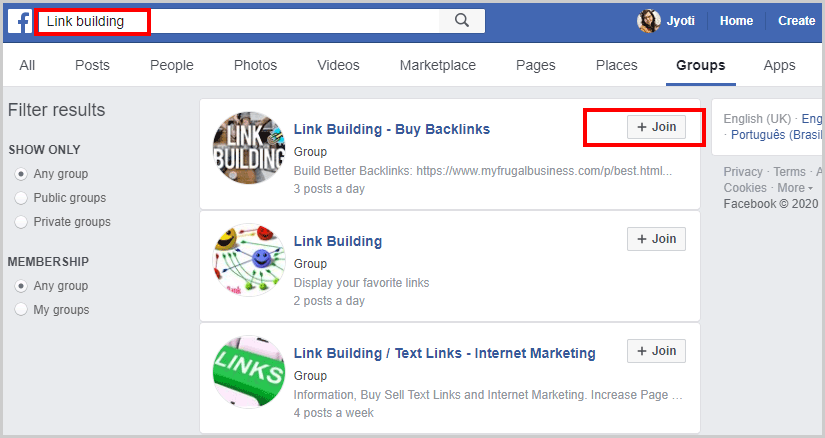
Click on the “Join” button to join groups. Once the group admin approves your request, you can share your blog posts and useful information with group members.
For LinkedIn, process of joining and searching communities is quite similar.
Note: Avoid sharing your post in more than 4-5 groups in a day to stop being banned.
If you share the same post in more groups in a day, Facebook blocks your blog URL. After that, you can’t share your blog URL even in chat with friends.
Networking plays an important role in blogging. Hence, I will advise you to start making real connection (not just friend on social media) with other bloggers in your niche from day one.
Here is what I did to connect with bloggers when I was new to blogging.
I sent request to popular bloggers, few of them accepted. Then sent request to their friends (who are bloggers).
If you don’t know popular bloggers in your niche, you can google.
For e.g. if you are starting a travel blog, then you use queries like Top travel bloggers to follow at Social.
Once you’re friends with them, share their blog posts. In return, you will receive some shares for your blog posts eventually.
After publishing a blog post, you can drop a message to your friends and ask them to share it.
Before asking, make sure you have already shared their posts previously.
It will increase chances of your post being shared. Everyone love to return a favor. Exceptions are always there, ofcourse.
In fact, few bloggers have a pretty big number of fans/readers. So, if they share your blog post with their followers, you will get massive traffic and great exposure to your blog.
Now you know how to promote a blog on social media. Time to jump in towards next step of this guide on how to start a blog.
Part 5: Create Backlinks for Your Blog
Backlinks are important as much as content for your blog.
Here, I am going to discuss some link building strategies for your blog.
Directory Submission: Directory submission is still an effective technique of link building. it provides permanent backlinks. Every directory submission site has own guidelines so always read the guidelines before submitting your website. I shared this Directory Submission Sites List and guidelines on how to do it.
Social Bookmarking: Social Bookmarking is the best way to get instant backlinks for blog posts. It’s helps with faster indexing and also with driving traffic to the site. Use only the best sites like Reddit, Mix, and Pinterest etc.
Blog Commenting: Blog commenting helps building relationships with other bloggers. Is it not cool? Always ensure you are adding value to the post or providing honest feedback about blog post. Don’t spam the comments just to get links.
Forum Posting: Forums are more of a source to connect with targeted audience than a technique of creating backlinks. A few forums allow you to insert links in signature or in profile, a field named Homepage.
Steal Backlinks Sources from Competitor: It’s a really cool technique, I hope you’ll love this. First, find out your top 10 competitors with the help of SEO tools, then, check their link sources and find the sources from where you can build links to your blog.
For example, Someone is linking to their blog post, you can reach out them if you have an quality article on the same topic or they are using some forums which are allowing them to place the link, you can do same for your blog.
Hope now you have pretty good idea how spying on competitor can work in building backlinks.
Part 6: Monetize your blog
Here are the best ways to make money from your blog.
- Affiliate Marketing
- Placing Ads
- Sponsored Review
- Offering Your Services
- Sell an ebook
Affiliate Marketing
My favorite method to make money from blogs.
I’ll advise you to focus on affiliate marketing from day one of your blogging journey.
Affiliate marketing is a process to promote a product and earn a commission when someone buys a product using your affiliate link.
Affiliate link is a tracking link that you get when you join any affiliate program for a product.
Some affiliate programs offer one-time commission and some offer recurring commission.
One time commissions mean you get money once when someone buys a product using your link.
Recurring commission means you get money every time when referred user pays. This creates an automated, repeated source of income.
Now you know what affiliate marketing is and how it works. Time to make money.
To earn money from affiliate marketing, first, you need to find the best affiliate programs & networks.
Don’t worry, you don’t need to spend hours to find the high paying affiliate programs & networks.
I am listing them below. 🙂
Best Affiliate Marketing Programs & Networks
- ShareASale
- ClickBank
- Amazon Associates
- eBay Affiliate Program
- Impact Radius
- Avangate
- CJ Affiliate
- Awin
- Flex Offers
- MyThemeShop
- Thrive Themes
- Semrush
- Grammarly
- BlueHost
- SiteGround
- WpEngine
- GetResponse
- Aweber
Now you know best affiliate marketing programs and networks. Time to take action.
So why are you waiting? Join them right now and start promoting.
Placing Ads
Another easy way to make money from a blog is by placing ads.
Google AdSense is one of the best ad networks that pays good money to place ads on your blog.
It pays based on CPC (Cost per Click). This means you get paid whenever someone clicks on an ad.
For placing Google Adsense ads on your blog, you need to apply for Google AdSense.
They manually review your blog and then decide to approve/disapprove your blog.
There are several alternatives to Google Adsense in the market. But no one can beat them in terms of the amount they pay.
In fact, they show relevant ads on your blog. While other networks’ ads are irrelevant, spammy and cheap.
So, try to get your blog Adsense approved.
If you have hard luck, you can give a try to Media.net, a true Google Adsense alternative.
Media.net offers CPM (cost per thousand impressions) ads. Ads are relevant to your blog content.
Sponsored Review
A quick way to monetize your blog.
Sponsored Review is a process of reviewing a software/service on your blog and get paid in return.
If you have a blog with decent traffic, advertisers will reach you.
In other cases, you need to reach out.
Here are some quick tips which you need to implement to get more sponsored review requests.
- Give a professional look to your blog by using a premium theme
- Get a well-designed logo
- Create a Contact, About Me & Advertise page
- Add Review Category
- Publish 4 -5 detailed review articles
- Reach out to brands that are reviewed recently by fellow bloggers
Here are some things which you need to remember while accepting/publishing sponsored review request.
- Product/service should be relevant
- The review should be honest, even if it’s sponsored.
- Give nofollow backlinks only
- If you decide to give a dofollow backlink (in an exceptional case), link it to the brand name only and also ensure that you give backlinks to at least 2 other high authority websites.
- At least 50% of the payment should be in advance.
Offering Your Services
If you’ve a specific skill-set, start offering your services to your blog visitors.
Use your blog as a platform to sell and make money online.
Create a “Service” page and list all your services there.
Ensure the service-page is accessible from home page.
Apart from your blog, you can sell you services also at websites like Fiverr.
Sell eBooks
Several PRO bloggers are making passive income by selling their eBooks.
If you know something that will be useful for your audience, you can write an eBook on the topic and sell it on your blog.
These were all best ways to make money from a blog.
I will advise you to focus on #1 Affiliate marketing from day 1 of your blogging journey to make passive income from your blog.
And thus, I have reached the end of this guide.
Now, you know how to start a blog in 2025 and earn around or more than $1000 every month.
My job is done. And yours begins.
If you face any problem when trying to start your blog, drop a comment right now. I will love to help you.

Hello Jyoti,
This is very helpful guide for newbies and also for old blogger. You covered all of method which help to make new blog and after it monetize it to make money.
Thanks for sharing
Cheers,
Vishal Fulwani
just wow. A complete n detailed guide i have ever read,its pretty much useful for newbies and you have explained each points in detail.
I used to see this kinda posts in shoutmeloud only but this post is better than any other posts on this same topic.
Congrats miss.chauhan for writing such an useful post. I guess you might have spent many hours to complete it,one thing i want to ask how to make quality image for blog post?
Means where to get free stock images,any light software to edit pics except photoshop ??
Hello Jyoti, Thanks for share your complete guideline with us. AS well, i am newcomer Blogger i am always searching for Blogging Guideline that will make a good carer for me as a Blogger. To be honest, By reading your this article, learn a lot’s of points. Today, i am following follow your these steps one by one .
Cheers
Hi Jyoti,
Nice to be here again,
This is indeed a timely piece
As i mentioned in one of my
comments here, most of my
blog needs (technical) are taken
care of by one of my friends.
But now I feel that i need to know
myself many things which i do not know
This post has come as a handy one to me
on this issue, I am bookmarking it for my
further study and use, Thank you so much
for this informative post.
Good, this is indeed very useful to me,
Keep sharing your knowledge with others!
Good Wishes and Best Regards
~ Philip Ariel
Secunderabad
Hi,
Nice and very informative article. I would like to know that ‘how i can improve CPC & CTR’. I have recently got the approval of AdSense. But did not make more money.
I have written 50 plus article. Suggest any tips to improve CPC & CTR.
Thanks
Hi Jyoti
Thanks for that very informative guide that will surely help new bloggers.
Enjoy the rest of your week, Joy
Thanks for very interesting guide helpful article
Thanks!
Hello dear, Came to visit your site after I read your views on blogging tips. It is a pleasure to come to know about your site!
Great information jyoti
Wow such a great article for newbie like us very helpful thank’s
Glad you found it helpful for you.
Thanks Varun
Hi Ashok,
First of all, I would like to welcome at Updateland! I am happy to see you. Keep visiting and learning 🙂
Glad you found it interesting!
Hi Joy,
There are several people who want to start blogging but don’t know from where to start. I shared this guide for newbie. I hope they will find it useful.
Thanks to stopping by and leaving your feedback.
Hi Rajesh,
Increase your blog traffic first, no. of articles doesn’t matter, know how many articles are ranking at first page of Google.
Hi P V Ariel,
Welcome again at Updateland! I am glad you found it useful for yourself and bookmarked for future. Keep coming to learn more blogging tips.
Hi Tonmoy,
I am glad to know you found it useful for you and you are following one by one. Keep coming and learn more bloging tips tricks.
Wish you good luck for your blogging journey!
Hi Vishal,
Many times, I got requests to share complete blogging guide and emails for how to start a blog so it is complicated to reply everyone with complete steps so i decide to write this guide for newcomers.
Thanks for stopping by and leaving your feedback.
Hi Dilpritam,
Nice to see you again! Thanks for your good words. yes, I have spend so much times to craft this blogging guide. I personally use canva to make images.
Hi Jyoti,
Thanks for the quick reply,
Indeed the internal links are
very useful,
Thanks again for sharing this
informative and educative post
Keep sharing
~ Philip
hi
Great post!! For any website, we need to know certain tips and you have shared tips on it.Thank you very much for discussing sharing interesting tips.
thank u
Hi Jyoti
I have already read so many comprehensive tutorials on starting a blog and earning money with it. So with this thought in mind when I tried to glance your post fast I could not have done so because of the quality of images and relevance of sub headings.
So I gone through the whole post and especially your points with regard to Blogger blog and WordPress blog for offering full liberty to your readers to opt from the two platforms.
Internal links in the post are also so relevant and do have much info in addition to this comprehensive tutorial.
Thanks a lot for sharing this valuable resource.
Hi Mi Muba,
Nice to see you at Updateland again, I have write this guide especially for newbie who don’t know how to start blogging and after stating what to follow.
I am glad you have gone through whole post.
Thanks for stopping by and providing your feedback.
Hello
Dear Jyoti
I am really confused that how to express thanks to you because,
I got this content as much helpful for me to create a solid and impressive blog………..thank you.
Hello Jyoti
Great idea this is really a valuable post.
I got this content as much helpful for me to create a solid and impressive blog………..thank you.
Well first of all I’d like to thank you for sharing such a wonderful and details guide on starting a blog and earning money from it. Well when I started my very first blog it was really heard to find all the necessary resources. But newbies can take good advantage from this post and start their first blog sooner.
Thanks for share.
Hello Jyoti,
Today every body want to make some sort of income from the online source. But the idea of manking real money is know to only few. I think sharing such useful article is really going to benefit many such online bloggers who wish to make some money through blogging.
Thanks for sharing this information!!
Amit
Nice and very informative article. I would like to know that ‘how i can improve CPC & CTR’. I have recently got the approval of AdSense. But did not make more money
Thanks
This is absolutely informative post. Lot of labor has been made by author for new blogger. Complete guide for them and very easy to read. Log of helpful links which will help to improve on search engine.s
Hi Westen,
I am glad you found it helpful for you. Keep visiting and learning with Updateland. 🙂
Thanks
Hi Christy,
Every newbie face lots of problem since s/he don’t know how to start and from where to start. That’s why I wrote this guide. I hope they will find it useful.
Thanks to stopping by 🙂
Hi Amit,
I agreed with you everyone want to earn money online and can earn also only need to follow proper guides. I have got couples of questions how to make money starting a blog and finally I came with this.
Thanks to stopping by and providing your feedback.
Vivek, first you need to improve your website traffic. Can i know how much traffic you are getting currently.
Hi Rohit,
Yes, I have done very hard work to craft this blogging guide. Since I am getting many query everyday how to start a blog and earn money. it is very hard to job to define complete proceed in chat or phone so I decide to write complete guide. Now I easily send everyone to this guide.
Thanks for stopping by and leaving your feedback.
keep connected 🙂
Hi Jyoti,
This article is written in very simple language and everything explained in very easy manner. Great Stuff. I think you can also give tutorials @youtube. Design this proper course in pdf format and then launch in all India with help of government Entrepreneurship institutes.
This will give certificate and money both.
If need any help, contact me anytime.
Thanks for sharing this useful informatin. This is really an great article
Helpful for me 🙂
finally i found correct information about bolgger thanks
Hi JYOTI ,
You guide all things in one post it is very helpful new blogger who is new in blogging and helpful for me Thanks for sharing with us keep up it
Have a nice week Ahead.
Thanks for sharing this topic…. nice
Hi Jyoti,
This is an awesome article for a beginner. But I think if it is blogging for money, then it is always better to start a blog with self-hosted WordPress platform and target a profitable niche. What do you think?
Thanks for sharing this …but actually already i started one year back Blog & seo but i did’nt get any money through adsense is not approved so how can i proceed? can you help me what the roles are applying to my blog? am waiting to your reply.
Hey Jyoti,
This is a great tutorial for anyone who is starting into blogging,
Starting free blogs aren’t a bad idea, but they should be run as a side resource – more like micro blogging. Sites like tumbler are great for building an audience and it can help in bringing traffic to the main blog as well.
Would like to see more posts from you, I see that you don’t post much these days?
Hi Jyoti,
Really a very useful article for bloggers like me who very confused to start blogging from blogger.com or wordpress.com. after reading this every thing is well understood thanks so much
Jyoti, how are you doing today..? I hope you are doing well. I just went through your FB group and found you. I click on it and arrived here, on your blog.
What’s amazing day is day…! I found an awesome blog post here. thanks for sharing..
Honestly, the above is really amazing for newbie bloggers to start their online business with blogging. Choosing domain and hosting service are the most important fundamental for getting start with blogging.
You know..? When I first started my blog, I never knew about this. I did mistake with choosing wrong domain and hosting service. I’ve got a lot of problems at that time. Hence, I assumed that the above are really the most important and step by step guide.
Thanks for sharing, I love additional information provided from your links. They are almost brilliant ideas..
Have nice day..
Hello jyoti madam,
This is really a good article and will help many new bloggers…….
Thanks for full guide of make money with blogging this very helpful guide for newbies like me.
Hello Jyoti,
Thanx for sharing this detailed article with us. I wanna just say awesome detailed article.
Hi Jyoti,
Great Stuff. Many many thanks for sharing this very informative article. Jyoti,I would like to know that How can I make money with my blog at Jobsnexams which I have started in the year 2014 but still I have not got the approval of AdSense. Awaiting your reply.
Thanks for such information. I wish to start blogging. I Need some more information.
Thank you for such a detailed post.
Hi Jyoti,
Really an Awesome Article….!!!
This is really so helpful for all bloggers especially newbie like me. you have explained all the required points in a very effective way.
Thank you for sharing such a great information
All the Best…!!
Good Article Jyothi, this article was written with so much information that even a newbie can pickup what you actually wanted to tell them about blogging. I too started my blogging career with blogspot and still I have it as one my sources of income.
Thanks for this well framed article. Hoping to read more articles in your blog…
Hey thats really a nice guide, do you have your Ebook?
That’s a pretty neat guide for the beginners like me, Jyoti. I am still struggling with the monetization part. Probably, it is because I have not achieved the ranking yet. SEO and link building seems to be a more difficult task than anything else
Hey there! 🙂
Great work done.
Truly it’s Complete Guide. Thanks for sharing your genuine views and ideas.
I would love to see some more post of NEWBIES struggling.
Thanks.
I’d downloaded an eBook written by Neil Patel telling the method and procedure for having custom domain. But your way getting message across is more better than him I should say.
Hello jyoti,
Thanks for publishing great guidelines for initiator.even i learned so many things by reading a nice guidelines.I am fond of blogging but i couldnot get support till now.i hope u will support me.
THANKS Regards,
Shivam
Gurgaon
Good Article Jyothi, this article was written with so much information that even a newbie can pickup what you actually wanted to tell them about blogging. I too started my blogging career with blogspot and still I have it as one my sources of income.
Thanks for this well framed article. Hoping to read more articles in your blog…
Hello jyoti, when I came acrosd the post I said wow wat a great! This type of complete guide I have never read before. As you said bloggigging givrs the passive income. And it is true the blogging industry is growing rapidly. But can you say it is a good career option?
Hi Jyoti,
Wow !!
What a blog. I love this ………….. and the way you explain it.
Many time people know it very well but didn’t able to explain it properly.
Your simplicity make it simple to understand.
Now I know that blogging can earn money…. Thanks …. Thanks Jyoti.
Awesome post, starting a new blog is really easy after following this great post. Will surely forward this post to my newbie friends.
Thanks
Very nice blog. i am very happy to find your blog as i am new to blogging. Your article is a great help for new bloggers. A big thanks for sharing it.
Hi Jyoti, I am planning to start a new blog and have been searching good articles on the internet for the same. In your article, you have given the insight of how to start a blog, it shows your research and dedication in gathering knowledge regarding this topic. Keep helping the new bloggers like me with more articles like this.
Thank you
Its a wonderful post and very helpful, thanks for all this information. You are including better information regarding this topic in an effective way.Thank you so much
Great article Jyoti. You should also cover “theme and plugin installation, menu and widget creation” in this article. It will help the newbies.
Great work either way.
Inspirational stuff Jyoti, thanks for sharing. Being new in the blogging arena I have got a lot to learn about the strategies to grow my blog and start earning an income.
Hi Jyoti !
Perfect guide, I would rather say this how to start a successful blog.
I would also suggest everyone who has started blogging newly must have to go through with this amazing post.
Thanks for sharing such a practical helpful post.