For Everyone, who is into online business, the value of sending Paypal invoice is immense. In this comprehensive guide, I’ll tell you how to send a PayPal invoice and request money Paypal.
There are lots of people out there, who often gets confused about the difference between ‘send PayPal invoice’ and ‘PayPal request money’ feature. So in this article, I’ve decided to come with everything regarding Paypal request money vs invoice.
Bloggers, marketers, freelancers, and perhaps anybody who is involved in online marketing, very well know the importance of Paypal. Apparently, Paypal is the best online money transaction system. And one can easily receive and send money on Paypal for business as well as personal use.
But do you know what’s the best practice to ask for money on Paypal??
If you noticed, I’ve just used two terms above. The first one is Paypal invoice and the second term is Paypal money request. These two ways are the best ways to request money on Paypal, for professional as well as personal use, respectively.
Let’s figure out the difference between both the ways.
Table of Contents
Difference Between Paypal Request Money and Invoice:
The major difference between both features is the way they are used.
If the money request is for personal use, then the best way is to send a payment request. for instance, If I need some money from my friends, relative or someone with whom I’m not associated professionally, I’ll send them a money request.
But if you have some due payments to your clients, or if the money request is for the official purpose, then the best way to follow is to send an invoice. Yes, Paypal does offer to create and send the invoice via its in-built invoice feature.
And I must say, Paypal invoice is the best way to keep track of all the money transactions regarding your online business. In the invoice, you can add your company’s logo, invoice number, invoice date, item, service details etc.
And the best part is, both the ways are too easy to follow. Whether it’s about creating invoice Paypal or sending money request, both can be done seamlessly with least possible efforts.
So, now without any further ado, let’s move ahead to learn how to send Paypal invoice and how to request money on Paypal.
How to Send a Paypal Invoice & Request Money:
To make the things easily understandable, I’ve divided this tutorial into two parts. The first part is dedicated to teaching you steps for sending money request. And in the second part, you will learn how to send an invoice on Paypal.
Excited to learn how to send a Paypal invoice & request Money?? let’s get started with the tutorial.
Part 1. Money Request on Paypal:
Sending money request on Paypal is comparatively easy than sending the invoice. And it doesn’t take more than a few minutes to be done. To send the money request to your friends or relative on Paypal, all you need is just the email address of the request-receiver.
Or if you don’t know the exact email address, you can also use the phone number or name of the person. Let’s figure what is the exact step by step process.
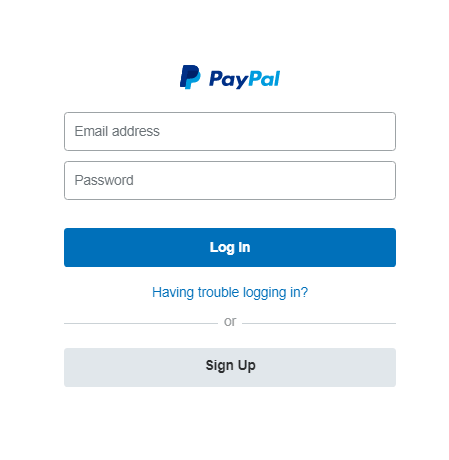
Step 1. First of all, you need to login to your Paypal account. So, go to www.paypal.com. Enter your credentials and log in.
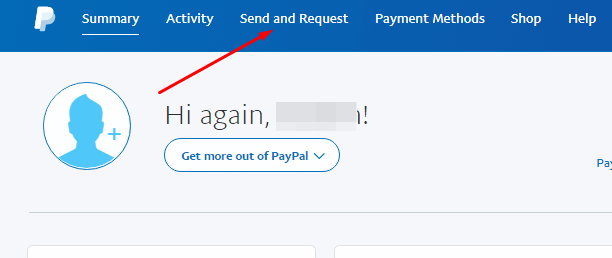
Step 2. After successfully logging in, you need to click on the Send and request option. The Send and request option is located on the top of the page, just beside the Activity option.
You can take help from the below screenshot to easily locate the option.
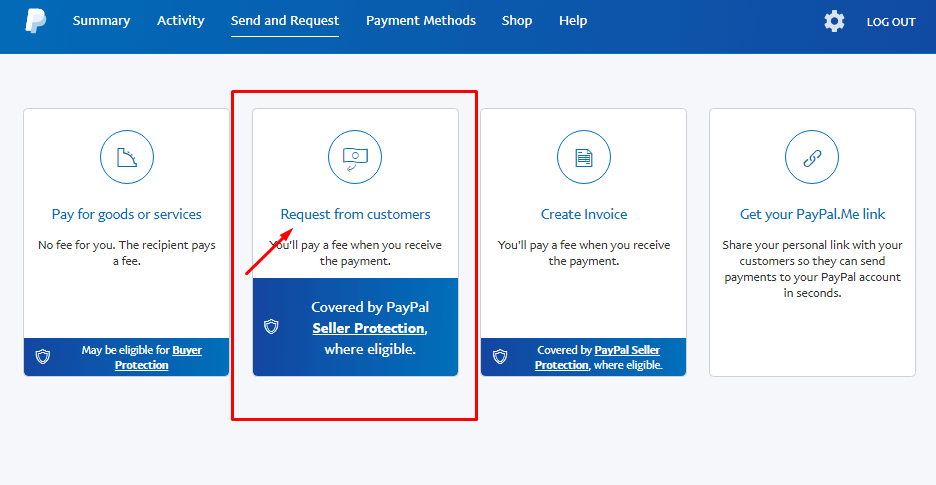
Step 3. On the next page, you will see four options out there. One of such options is Request from customers. Click on this option to proceed further.
Step 4. As you can see, there a big text field located on the top of the page. Here, you need to enter the email address of the person, you are requesting money from. It’s notified on the top of the page itself, that money can be requested from anyone around the world. Even if they do not hold a Paypal account.
Anyways, now just enter the name or the email address of the person. Once done, just click the Next button. See the screenshot below.
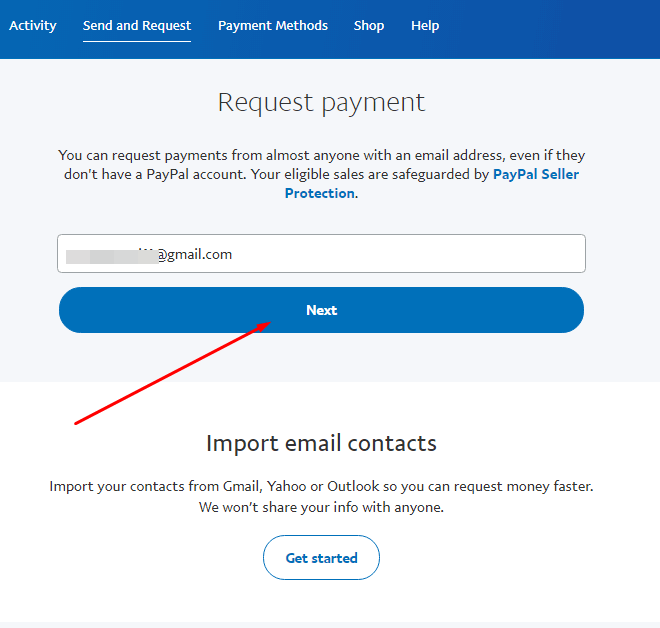
Note: You can also Import your contacts from Gmail, Yahoo or Outlook to make the money request process faster.
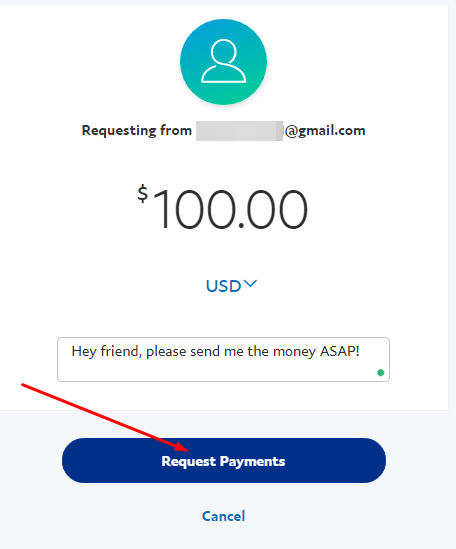
Step 5. On the next page, you need to enter the amount that you want to ask from your friend. For, instance, I’m writing the amount $100.
By default, the currency is set in $. If you want, you can change the currency as per your requirements. Once the amount is entered, there is an optional Note option. Here, you can add any of your desired note and click the Request Payments button.
I’ve grabbed a screenshot to help you understand the things better.
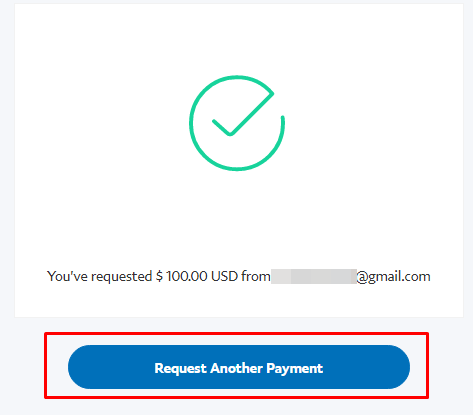
Step 7. On doing that, the very next moment, you will see a green success checkmark. This sign indicates that your money request is sent successfully. If you want to request another payment, you can easily do that by clicking the Request Another Payment button. See the screenshot below.
Step 7. Now, if you want to update the requested amount, cancel the money request. Or if you want to send a reminder to your friend, you can that too. For that, you need to go to the Activity tab.
There, you will be able to see all your pending requests like the below screenshot. Now just click on any of the options from Send a reminder, Edit amount, or Cancel to perform your required action.
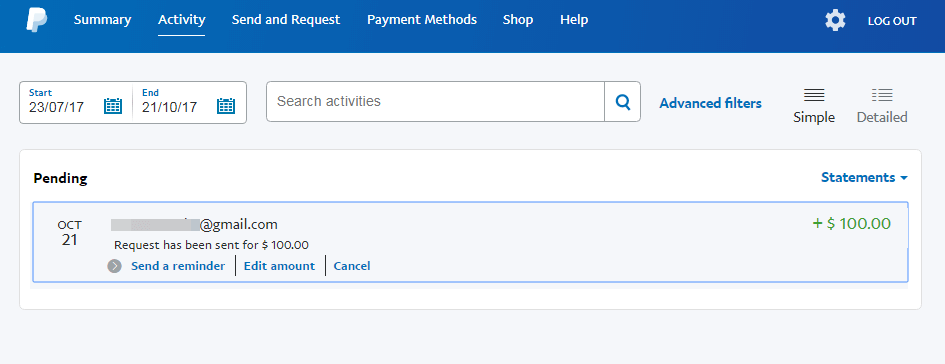
With this, your money request will be sent to the person.
How to Accept Money Request and Send Money??
By following the above steps, you can send the money request to your friends and customers. But if you receive a payment request, follow the below steps to send the money to your friends.
Step1: First of all, go to the Activity tab on your PayPal account.
Step2: There, you will see the received money request from your friend along with his Name and amount. Now click on the Send Payment option just below the request option. See the screenshot below.

Step3: On the next page, confirm the details. And click the Send Payment now button. That’s it. Your Payment will be sent to the associated person.
Now let’s move further to my next part of the tutorial i.e how to send a Paypal invoice.
Part 2. Paypal Invoice:
I guess now I’ve told you enough about the Paypal invoice. And I don’t find the need to add extra words to it. Instead, I’ll just come straight to the point to tell you how to send a PayPal invoice.
Let’s get started with the steps and figure out how to send a Paypal invoice.
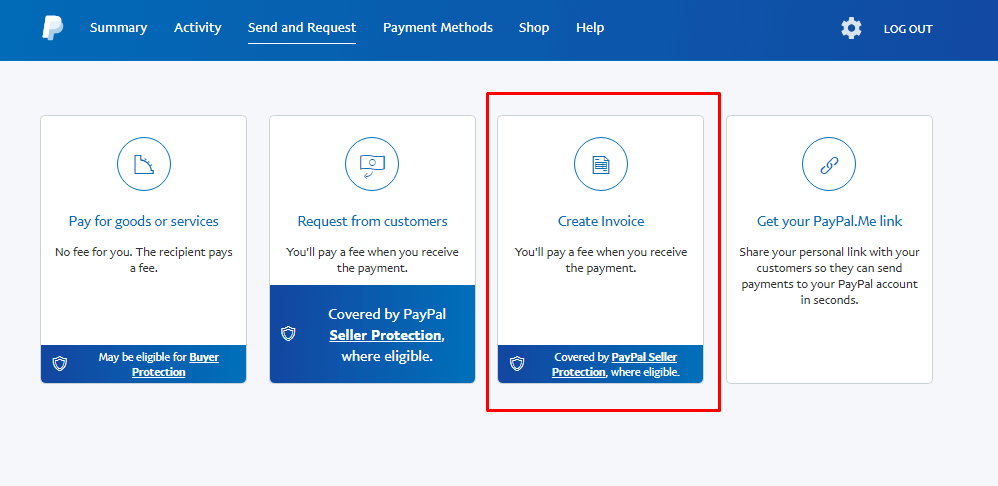
Step 1. The first two steps are similar to the request sending part of this tutorial. So first log in to your Paypal account. And click on the Send and Request option from the main menu.

Step 2. Now click on Create Invoice option. Have a look at the screenshot below.
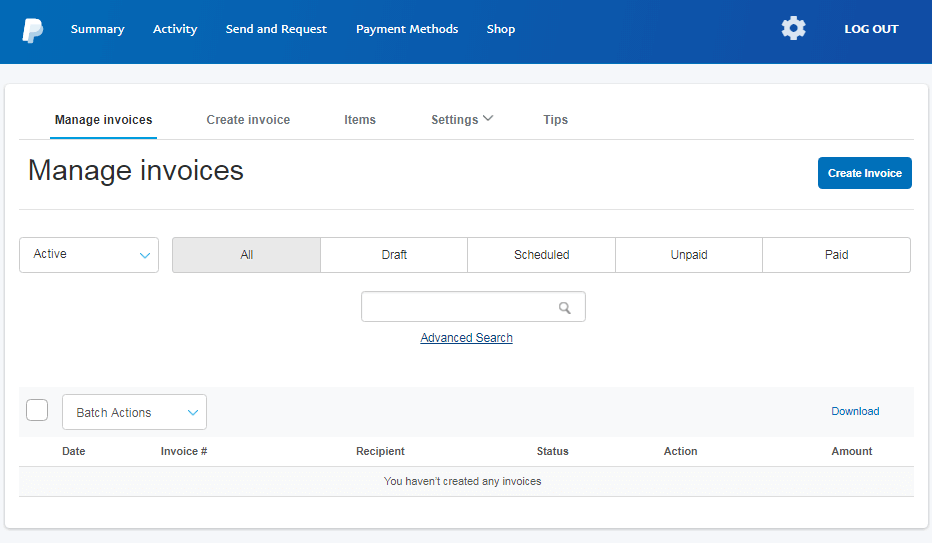
Step 3. In the next page, you will be landed on the Manage Invoices page. Here, you can manage all the previously created invoices. But since you are here to learn how to send a PayPal invoice and it’s your first invoice, you won’t see anything there.
The ‘manage invoices’ page looks like the below screenshot.
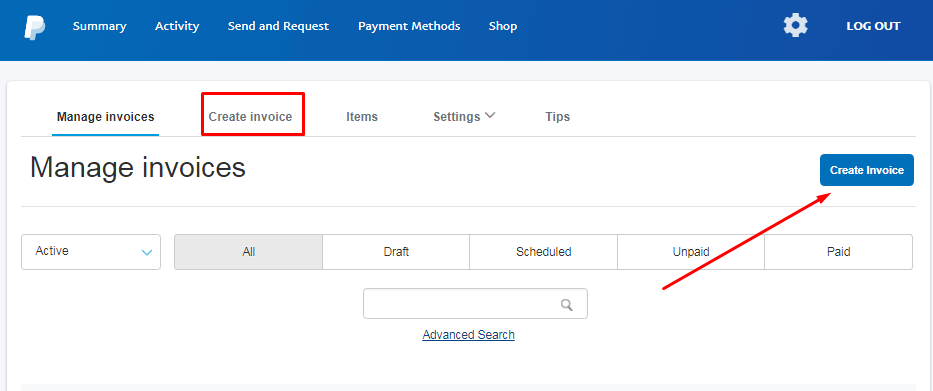
Step 4. Now in order to create a new invoice, just click on Create Invoice button. Or you can also go to the Create Invoice tab from the top menu. Both the options will lead you to the same page where a new invoice can be created.
Step 5. After landing on the create Invoice page, I’m done with my part. Now it’s you, who has to fill the customer information in the invoice. The details that can be filled on the invoice includes Company logo, item description, the date invoice needs to be sent, invoice number, reference, terms, and condition etc.
Since you are already into business, it’s presumed that you already know the meaning of terms, used in invoicing. But still, for the newbies, I’m writing down the details of the invoice terms.
- Company Logo: It’s optional. If you have a company logo, and you want your invoice to look more professional and authentic, you can input your company logo to your invoice. It can be in any image format like png, JPEG etc.
- Invoice number: This option lets you keep track of all your invoices sent till the date. So make sure you enter the invoice number in the sequence. By default, the Paypal invoices are numbered automatically like 001, 002 and so forth.
- Invoice date: It’s the date of the invoice sent. You can even schedule your invoice to be sent on the future date.
- Reference: Reference is an entirely optional option. You can add here the reference if there is any. Or you can leave the field empty.
- Due date: Due date means the date before you want to get paid for the invoice sent. Typically, the field is left default i.e ‘Due on Receipt’. But if you want your payment before a certain period of time, you can set the due date as “Due before X days”. Where X is the number of days the payment is due for.
- Bill to: Here, you need to enter the email address of your customer.
- CC: In this field, you can enter the email addresses of the people you want to send the invoice copy. It’s an optional field. So, you can leave it empty if you want.
- Description: Description field is to specify the item details. The details include the item you have sold, quantity, tax (if applicable) and shipping price.
- You can also add more rows for the items if you wish to. For that, you need to click on the Add row option below the item field.
- Note to Recipient: In this field, you can add any note to the customer.
- Terms and conditions: If there is any additional information about your terms and condition, you can add that here.
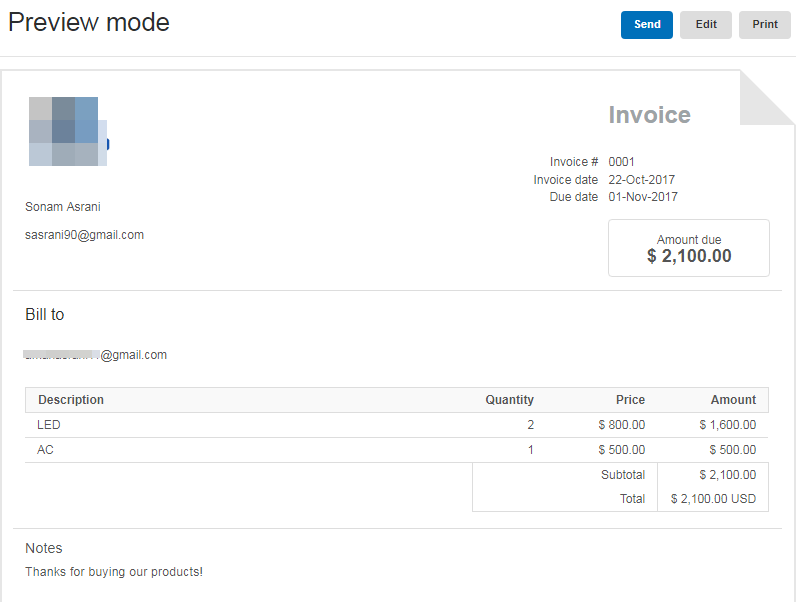
Step 6. Once you have filled all the information, you can preview the invoice to make sure all the details filled are correct. Once you are ok with everything, you can send the invoice to the customer by clicking the Send button. or, you can also print it if you prefer to.
See the screenshot below to see how the invoice preview looks like.
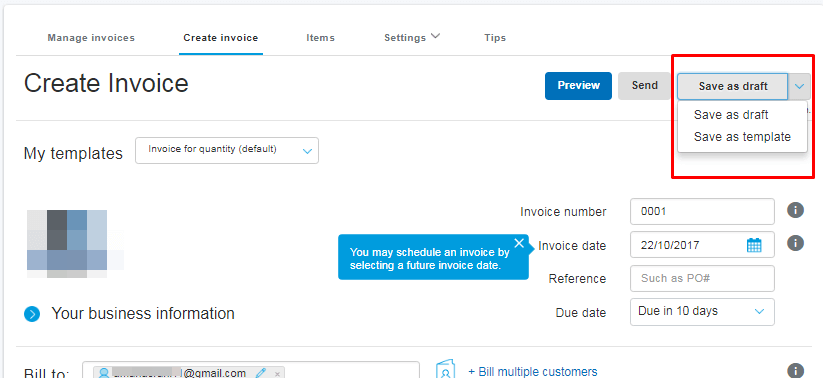
Step 7. Or you can also draft the invoice by clicking the Save as draft button, located on the top right corner. This option lets you send your created invoice anytime later, as per your need.
Or if you have to reuse the same invoice time and again, you can save it as Template. Once the invoice is saved as a template, you can use it anytime you want to like a template in general.
So that’s how to send a Paypal invoice. I know creating an invoice is little time taking. But it’s only when you are creating the invoice for the first time. But when you will keep doing it again and again, it will come into your practice. And you will be able to do it in less than a minute.
Also, there are some handy options offered by Paypal which makes creating invoice easier. Like, to ease your work of entering item details along with its price, you can go to the Items tab and save the item details in advanced.
The details include item name, description, currency, price etc. Now you can directly enter the Item from the saved list. And all the additional details will automatically get added.
With this, I’ve come to the end of the tutorial “How to send a PayPal invoice”.
Hand Picked Stuff For You:
- How to Delete a PayPal Account
- How to Verify a PayPal Account
- How to Cancel Recurring Payments on PayPal
Conclusion:
Paypal is my favorite online money transaction system. And I’m using it for quite a long time now.
There are various features of Paypal, that are amazing and come out really handy at times. And one of such features is Paypal invoice and money request.
And after going through the article, you must have also understood that the process of doing it is very seamless. So on that note, I’m done with my part. And I hope now you very well know how to send a Paypal invoice.
I expect this detailed tutorial was useful to you. But if you still have any doubts remaining, you can reach out to me by the comment section below. And I’ll get back to you as soon as possible.
Also, consider sharing the tutorial with your friends if you find it worthy.
