Over time WhatsApp has become one of the most popular instant messaging apps for over 1.5 billion mobile device users and due to its massive popularity, it has also been made available for free download on your PC using Windows 10, Windows 8/8.1, Windows 7, Windows Vista or Windows XP.
The WhatsApp for Windows version has pretty much the same features and interface as the mobile version but on a larger screen. To set it up all you need is one account from your mobile device that can then be synchronized to enable messaging on your Windows PC and multiple devices.
So for most users who spend more time on their computers, this provides an easier and convenient way to be on your PC and keep in touch with family and friends instantly, without constantly having to switch from your PC to your mobile device.
You can enjoy features such as messaging, access to emojis, stickers, as well as GIFs, sending a picture, documents and voice notes, status updates, privacy settings and a lot more just as you would on your mobile device. Likewise, all messages on your mobile device are accessible in real-time from your PC, and notifications of new messages are received faster on your PC than the mobile app.
With its enhance end-to-end encryption it provides communication privacy and protects users’ messages from impostors or malicious actors
Table of Contents
How to install WhatsApp on your PC
Once you already have an account on your mobile device, there are two methods you could use to download WhatsApp for PC:
First Method:
WhatsApp can be used right from your desktop without a browser simply follows the steps below;
Step One: You can download WhatsApp for Windows PC installer from the WhatsApp website by clicking on the download for Windows button to download the setup file. The setup file size is about 65 MB.
Step Two: Once the WhatsApp setup file has been downloaded on your PC, double-click on the installer file to launch setup that takes you to a screen with a QR code.
Step Three: Launch WhatsApp app from your mobile device and make ensure that it is connected to wifi or mobile data.
Step Four: On your mobile device, tap on the WhatsApp app, select Menu (Windows Phone & Android), and then tap on WhatsApp Web option to open the QR code scanner.
Step Five: Using your mobile device, scan the QR code that shows on your Windows PC, and then click on the OK button to confirm the scan. The WhatsApp app on your mobile device will send the scanned information to WhatsApp servers, and your WhatsApp program on Windows PC should start displaying your recent messages.
Second Method:
For this second method, you will need to install an Android emulator known as BlueStacks App Player. The emulator comes in two versions, the normal BlueStacks App player and the thin BlueStacks App player. The normal BlueStacks App player comes with some installation issues, so it’s more advisable that you to Download and Install Thin BlueStacks App player. While installing the emulator ensure that the Installation Drive has freed up space of about 2 GB otherwise you will encounter errors while installing.
Download Whatsapp for PC using Bluestacks with the following steps
- First, install the BlueStacks emulator on your PC to help you install Whatsapp for PC.
- After successfully downloading BlueStacks, you need to install. (you can follow the Bluestacks installation Tutorial)
- After installation, open Bluestacks emulator.
- Upon opening BlueStacks, you will be presented with different top Apps.
- You will need to search for WhatsApp Application using the Search bar (at the top right side of your screen) to install WhatsApp on your PC, type WhatsApp Messenger or Whatsapp app and click on search for WhatsApp App.
- When Whatsapp pops up in your search results, click on the Whatsapp App to download and wait until it is successfully installed.
- You can now use WhatsApp on your Windows PC just as you would on your mobile device.
How to fix WhatsApp Windows 10 issues
Installing WhatsApp for Windows 10 doesn’t come without its issues, sometimes users may encounter getting a “WhatsApp Installer has failed” or “an error occurred while installing the application” message every time they try to install the app on their PC. When such errors occur you could try either of the following to fix the installation issues:
1. Ensure that you’re using a 64-bit version of Windows
Sometimes the version of Windows you are using may be the issue, and if you want to fix it, you’ll have to have the appropriate version of Windows 10 64-bit installed. If your Windows 10 comes in 32-bit version sadly there is no way to upgrade to a Windows 10 64-bit, therefore you’ll have to perform a clean install to get a 64-bit version of Windows 10. Note these few things before installing the 64-bit version of Windows;
If you have a 32-bit processor you’ll need to replace both your CPU and motherboard.
Though the build of the 32-bit is outdated in comparison to most PCs use 64-bit processors, but with the supporting 64-bit version of Windows 10, there shouldn’t be an issue installing 64-bit Windows on your PC. After successfully installing the 64-bit version of Windows 10, you should be able to install WhatsApp without any issues.
Newer versions of WhatsApp have been known to also fix this problem for some users, so if you’re having this issue you can also try downloading and install the latest version of WhatsApp for a Windows 10 with 32-bit.
2. Reinstall the app
In an instance where WhatsApp isn’t working properly on their mobile device, you might want to consider reinstalling the application. After reinstalling check if the problem persists. You could also try to delete all the data associated with WhatsApp when you reinstall so you don’t have any potential.
3. Check if WhatsApp is allowed to run in the background
Not getting your WhatsApp notifications on your PC could also be another issue Windows 10 users could encounter. This could be a big problem since your calls or messages won’t be coming in unless you’re switched to WhatsApp on your phone. This issue may sometime be caused by Battery Saver mode, and to fix this, you will need to open Battery Saver and check if WhatsApp is enabled in the Background apps section.
Where WhatsApp isn’t enabled, be sure to enable it with these steps:
• Go to Settings and open System and then click on Battery Saver.
• Tap on Change battery saver settings.
• List of all apps will appear, locate WhatsApp on the list and ensure that it’s set to On.
You’ll now be able to receive texts, calls and other notifications without any problems.
4. Run the app as administrator
You could also try to run WhatsApp as an administrator if you are having issues with WhatsApp on your Windows 10 PC. To enable WhatsApp as an administrator to run properly on your PC simply right-click the application and choose run as administrator option. After this, you can start WhatsApp normally, and it will always run with administrator privileges.
This can be a bit tiring as you will need to do it every other time, but you can automatically set WhatsApp to run with the administrator with the following steps:
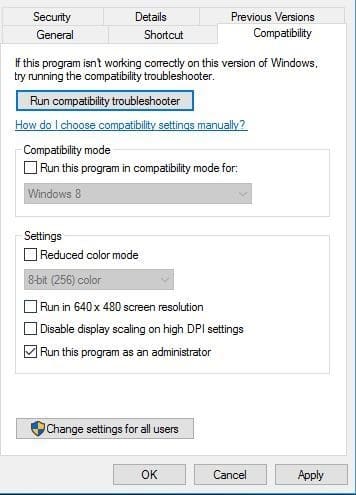
• Right, click WhatsApp shortcut on your Pc desktop and select Properties.
• Navigate to the compatibility tab and ensure to check Run this program as an administrator option.
• Click on Apply and then click on OK to save changes.

5. Disable your antivirus
An antivirus tool can also interfere with the installation process and cause WhatsApp installation to fail. Where this occurs you will need to temporarily disable the antivirus tool and try installing the application again.
6. Reset browser settings

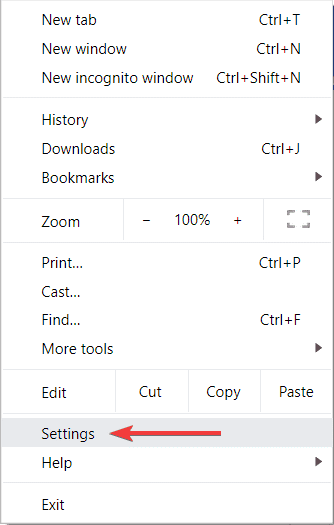
If the solutions above don’t work, try resetting your browser settings. If you use Chrome, click on the Menu (the three vertical dots). Then, select “Settings”
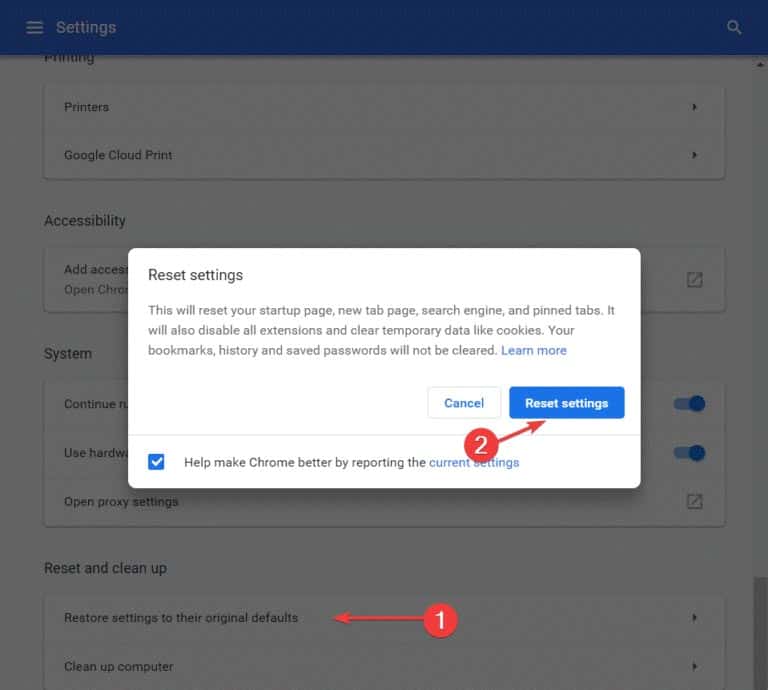
and go to the bottom of the page and click “Restore settings to their original defaults”. Then click “Reset settings”.

7. Try Restarting the Computer
Where all else fails? Try a system reboot! Being that stealth bugs in the system or other problematic apps might probably be preventing your WhatsApp’ Windows 10 installation.
And if issues still persist after trying these given solutions, you’ll just have to wait until a new version is released.
