How to disable fast user switching windows 10 is one of the questions which bother Windows 10 users a lot and probably you are also looking for the same answer. And since you have landed on this page, we assure you about the complete knowledge on this very topic.
But before we dive deeper into the guide and learn windows 10 disable fast user switching, let’s illustrate a little more on what is fast user switching.
Windows 10 fast user switching is a feature which is designed to help users switch quickly between multiple users, enabling them to work simultaneously on the same computer. And it’s not just a Windows 10 feature, in fact, it’s available in almost all the Windows versions.
While fast user switching is a great feature of Windows and helps user switch faster between multiple user accounts, this feature has some deprivations as well.
In the guide below, we will walk you through all the possible solutions on how to disable fast user switching on Windows 10 along with other details. So stay tuned and read along!
Table of Contents
How to disable fast user switching windows 10
The windows 10 fast user switching, however, is a great feature but the problems people often face due to this feature is the over consumption of resources. If more users will be signed in on the same computer, obviously more resources will be used that causes slower system performance.
Besides, if you are working on one user account and there are other users signed in, you can’t simply turn off your computer unless those user accounts have been logged out.
So these are some of the reasons which make people search for different methods to disable fast user switching windows 10. There are three ways through which we can disable fast user switching windows 10. Let’s move ahead to look for the solutions!
Method 1: Disable Fast User Switching Windows 10 via Registry
The very first method through which we can disable fast user switching windows 10 is via Registry Editor. Registry settings are very crucial part of the Windows. So before you opt for tweaking registry settings, make sure you follow all the steps carefully.
Else, wrong registry settings can damage your computer even more and make it unstable at times instead of resolving the disable fast user switching windows 10 error. The detailed steps for the same are given below.
Step 1. First of all, you need to go to the Registry Editor on your Windows computer. There are two ways to reach to the Registry editor. The first one is via the Run window and the second method is by directly searching in the start menu’s search bar. Here’s how you can open the Registry editor on your computer.
- Click on the start menu and type in regedit in the search bar. Now click on the very first result i.e regedit. You can have a look at the below screenshot to understand this option better.
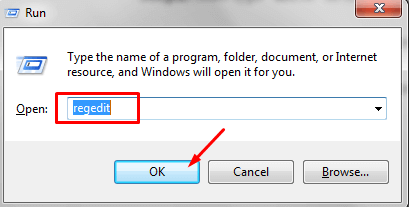
- The second way to reach out to the registry editor is by pressing the windows+R keys to open the Run window. Now type in regedit in the search field and press enter. A screenshot for this step is given below.
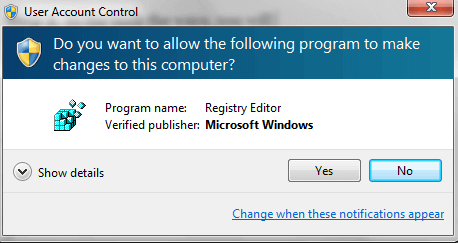
Step 2. In the both the ways, you will encounter a user account control window, where you need to give registry editor permissions to make changes to your computer. Click Yes and move further.
As sooner you click the Yes button, Windows Registry Editor will be launched on your computer.
Step 3. In the Registry window, you will see some options in the left pane. Now you need to click on the HKEY_LOCAL_MACHINE to explore its suboptions and then go to SOFTWARE>>Microsoft>>Windows>>CurrentVersion>>Policies>>System.
On reaching to the System, you will see the following window.
Step 4. In the above screenshot, you can see two partitions of the windows. Now you need to find the HideFastUserSwitching option on the right side. If you don’t see this option, no need to be worried. You can simply create this value.
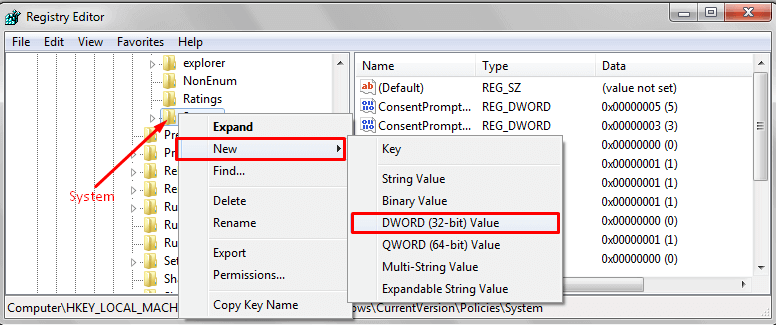
To do that, just right-click on the System option and hover your cursor over New and click the DWORD (32-bit)Value. If you find it difficult to locate the option, have a look at the screenshot which I’ve grabbed for you.
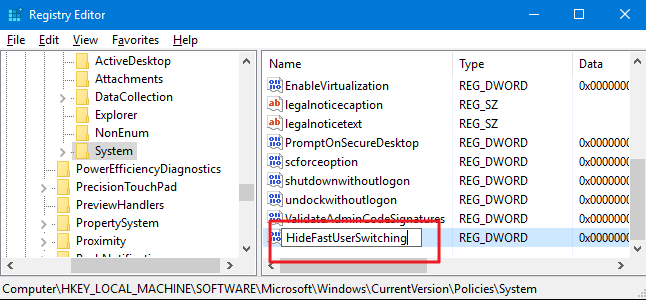
Step 5. On following the above step, a value will be created under the system key with the name new value #1. You need to rename this value with the HideFasterUserSwitching as given in the screenshot below.
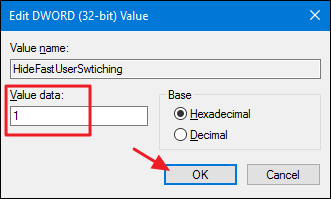
Step 6. In the next step, you are required to Double-click the newly created value named ‘HideFastUserSwitching’ to open its properties window. As sooner the properties window pops up, just change the Value data from 0 to 1 and keep rest of the settings as it is.
Now simply click Ok to save the settings. Have a look at the screenshot below.
By now, you are done with all the settings. Now sign out of all the logged in accounts from your computer if there are any and restart your computer to make the changes take effect.
Now when you turn on your computer, you will notice there is no shortcut to switch user in the start menu or in the main menu. But mind it, the above steps don’t disable fast user switching windows 10 but hides it.
So this is how you can disable fast user switching option on your Windows computer. Anyway, now lets head over to the next method to disable fast user switching windows 10 that basically applicable for Windows 10 Pro and Enterprise users.
Method 2: Disable Fast User Switching Windows 10 via Group Policy
The above method to disable fast user switching windows 10 is specifically dedicated to Windows 10 home users. But the second way, i.e disabling fast user switching using the Group Policy is the best workaround for Windows 10 Pro and Enterprise users.
This method can’t be applied on Windows 10 Home edition as there is no group policy option available out there. Let’s see what are the steps to Disable Fast User Switching Windows 10 via Group Policy.
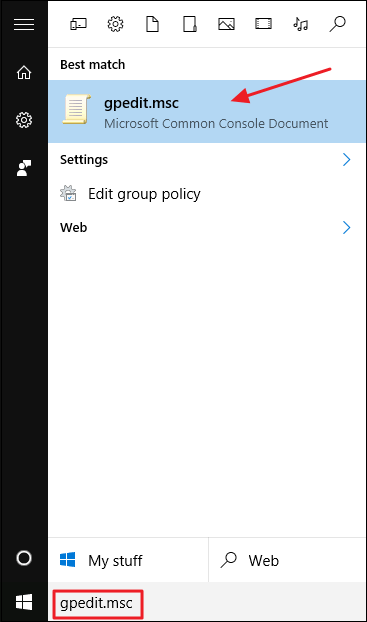
Step 1. The first and foremost step is to click on the start menu and type in gpedit.msc in the search bar and click on the first option as shown in the below screenshot or simply press enter.
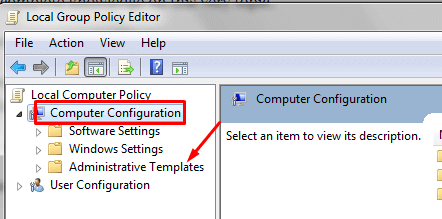
Step 2. As sooner the Local Group Policy Editor window is opened, you will see Computer Configuration option in the left pane, just click on this option to see Administrative Templates. See the screenshot below.
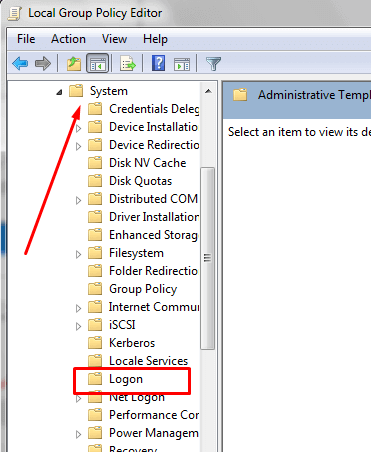
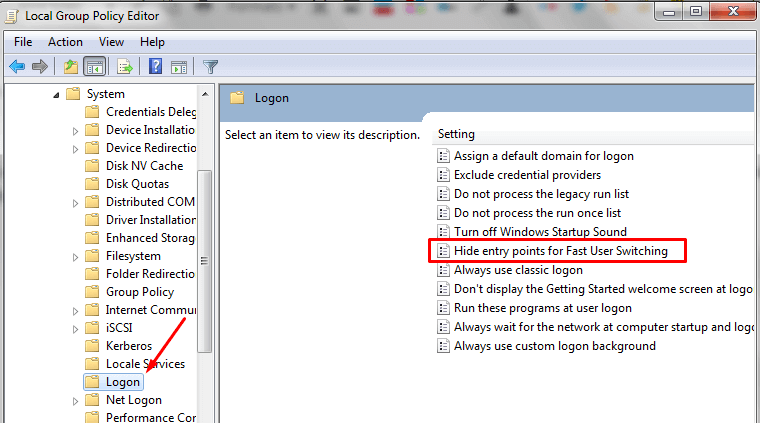
Step 3. Now click on the Administrative Templates and you will see yet another set of suboptions. Out of them, you need to click on the System to explore further options. Under System, you need to click Logon.
I’ve grabbed a screenshot to help you locate the option more easily.
Step 4. As sooner you click on Logon, you will see several options in the right pane and one of them is Hide entry points for Fast User Switching. See the screenshot below.
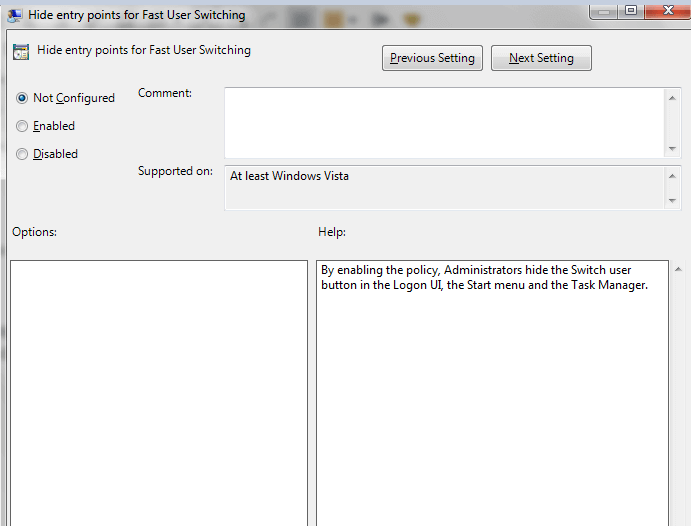
Step 5. Now Double click this option to open the Hide entry points for Fast User Switching Properties window which looks like the below screenshot.
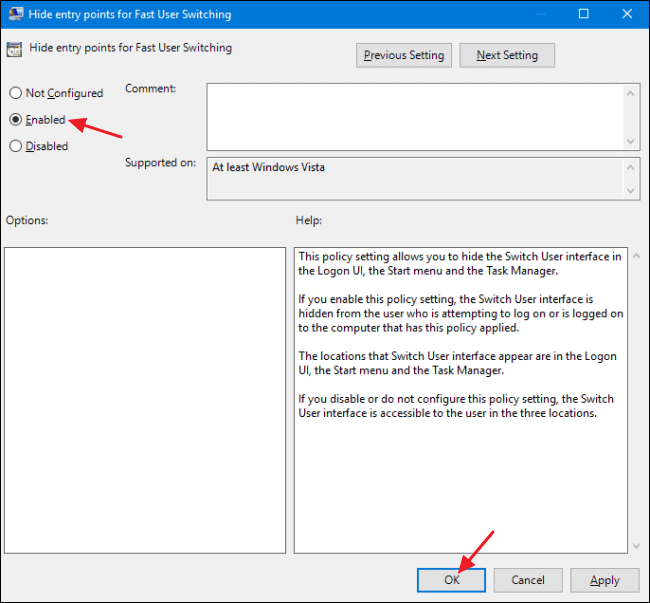
Step 6. In Fast User Switching Properties window, the default configuration for “Hide entry points for Fast User Switching” is set to Not Configured. Here you need to set it to Enabled and then click OK. See the screenshot below.
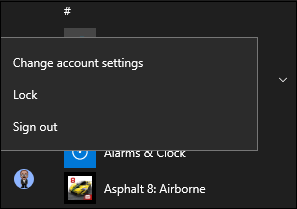
Now sign out of all the currently logged in accounts if there are any and restart your computer for the changes to take effect. After applying the above changes, you will notice there is no switch user option in the start menu.
So these are the two methods which you can apply to disable fast user switching windows 10. Now let’s head over to our next method.
Method 3: Disable Fast User Switching Windows 10 via Third party tool
Basically, there are only two ways for disabling fast user switching in Windows 10. The third method is nothing different but disabling Fast user switching using the registry editor but through a shortcut.
There are several tools available on the web which offers one click registry hack for creating the new entry named hideFastUserSwitching and changes the data value from 0 to 1 in just one click.
You no need to follow the detailed instructions given in the Method 1 to disable fast user switching windows 10 if you download and run that tool. To reverse the settings, there comes another software.
The detailed steps mentioned in the method 1 is the official way to tweak the registry for disabling the fast user switching but if you find that method long, click on the below link to download and install the one-click tool.
Fast User Switching One-click tool
The above file is in zip format, in which there are 2 files named “Disable Fast User Switching” and “Enable Fast User Switching (Default)”. Running the first file creates the HideFastUserSwitching value and sets it’s value to 1 and the second file changes the value to the default settings respectively.
So, that’s it for this article. These are the three methods to disable fast user switching windows 10. Now we have reached the conclusion.
Hand Picked Stuff For You:
- How to Fix Kmode Exception Not Handled Windows 10 Error
- How to Fix Class Not Registered Windows 10 Error
- How to Fix Windows Update Error 80072ee2
- How to Fix VLC Building Font Cache Error
Conclusion:
Windows is a flexible operating system. It’s feature rich and has a seamless interface. Windows OS is designed in such a way that we are not forced to use any particular feature.
Fast user switching is a great feature and it is intended to help users but in case you don’t utilize this feature and don’t find it worthy, there is no point having such a feature on your Windows computer.
So these were the three solutions on how to disable fast user switching windows 10 if you don’t like this feature. I hope you got all the steps clearly.
If you are facing any issues while following the above-mentioned steps, tell us in the comment section below. We will reach out to you ASAP.


