DesignCap Review 2023: A complete, detailed, thorough breakdown of the tool and its potential is what I’ll be sharing in this article.
I know not if it’s the best graphic design software out there.
All I’ll be doing is, getting you an insight into its features and potential.
You may or may not go with it, depending solely of your own understanding.
Table of Contents
What is DesignCap?
DesignCap is basically a web-based graphic design software.
It offers thousands of pre-designed templates, tons of modules, charts & graphs to name a few of its features.
The editor is completely drag & drop hence requiring absolutely no previous “designing” skills as such.
How good (or not good) are these features?
That I believe you can answer better, once you’ve gone through this DesignCap review.
I will say this though, you wouldn’t want to miss the “Modules” section I’ve mentioned later in this piece.
DesignCap Pros and Cons
Even though the “cons” listed below may make me look biased, I’m not.
I’ve not been paid for this DesignCap review.
Pros:
- Thousands of professional, pre-designed templates.
- Charts, icons, pricing tables, maps and other such blocks available.
- Drag & drop editor.
- Forever free version.
- 7-day refund on paid plans.
- JPG, PNG and PDF downloads.
Cons:
- Honestly? None.
No cons? Am I being too generous?
No, I’m not.
DesignCap never claims being an animator, or a video editing suite. Hence the lack of those features can’t be counted as a negative factor.
It says it’s a graphic design software, and that it excels at.
Sure, more templates or fonts could be added. But again, these aren’t “cons”.
Considering how it’s largely free, there truly aren’t any major cons I could come up with.
I refuse to simply list a vague “con” for the sake of it.
DesignCap Review- Final Verdict
If you’re in a rush, here are my personal thoughts, a kind of summary to this entire DesignCap review.
So, in my opinion, DesignCap is a lot more than just a graphic designing tool.
It can be used as a very powerful chart creator.
And, it’s even capable of creating (not so) basic landing pages.
As far as the designer goes, I’m impressed.
A lag-free drag & drop interface. Tons of elements to choose from. And, the “modules” impressed me most.
Moreover, it does offer a forever free plan.
So, is it worth it? In my opinion, yes.
There’s even the 7-day refund policy making sure you only pay if you’re satisfied.
Pre-designed templates, and icons.
Most graphic designing tools offer pre-designed templates.
However, DesignCap offers thousands of them.
More importantly, it doesn’t limit itself to just social media posts and banners.
But also offers templates for Infographic and logos.
These two I believe are some of the most expensive graphic-assets we generally need, don’t we?
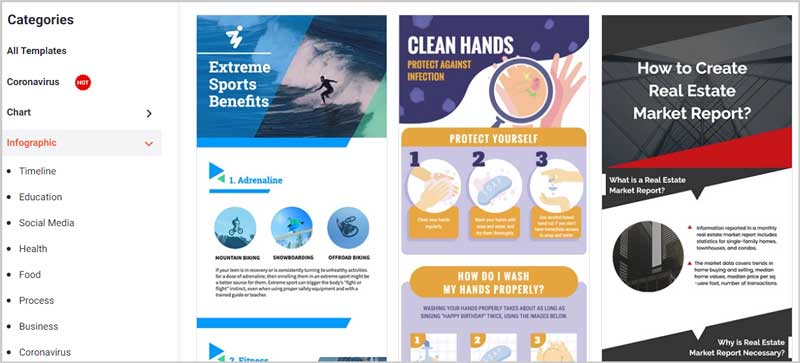
The infographic category includes sub-categories such as health, food, business, education and so on.
Other templates for social media, Email headers, flyers, cards, reports, schedule, presentation, charts etc. are offered as well.
This I believe makes DesignCap a tool for everyone.
You may be a “for-fun” designer, a professional, a student, or even a business person, DesignCap probably has something for you.
Moreover, it also has a tons of pre-designed, professional icons which can be used on our designs.
In a nutshell, it offers everything that you may need to present your content/data in a more appealing, graphical form.
Getting Started- Template selection.
Imagine, you’ve never before used a graphic designing tool.
Can you understand, use and design using DesignCap?
Well, we’ll see.
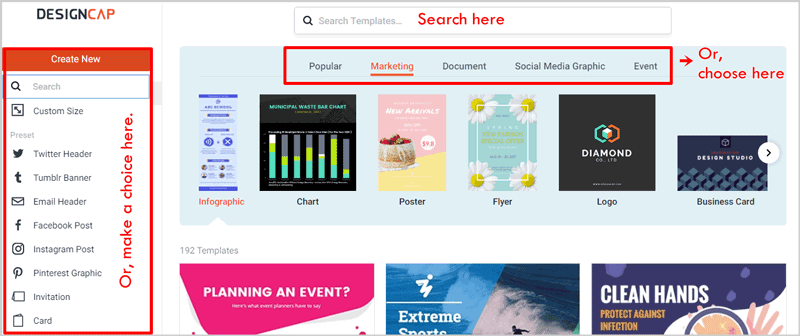
So, once you login, you’ll be taken to the template-selection screen.
Notice the search-bar?
That’s where you can directly key-in your keyword. E.g. “Games”.
Or, choose from one of the displayed categories just below the search-bar. E.g. Marketing, Social media graphic, Document etc.
Or finally, use the left-sidebar to tell DesignCap what exactly you wish to create.
So far, I think it’s pretty beginner friendly, don’t you?
Drag & Drop Editing Interface
So now, we’ll see how exactly these templates can be edited.
Well, here’s the editing-screen.
The interface I believe is pretty traditional.
If you’ve used any other graphic designing software previously, you’ll find familiarity here.
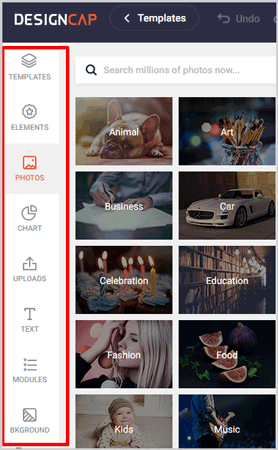
There’ the left-sidebar with all the elements.
The top-bar which lets us save and download the design.
And finally, the centre-screen which lets us actually edit the design.
This interface is 100% drag & drop.
Hence, no “skills” as such required.
Simply drag an element (logo, text, chart, photo or anything else) and drop it where you want it on the design.
Editing text is simple. Simply click on the text and change it entirely, with full control over the size, font, alignment, formatting, spacing and even layering.
Let’s get into the finer details of this editor then?
The Tool-bar
What exactly can you insert onto your design?
These in my opinion are what make one tool better than the other.
The left tool-bar hosts all the objects/elements which can be used on our designs.
So, it offers:
- Templates: Pretty traditional, lets us choose/change our current template.
- Elements: Lets us insert lines, shapes and icons etc.
- Photos: Can be used to insert free photos. These seem to be pulled from Pixabay, one of the largest royalty-free platforms on the planet. Hence, the options should be in the millions, numerically speaking.
- Chart: Lets us make our designs more professional and data-rich. Various charts including pie, bars, columns, area and line are available. Even custom tables and maps can be inserted. Easy data-import using Excel or CSV files.
- Uploads: This one lets us upload, and access our uploaded images.
- Text: Lets us insert texts. (pretty hard to guess, huh?). Design-text further helps insert more professionalism to the design (refer to the screenshot below)
- Background: I’m not telling you what this does. Go figure. (Yes, it lets us change the background, obviously).
Modules
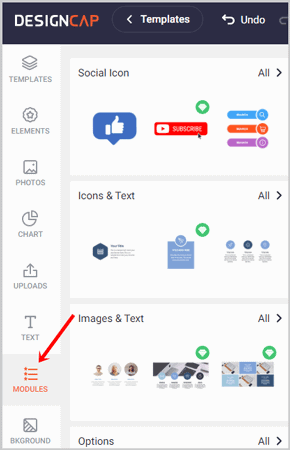
“Modules” is another option on the left-toolbar.
So, why this special section?
Well, because, it’s unique and not that common even amongst the best graphic designing software.
Secondly, because it has quite a few sub-categories of its own.
When used right, this element alone can be used to design an entire landing page (and, I’m not kiddin’).
So, it lets us add:
- Social icons: Tell people to subscribe, follow, shop and so on.
- Icons and text: Professionally-designed text-blocks, with icons. Endless use-case scenarios.
- Images and text: Best used for displaying reviews ,testimonials, feedback, primary-features, roadmap, stats and so on.
- Options: This is graphic-content which can be used for pricing tables, timelines and well, a lot more depending on your creativity and need.
- Steps: As the name suggests, show “progressive-data”. May be steps to get something done, roadmaps to a project and so on.
- Diagrams: One of the most professional diagram-designs I’ve seen. Venn diagrams, overlapping graphs, feature-breakdown and a few more.
- Comparisons: A personal favourite of mine. I often compare between products and companies. What otherwise takes hours to design with Photoshop is literally done in minutes.
- Stats: Display numbers, in a much non-boring form than numbers actually are.
- Swots: I wouldn’t show fake expertise here. I didn’t initially know what they were. But well, design blocks, with icons, texts and symbols. Quite a few use-cases seem possible if you ask me.
These modules alone make DesignCap one of the top-competitor against leading graphic-designing websites like Canva.
I’ll be honest, the true potential of these “modules” can’t be explained in a few text-lines.
I’d urge you to go check DesignCap out (it’s free).
Make your assessment, and then come back to this DesignCap review to share if you feel I exaggerated earlier in saying it can be used for design landing pages.
Download formats
What are the formats DesignCap allows downloading the designs in?
Well, the following formats are currently supported:
- JPG
- PNG
- Or PDF.
Let’s be honest, these do suffice, but, I’ve used some other tools with quite a few other options.
Sharing options
The sharing options do not disappoint.
For starters, a link is generated which can be shared directly with other users. Pretty convenient, eh?
Then, the design can directly be shared on Facebook, Tumblr, Twitter, or via e-mail.
Furthermore, it offers three sharing options:
- Public: Available to everyone.
- Public and Edit: Anyone can view, and also edit the design.
- Private: Only remains visible to you.
DesignCap Pricing Plans
For the final section on this DesignCap review, let’s talk of the costs?
Let’s start with the fact that, DesignCap offers a 100% forever free plan.
So, it can be used without making any payment whatsoever.
However, it sure has its limitations.
There are two optional paid plans:
- Basic: $4.99/mo.
- Plus: $5.99/mo (the plan I’m using).
Plan differences:
The free plan only allows 5 uploads at a time. The Basic plan allows 100 and the Plus plan allows 1,000 uploads.
The free plan also only offer JPG downloads. Both the paid plans offer PNG and PDF downloads as well.
The free plan allows saving only 5 designs, while the Basic and Plus plans allow 100 and 1,000 saved designs respectively.
The paid plans also offer more pre-designed templates and modules as compared to the free plan.
Refund Policy
DesignCap is completely risk-free.
It offers a 7-day moneyback guarantee.
I personally think 7-days are more than enough to get a cost: profit ratio on the tool. Don’t you?


