You’re a content writer, web-dev, blogger or a SEO guy, but not a designer; have absolutely 0 experience, can you still design the best of social media images, banners, blog-post thumbnails, marketing material, or animations? That’s what this piece aims at exploring throughout this Crello review.
Wait! Why do you even need images in your social media or blog posts to begin with? Well, one of the reasons I could get you is according to Jeff Bullas, if an article has images it gets around 94% more views.
Table of Contents
Crello Review: What is Crello?
The common concept around “Professional” images is, you need to have a diploma of some kind or years of Photoshop experience to carve one out. That’s not particularly true.
Crello is an online graphic design tool like Visme which aims to change that, in simplest possible words it lets anyone, with 0 design-experience design the most professional, attractive, informative graphic images/banners and even animated gifs in a fizzy!
The animated gifs are what really caught my attention, they aren’t simply text blips or sliders rather have many other professional superpowers (covered in detailed in the “Animation-creator” section).
Fun fact- Depositphotos, one of the largest online stock-photo platforms is the parent company which owns Crello, hence it offers a plethora of pre-designed photos, backgrounds, icons and other elements!
Pre-Designed Templates and Elements
This is one of the best features that Crello offers, it has a library of over 1100 different pre-designed templates in various categories, which can simply be taken up, edited to fit your brand or company and published right away!
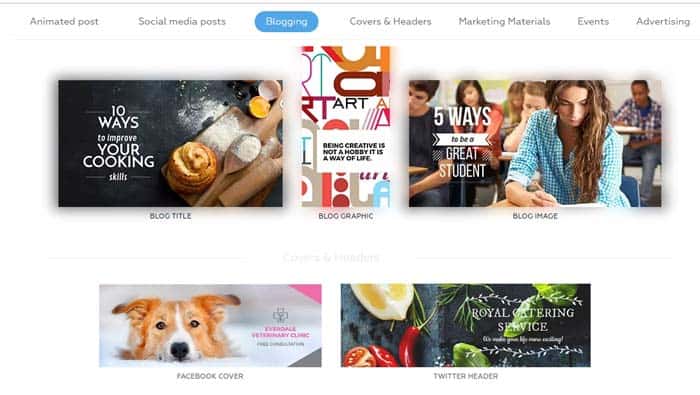
There are 33 pre-designed formats available, the parent-formats being:
- Animated Posts
- Social Media Posts
- Blogging
- Covers and Headers
- Marketing Materials
- Events
- Advertising
And each of these formats have been broken-down into sub-categories further helping users land on the best-suited banners and templates for them, for e.g. “Advertising” has Facebook Ad, Instagram Ad, Twitter Ad etc.
“Covers and Headers” includes Facebook covers, Email Headers, Twitter Headers, Youtube Thumbnail and so on.
“Marketing Material” would let you design Posters, Flyers, Gift certificates. “Event” similarly offers Invitations and even Business cards among a few other choices.
Bottomline, most types of banners/ graphic-requirements that the modern, digital age demands off us have been addresses by Crello, and pretty neatly as well if I might add.
It also offers over 12000 free HD images and elements such as icons, patterns, frames, vectors, shapes, illustrations and so on followed by over 60,000,000 photos (courtesy of being owned by a company as big and established as DepositPhotos).
Crello Editor
This section on the Crello review would cover the actual editor, where users get to edit their content. The amount of control provided over the pre-designed templates as well as on the manually uploaded content.
Before starting with one of those pre-designed templates, let me just point out that you can also create a completely random, unique format based on your dimension-requirements by using the “Set Dimensions” feature available on the “Create Design” page.
And it even lets you set the dimensions in “Inches”, or “Centimetres” just in case you aren’t comfortable with “Pixels”!
It has a left-sidebar which is like the “Main Menu” and offers the most important controls, such as Create design, Help and Support, Account Settings etc.
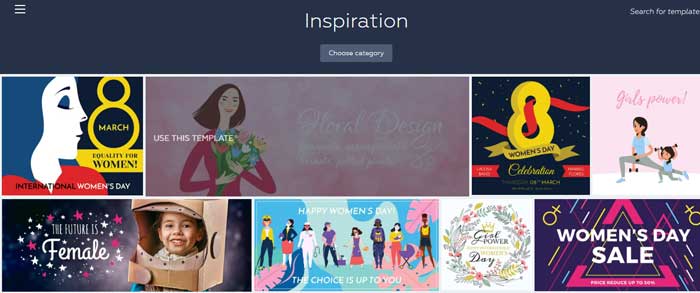
If you’re fresh out of ideas, it has an “Inspiration” tab which presents 23 categories to choose from, with pre-designed templates in each category which should spark up your creativity quite a bit.
Or users can go to its “all formats page” (https://crello.com/home-all-formats/) to get access to all the pre-designed templates in the various categories, simply pick one and start designing!
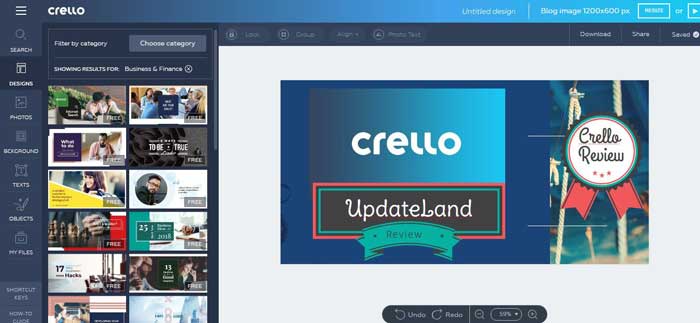
Another option is, simply clicking on just about any design, then on the editing-page, select “Filter by Category” from the left-pane to get a list of all the formats you can choose from.
Anyway, for the purposes of this Crello review, I’m going with a pre-designed template in the Blogging section. Here’s what I’m presented with when I chose a random “Blog image” template on the platform.
I obviously edited the banner a bit to suit this Crello review (which took me less than 3minutes, for real). Hey, why don’t I take you on a trip through all the editing options? The smallest and basic(est) customization superpowers?
Editing Text:
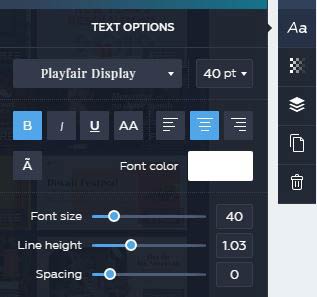
This is what the text-editor on Crello looks like:
As is evident, users get to select the text-size, font, choose from Bold/Italic/Underline, alignment, and font-color.
In addition, Crello has provided sliders in case you do not wish to enter the values manually, you can simply use the sliders to increase/decrease the font size, line height or spacing.
There also is the column-like tab next to the text editor which lets users edit the visual properties of the text, for e.g. the transparency, layering etc!
The changes can be seen live on the editing dashboard on the right-pane of the screen. Easy so far, ain’t it?
The left-Column:
This is the primary bar which lets you add various elements onto your image:
Design:
The “Design” option lets you choose from the hundreds of pre-designed images, all of which have unique backgrounds, text-placement, and overall vibe.
What’s interesting is, any of these designs can be customized 100%, and make to look like any other, or unique design by itself. So this tab is more like a stepping-stone, or a starting point so you get something to work with.
Photos:
The “Photos” option next obviously lets you add Photos to your content, it has three basic options:
- Gallery
- Free Photos
- & Uploads.
Gallery is where you can buy premium, Royalty-free images for your content for a fixed price of USD $0.99 each.
Free Photos would let you choose from over thousands of free yet professional stock photos.
And Uploads is where you can upload your own images, either small in-content images or complete backgrounds there’s no restrictions.
The ease of navigation between the three-options, or that they’re all listed in the same tab does make it an easier switch than some other visual editors we’ve worked with before.
Background:
As the keyword makes it clear, this is where you can select an overall background for your image, the images enlisted here have been selected carefully making sure each actually suits and functions as a background and isn’t just a random photo.
It has “Photos” and “Patterns”, even though technically both of those are photos, the backgrounds in the Photos section may have flowers, fruits or other subjects in them, while those in the Patterns section consist of just lines and squares arranged as a pattern.
It even has solid-colour backgrounds, and then there’s the Uploads section.
Note that this upload section is the same which can also be accessed from the earlier “Photos” section hence whatever’s uploaded once on Crello, can be accessed or used from any other section where the Upload option is available without needing multiple uploads.
Text:
My favourite section throughout this Crello Review as well as while using the platform, this is the option which lets you choose and add from the hundreds of text-graphics on your content!
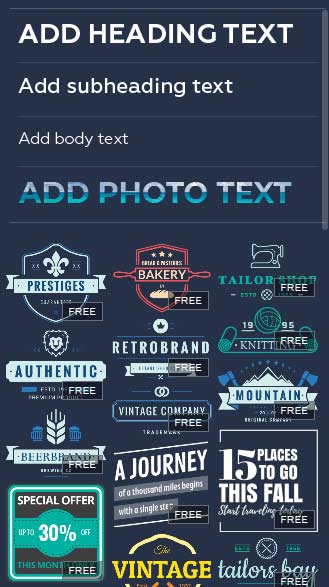
Here’s a glimpse of what the section looks like:
As is evident, you can either add plain text (Heading/Subheading/Body text), or you can choose from the graphical-images.
The graphical-images look like professionally designed texts however they can be edited just as easily as normal text and to the very core!
“Photo Text” is something unique and super-interesting that Crello offers which warrants a mention in this Crello review; so it’s a feature which lets you write text, using photo-font, meaning the text would consist of photo fragments, well here’s an example-
So I just clicked on “Photo Text”, wrote my text, drag & dropped the image from the left-sidebar which says “SALE” on the text and it was imprinted over the font. Can be done with just about every single photo on Crello!
Objects:
These are smaller objects which enhance the content and can be added from this section, they include:
- Shapes
- Icons
- Illustrations
- Lines
- Borders
- Stickers
- Frames
Most of these objects are free, yet not all of it and the paid ones cost USD $0.99.
My Files
The final option on the left-column says “My Files”, this basically is the Uploads tab, this is where you can access/view all your uploads and also upload newer content.
What’s special is, Crello doesn’t just limit you to Photos and also lets you upload your own fonts!
This tab also lets you access all the content which you’ve purchased on Crello, or your favourited content! (Yes, you can tap on a small “heart” icon next to each content to Favourite it and access it later from here).
So that’s about it, I believe there’s not an inch of the editing-dashboard which we’ve left untouched. Let’s move on to the most fascinating aspect about this Crello review (or the platform in general) then?
Animation Maker
So the animation maker’s primary look and feel is exactly alike the normal editor on Crello.
Its left-column however does have some new options which the normal editor lacks, which are “Media” and “Animations”.
Media offers hundreds of animated scenes to choose from, you can either make these scenes your primary background, or an in-content element with a much smaller screen-space.
“Animations” on the other hand has two options- “Objects” and “Backgrounds”. This object button (inside the Animations tab), as was the case with the normal editor lets you add objects to your content but in this case, these are ANIMATED, like an animated thumbs-up, a smiling face and so on.
And each of those objects when clicked reveal hundreds of other objects in similar category.
As for the “Background” option, it offers full-fledged, specially crafted animations which suit best when used as Backgrounds for animations.
It too has the “filter by category” thing which lets you land on a suitable background for your project by letting you choose from the many different categories available.
The video-sizes available on Crello are:
- 1080pX1080p
- Full HD
- Facebook-cover size.
Resuming and Downloading Projects
Crello being a cloud-based visual composer, lets you resume your projects at a later time, even after the session has been completely terminated.
It also doesn’t require manually saving projects hence whatever work has been done is instantly and automatically saved to your account.
Once finished, the projects can be downloaded by clicking on the “download” button on the top-bar, it offers the following download options:
- JPG
- PNG
- PNG Transparent
- PDF (Standard quality)
- PDF (Print Quality).
Additional Help
Making things even easier for us, the platform provides over 18 shortcut keys, for everything from saving, zooming-in/out, selecting elements, copying to changing object sizes and everything in between.
They can be accessed or learnt from the “Shortcut Keys” option on the left-column.
And if you still couldn’t use Crello, the platform offers another option called “How to guide” just below the Shortcut keys on the left-column, it offers as many as 8 video tutorials on how to add text, upload content, create photo frames text and everything else.
Pricing
Crello is essentially free, and can be used without paying a single dime. However, some of its stock photos, objects and other elements are paid.
Crello costs USD $16.67/month for the Pro version if and when opted for the yearly subscription; or it also offers a monthly plan which goes for USD $19.99/month.
The Pro version offers all the features of the platform; the free version however has some restrictions such as the availability of just one format; i.e. 1080X1080 and lack of a resize option. Also some designs (not all) may be watermarked when downloaded off the platform using the free version.
Crello Pros and Cons:
Before concluding this Crello review; let me just sum this piece up in this list of pros and cons which I personally found to be offered by or present on the platform:
Pros:
- Huge photo/object library.
- Ease of customization.
- Animation maker.
- Three download options.
- Pre designed templates.
Cons:
- Animations need 3-5minutes on an average to be exported.
Final Words on Crello Review
So that’s a wrap as far as this Crello review goes folks. I hope every inch of the platform has been dissected to its core, presenting a transparent and almost live insight into the platform for you curious souls.
In my personal opinion, Crello is arguably among the top 3 if not the top-most position when it comes to a ranking of similar graphic designing tools.
But hey that’s just what I think, I’d urge you to go out give the tool a try and then leave your two cents regarding the platform as well as this Crello review in the comments.
