In this AOMEI Partition Assistant review, I’ll transparently share and explain the features that the tool offers.
It claims being one of the easiest, one-click partition move/resize, creation/deletion, extension tool (among many other features).
We’ll see how true and practical those claims actually are.
And well, this isn’t just a review.
I’ll also show you how to use AOMEI Partition Assistant.
If you’re sceptical about any part of this AOMEI Partition Assistant review, remember that it’s 100% free.
So, you aren’t being “sold” anything. And, you can always try it for yourselves, without paying a penny. (No E-mail or cards required either).
Table of Contents
What is AOMEI Partition Assistant?
As the name hints, it’s a partition management tool for Windows.
Generally, partitioning a disk, resizing it, allocating free space from one to the other drive isn’t very easy.
This tool claims to make these a one-click process. (And that’s true.)
In my personal experience, nearly every action that can be performed required one, or a few more clicks at best.
More importantly, zero technical skills required.
If you know how to point and click, you’re set.
Primary features:
The following tasks are what AOMEI Partition Assistant primarily facilitates:
- OS Migration
- Creating/ Deleting Partitions
- File system conversion
- Cloning partition
- Merging/Splitting partition
- Extending partition
- Drive letter/label/format changing
- Formatting partition
- Checking errors etc.
Note the list isn’t all-inclusive. A number of other features are available as well (which I’ll discuss later in this AOMEI Partition Assistant review).
AOMEI Partition Assistant Review- Final Verdict
What do I personally think of AOMEI Partition Assistant?
Well, it offers over 20 different features in one tool.
Getting anything done is as easy as choosing the drive > choose the action > done.
It doesn’t even need restarts in most cases!
So, is it the best partition software?
Going by the (extreme) ease of using the tool, and the long list of available features, I’d say it’s close, very close.
Pros and Cons
What the tool does best, and what still needs improvement?
Pros:
- Over 20 different features.
- Extremely easy and newbie-friendly.
- No data loss.
- Forever free standard version.
Cons:
- Speed could be improved.
Pricing
Before you dive deeper in this AOMEI Partition Assistant review, it’s only practical to see if it fits your pockets, isn’t it?
Well, it does! I just know it.
Here are the pricing plans:
- FREE: Standard version. Lesser features, forever free.
- Professional: $39.95, access to all features, 2 PCs/license.
- Server: $159.00, all features, 2 servers/ license, priority support.
- Unlimited: $399.00, all features, unlimited PCs/servers.
- Technician- $699.00, all features, unlimited PCs/servers, billable clients allowed.
Payment modes:
You can pay using Cards, Bank/Wire transfers, Money Order, Cheque etc.
90-day refund policy
The company does claim to have a 90-day “no questions asked” refund policy.
However, I do not have a personal experience of the process.
Hence I’m not sure of the refund time-frame, or other details required for the refund.
User-Interface
It claims to make disk management easy, and for everyone, doesn’t it?
Let’s see if that’s true?
As soon as you launch the application, this is what you’ll see:
The top-bar is basically the control-bar. You can apply (confirm) processes, undo, redo tasks etc. It also displays a few major features.
The left-sidebar displays a more detailed list.
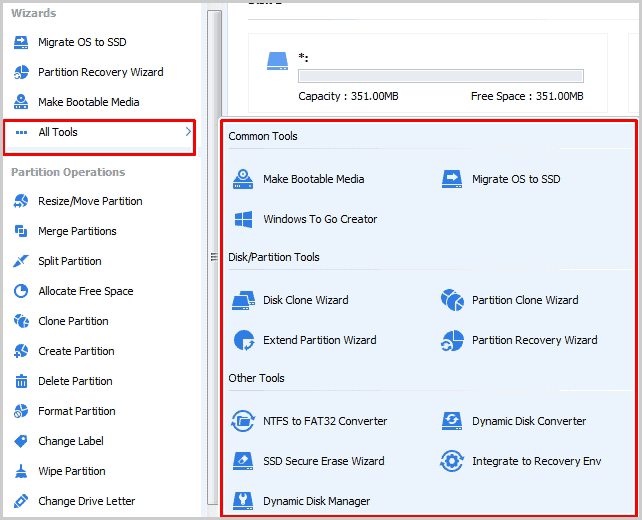
Even more tools are available and shown when you click on the “all tools” option:
And, the rest of the screen displays all your available disk partitions.
It can be understood pretty easily, don’t you agree?
Furthermore, it supports drag & drop, so you can increase/decrease sizes and partitions simply by dragging a slider.
(I’ve covered that in detail in the “How to” section on this AOMEI Partition Assistant review).
All in all, a first-timer-friendly solution so far.
Primary features
Let’s discuss the primary features in a bit more detail?
But hey, the actual features are pretty self-explanatory.
Hence, let’s not waste both of our times simply “listing” the features down?
Rather, I’ll also cover how to use AOMEI Partition Assistant for most of these features.
Let’s get started then??
How to create a partition using AOMEI Partition Assistant?
Arguably, the most important feature that the tool offers.
It lets me create partitions on my hard disk.
What’s more impressive is, I can create a partition in both these scenarios:
- If I already have unallocated space on my disk.
- Even if I don’t have unallocated space!
Well yes, in the second case, it shrinks an already-existing partition, and creates a new partition with this newly obtained space.
I loved the control and customization it offers. I do get to customize the size, label, file-system and everything else.
(Believe me when I tell you, it truly needs just 3 clicks!)
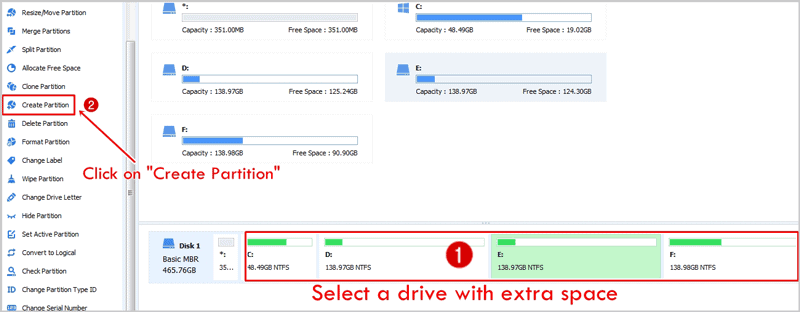
Step 1-> Choose a drive which has extra space you can use, or choose an unallocated drive > click on “Create Partition”.
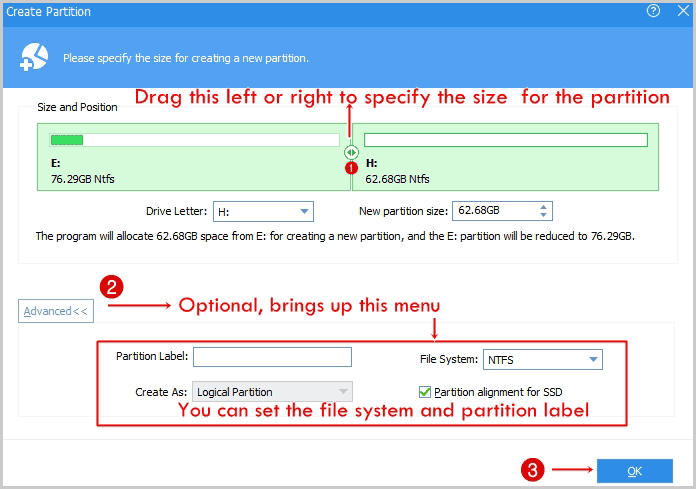
Step 2 -> Drag the space-adjuster to specify the amount of space you want for your new partition.
Note that space from your old partition would be shrunk (reduced).
Step 3-> Just click on “OK” and then “Apply” on the top-bar.
Done!
Resizing /Moving partitions
This actually is what I initially downloaded the tool for.
I had a lot of space on one of my drives.
I needed to resize the drive.
The resize/moving feature lets me change the size on my disk.
Again, I got that done in 4 clicks
Step 1-> Select the drive you wish to resize/move.
Step 2-> Click on “Resize/Move Partition”.
Step 3> Adjust the new size you need.
Step 4 > Click on OK!
Step 5> Click on apply (on the top-bar).
Could that be any simpler?
Merge / Split
I’ve grouped these two features simply because they’re pretty similar (even though opposites).
So, the merging lets you combine two partitions and make them one.
The splitting breaks one partition into two partitions. Simple, eh?
Again, the ease of use remains constant.
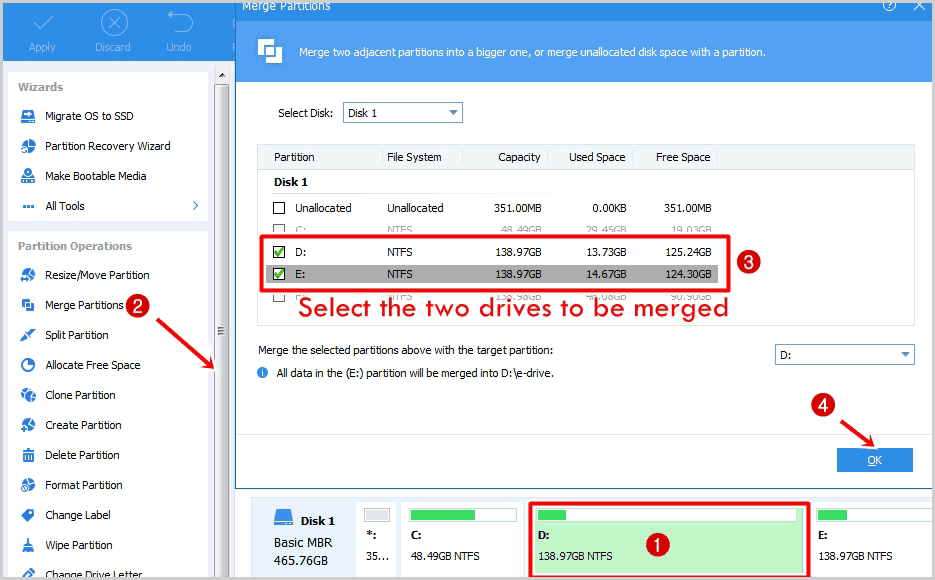
Here’s how to use AOMEI Partition Assistant to merge disks:
Click on the drive > click on “Merge Partition” > select the two drives you wish to merge > click on OK > click Apply.
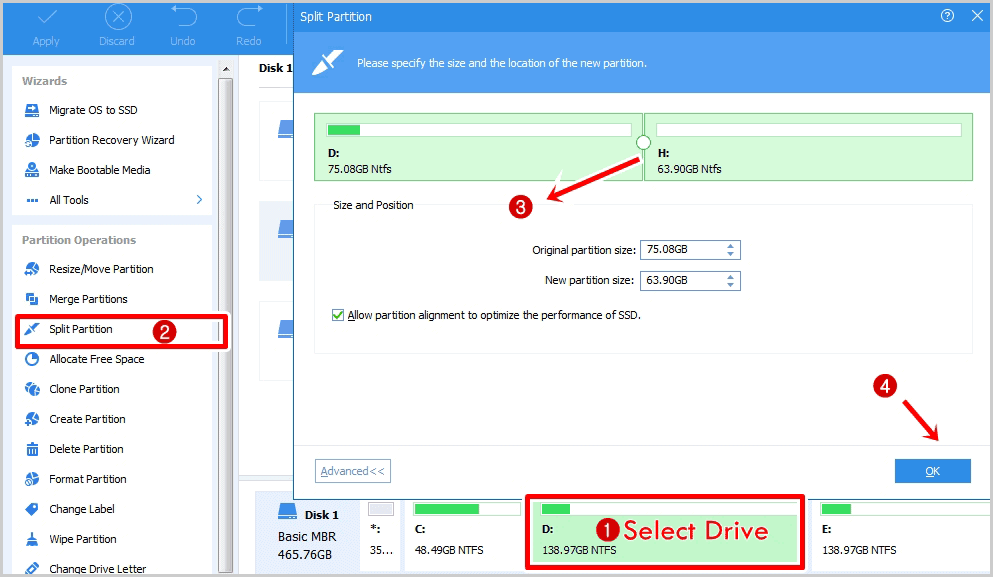
Need to split drives maybe?
Here’s how:
Select the drive you wish to split > click on “Split Partition” > select the two drives you wish to merge > click on OK > click on Apply.
Extend Partition
AOMEI Partition Assistant is a rule-breaker when it comes to disk extension.
The in-built Windows extension utility only allows extending the disk:
- If there’s unallocated space on your hard-disk.
- If that unallocated space is immediately behind the disk you’re trying to extend.
And, that’s almost never the case.
Hence, the Windows utility essentially becomes useless.
That’s where the AOMEI PA really impressed me.
It doesn’t need those two factors listed above to be true to extend your drive.
You want more space on a drive? You’ll get it, period.
Well, the steps on how to use AOMEI Partition Assistant to extend drives do slightly differ from the steps for other tasks.
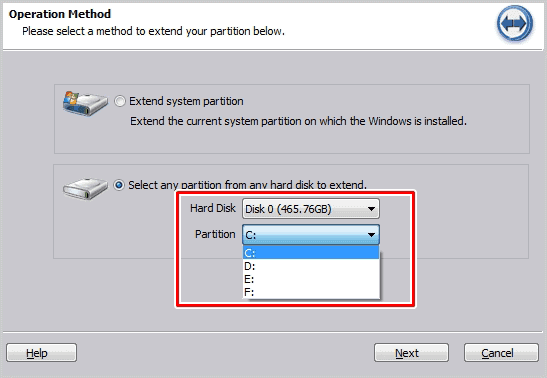
First, you select the drive you wish to extend > click on “All Tools” > select “Extend Partition Wizard”
Then, select a hard-disk, and partition you wish to extend:
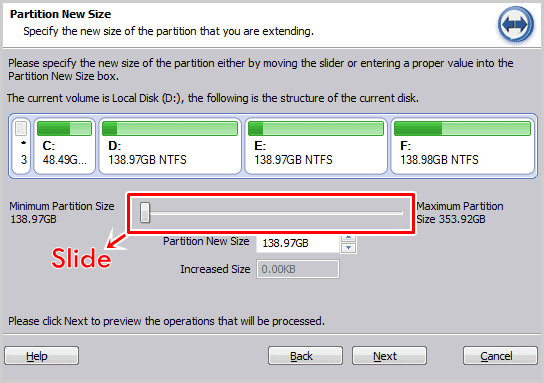
On the next screen, choose a disk with extra space, whose space you’ll be using to extend your drive.
What I loved?
I can select multiple drives to gain space from.
Meaning, I don’t have to compromise and congest just one drive.
Rather, I can select multiple drives, hence, the space will be much better adjusted.
It’s a drag & drop interface next! Simply drag the size-bar to adjust the size on all your disks.
And then finally just click “proceed”.
Can you honestly tell me they actually required an “explanation”, or were hard to understand?
Yeah, didn’t think so.
Other features
Hey, I’m sure you’re getting an idea of the steps and interface?
Let’s not bore you to death eh?
I’ll just list out the other features that AOMEI Partition Assistant makes possible, just as easily.
- OS Migration: This helps migrate the entire OS to a new SSD or HDD (in a few clicks).
- Partition Cloning: Two primary clone modes are offered. Quick clone (clone only used space), and “Sector by Sector” which clones everything.
- MBR to GPT conversion: GPT disks are more feature-rich, period. Loss-less conversions are made possible.
- Delete Partition: Two modes offered, “quick delete” deletes the partition but the data can be recovered later. “Wipe”, if selected, will delete all data beyond recovery.
- Check Errors: This is something you should use before making any changes. It checks the drive for errors and notifies you of errors (if any).
- Change drive letter/label: I’m sure you know what this is, don’t you?
- Make Bootable Media: This lets you create bootable WindowsPE versions on your USB sticks or CD drives. This prevents permanent damage to your system when troubleshooting or experimenting with the disks.
- Wipe Partition: Offers 4 wipe-modes. The safety, and speed of each mode displayed for better assistance.
- Integrate to Recovery Environment: This integrates AOMEI Partition Assistant to the Windows recovery environment. This helps you use the tool in the PreOS environment.
- Format Drive: 6 file-system choices available while formatting (NTFS/FAT32/ EXT2/ EXT3/ EXT4/ exFAT). The cluster-size can be manually set as well.
- Align Partition: Better organizes the partition, results in better speed.
- Command-line interface: If that’s your style, or requirement, the tool sure can be used from the command-line interface as well.
And well, that covers nearly all the primary features that AOMEI Partition Assistant boasts of.
“Move Slices”
It’s an advanced feature and hence I decided to give it the attention it deserves.
There are some functions (e.g. system volume extension) which require unallocated spaces immediately behind or before the system drive.
But, they may not always be available, right?
The “move slices” is a feature in the tool’s “Dynamic Disk Manager”.
It lets you create unallocated spaces, and move them exactly where you need them!
No restart required
This sure is a feature I didn’t expect, yet is offered by the tool.
Generally, when making changes as major as these, a restart is mandatory, isn’t it?
Not with AOMEI Partition Assistant.
Almost everything can be done without having to restart your computer.
You’ll only need a restart if you’re making changes to the system drive, or to the drive you’ve installed AOMEI Partition Assistant in.
Is AOMEI Partition Safe?
You’re messing with your disks.
So, it’s only natural to be concerned about their safety.
Now, as far as my experience goes, I can claim that:
- There’s no data loss when extending, merging or splitting partitions.
- No partitions/disks were corrupted during my usage of the tool.
At the same time, note that errors always may occur.
You may choose a wrong option, or the tool may malfunction.
Hence, it’s best to always backup your drive before making any changes.
Also, the tool offers detailed, step-by-step, how-to guides on every single feature!
Make sure you read and follow them ( I sure did).
That would explain the feature better, and the correct options to go with.
And well, that’s a wrap for this AOMEI Partition Assistant review folks. Is it the best free partition software? I’ll let you decide that.


